Version 6.9.1
Updated: 05/18/2022
...
After configuring your properties and job and format definitions XML files you can run download jobs in your test environment and SIS to confirm the data is mapping and storing correctly in your SIS prior to downloading data from the production server. Download jobs can be set for both the application data and supplemental question responses.
Download Client System Requirements
A Virtual Machine dedicated for the Download Client installation
Java 7 or higher of either the Java Runtime Environment (JRE) or Java Development Kit (JDK)
The latest Download Client version (the latest version is available here (as a transfer-client.v.xxx.jar file): Download Client Jar File
Supported Versions
The most recent Download Client version and one version back, are officially supported for each major CCCApply release.
Identifying Your Download Client Version
Examples:
If you have Download Client V5.4.0 installed, this will display: VERSION: 2016-03-08 12:35:19, 1.0-SNAPSHOT
If you have Download Client V5.3.0 installed, this will display: VERSION: 2015-10-16 16:00:27, 1.0-SNAPSHOT 2
If you have a Download Client version that is prior to V5.3.0, an error displays.
Troubleshooting
If you experience issues downloading your application data after a major release, use the following steps to determine your Download Client version:
Type the following command at the ../transfer-client/ command prompt: java -jar transfer-client.jar --version
...
Upgrade to the Latest Version of the Download Client
...
CCCApply Download Client - Current Production Version
When new data fields are added to CCCApply in a scheduled release, they need to be manually added to each relevant Application-specific Format Definitions XML file (every CCCApply application has it's own Format Definition XML and Job File XML) AND you must update your Download Client with the release-specific “transfer-client.v.xxx” Jar file. A new 'transfer-client-jar" is created for each release that includes database changes.
...
Replace existing transfer-client jar file with: transfer-client.6.7.0.jar
Replace conf/application-context.xml with: application-context.xml
Replace conf/ccctransfer.properties with: ccctransfer.properties
Working with XML
Although working with computer languages can be daunting, you don't need to be an expert to work with the Download Client XML files, and you don't need any sophisticated tools. A simple text editor and a rudimentary understanding of XML hierarchy will be helpful.
If you are comfortable writing computer software, you can of course use the tools that best suit you. Otherwise, create your XML files using your operating system's built-in text editor. On Windows, the text editor is called Notepad, and on OS X, it is called TextEdit.
| Note |
|---|
Note: These applications can work with file formats other than plain text. Be sure to save your files in plain text format. |
...
Important: Do not use XML Notepad to edit your XML files. It adds a BOM (Byte Order Mark) to the file and will cause the download job to abnormally terminate and an error message may display indicating that the XML file contains a BOM.
If you run your download and get the BOM error, you can take one of the following actions to remove it:
Copy and paste your XML content into a plain text editor or some other suitable tool to remove the extra characters (the BOM), such at Notepad. You can save the file as ANSI to remove the BOM.
Switch to an XML editor that allows you to save the content and remove the BOM, such as one of the following:
XML Copy Editor
To remove the BOM, click on options from the Tools menu and de-select "Save UTF byte order mark". Save your file.
Notepad ++
...
Working with XML
Although working with computer languages can be daunting, you don't need to be an expert to work with the Download Client XML files, and you don't need any sophisticated tools. A simple text editor and a rudimentary understanding of XML hierarchy will be helpful.
If you are comfortable writing computer software, you can of course use the tools that best suit you. Otherwise, create your XML files using your operating system's built-in text editor. On Windows, the text editor is called Notepad, and on OS X, it is called TextEdit.
| Note |
|---|
Note: These applications can work with file formats other than plain text. Be sure to save your files in plain text format. |
| Warning |
|---|
Important: Do not use XML Notepad to edit your XML files. It adds a BOM (Byte Order Mark) to the file and will cause the download job to abnormally terminate and an error message may display indicating that the XML file contains a BOM. See more notes below. |
If you run your download and get the BOM error, you can take one of the following actions to remove it:
Copy and paste your XML content into a plain text editor or some other suitable tool to remove the extra characters (the BOM), such at Notepad. You can save the file as ANSI to remove the BOM.
Switch to an XML editor that allows you to save the content and remove the BOM, such as one of the following:
XML Copy Editor
To remove the BOM, click on options from the Tools menu and de-select "Save UTF byte order mark". Save your file.
Notepad ++
To remove the BOM, select "Encode in UTF-8 without BOM" from the Encoding menu. Save your file.
Download Client System Requirements
A Virtual Machine dedicated for the Download Client installation
Java 7 or higher of either the Java Runtime Environment (JRE) or Java Development Kit (JDK)
The latest Download Client version (the latest version is available here (as a transfer-client.v.xxx.jar file): Download Client Jar File
Supported Versions
The most recent Download Client version and one version back, are officially supported for each major CCCApply release.
Identifying Your Download Client Version
Examples:
If you have Download Client V5.4.0 installed, this will display: VERSION: 2016-03-08 12:35:19, 1.0-SNAPSHOT
If you have Download Client V5.3.0 installed, this will display: VERSION: 2015-10-16 16:00:27, 1.0-SNAPSHOT 2
If you have a Download Client version that is prior to V5.3.0, an error displays.
Troubleshooting
If you experience issues downloading your application data after a major release, use the following steps to determine your Download Client version:
Type the following command at the ../transfer-client/ command prompt: java -jar transfer-client.jar --version
| Info |
|---|
Upgrade to the Latest Version of the Download Client A new version of the Download Client Jar file, also called the “transfer-client” jar file, is made available with each new CCCApply release that includes database changes. |
CCCApply Download Client - Current Production Version
When new data fields are added to CCCApply in a scheduled release, they need to be manually added to each relevant Application-specific Format Definitions XML file (every CCCApply application has it's own Format Definition XML and Job File XML) AND you must update your Download Client with the release-specific “transfer-client.v.xxx” Jar file. A new 'transfer-client-jar" is created for each release that includes database changes.
In your installed Download Client directory, replace the older files with the latest version. The latest Download Client jar file aligns to CCCApply version 6.7.0.
Replace existing transfer-client jar file with: transfer-client.6.7.0.jar
Replace conf/application-context.xml with: application-context.xml
Replace conf/ccctransfer.properties with: ccctransfer.properties
...
Unzipping, Installing, and Configuring the Download Client
...
| Note |
|---|
The steps that follow assume the ‘java’ and ‘jar’ commands are available from your PATH environment. The installers for both the JRE and JDK should install the Java runtime so that the various command-line tools, including ‘java’ and ‘jar’ are available in the system PATH. |
...
| Tip |
|---|
If you have already |
...
installed the Download Client you can skip to: Preparing to Download Applications:Configuring Your Job and Format Files. |
Contact CCC Tech Center Technical Support to get your CCCTC Implementation & Configuration Engineer (ICE) representative (Enabling Services & Support) to order your Download Client. The Technical Support representative ICE representative will deliver the Download Client zip file to you via Dropbox or some other means secure method that they will indicate to arrange with you.
Once you receive the your Download Client zip file, download the file to your local computer and extract it into a local file directory of your choice.
Once you extract your Download Client, it should look something like this, with the expanded files within the transfer-client root folder: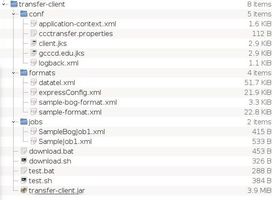
...
Key | Description | Required? | Default Value |
|---|---|---|---|
javax.net.ssl.keyStore | Specifies the Java Keystore that contains the certificate to validate your college to the CCC Transfer Server | Yes | FTT_HOME/conf/client.jks |
javax.net.ssl.keyStorePassword | Specifies the password for the keystore that javax.net.ssl.keyStore indicates. | Yes | password |
3. Change your college keystore password using the steps in this section. When you first receive the Download Client from the CCCTech CCC Tech Center, a certificate is created for your college that controls which MIS code(s) you can access for downloads. The default password for this initial certificate is “password.” The CCCTech CCC Tech Center recommends that you change this password using the following steps.
| Note |
|---|
Note: Though security is driven by the key and not from the password to load the keys, we still recommend you change your password to be unique. Perform these steps from the machine where the keystore is installed. |
| Note |
|---|
Note: You only need to change your keystore one time for it take effect for all applications (both all CCCApply applications (Standard/Noncredit and International) and the CC Promise Grant application). |
a. Navigate to the transfer-client\conf\ directory and create a backup of your current client.jks file.
b. At a command prompt, navigate to the transfer-client\conf directory and locate your college key alias by entering the following command at a command prompt (press the Enter key after you type the command): keytool -list -keystore client.jks The output from running this command will be a list of keys contained in the keystore.
c. Locate your college key alias by looking at the key name at the beginning of the entry of type "PrivateKeyEntry". The college key alias will usually be in the format of "xxx.edu" where xxx is your college’s initials.
d. Update your college keystore password by entering the following command at the command prompt from the transfer-client\conf directory (press the Enter key after you type the command): keytool -storepasswd -keystore client.jks
e. When prompted to enter your current keystore password, enter your current password (the password = password for all first-time Download Clients). You’ll be prompted to enter your new keystore password, and then prompted to re-enter the new keystone password (press the Enter key after each entry).
f. Update your college key password to match the keystore password you just set in step 3e above by entering the following command at the command prompt from the transfer-client\conf directory (press the Enter key after you type the command): keytool -keypasswd -alias <key_alias> -keystore client.jks
g. When prompted to enter your current keystore password, enter they keystore password you set in step 3e, above.
h. Enter the same password as in step 3e when prompted to enter and re-enter your new key password.
i. Open the conf/ccctransfer.properties file and edit the ccctransfer.keystore.password value to have your new password instead of the old one (password). That is, edit the word password after the = sign in this entry: ccctransfer.keystore.password=password
...
j. Save and close the conf/ccctransfer.properties file. You have now updated your college keystore password for all applications (CCCApply Standard and International, and CC Promise Grant).
k. Test the new keystore by entering the following command at the command prompt for each application.
To test the new keystore for your Pilot server, enter the following command at the command prompt:
For the CCCApply application:
java -jar transfer-client.jar -test https://pilot.admin.openccc.net:8443/ccctransfer/debug
For the CC Promise Grant application:
java -jar transfer-client.jar -test https://pilot.admin.openccc.net:8443/ccctransferbog/debug
For the International application (coming soon):
java -jar transfer-client.jar -test https://pilot.admin.openccc.net:8443/ccctransferintl/debug
Confirm that no errors are printed.
To test the new keystone for your Production server, enter the following command at the command prompt:
For the CCCApply application:
java -jar transfer-client.jar -test https://admin.openccc.net/ccctransfer/debug
For the CC Promise Grant application:
java -jar transfer-client.jar -test https://admin.openccc.net:8443/ccctransferbog/debug
For the International application (coming soon):
java -jar transfer-client.jar -test https://admin.openccc.net:8443/ccctransferintl/debug
Confirm that no errors are printed.
...
Preparing to Download Applications
...
After installing the Download Client, you will need to configure the job and format XML files to configure specify which application data you want to download.
| Note |
|---|
Noncredit Application DownloadsThe CCCApply Noncredit application is an optionally-implemented, separate a separate (optional) workflow within the CCCApply Standard application that allows students taking only noncredit coursework to apply to your college without having to answer enrolling exclusively in noncredit courses to complete the application in an expedited manner, using skip logic to hide non-applicable and residency-related questions. The only changes you need to make to your Download Client Job File is to include the two new Noncredit application-specific fields: integrity_fg_81 and non_credit. See the "Noncredit Application" and "Appendix E: Table of Downloadable Fields" sections of If implemented, you can download submitted Noncredit applications using your existing Standard application Job File XML by adding the following two Noncredit Application fields to the format definition XML: <integrity_fg_81> and <non_credit>. These two fields are detailed further in the CCCApply Standard & Noncredit Application Data Dictionary and the Data Fields: CCCApply Standard and Noncredit application for detailsData Dictionary. |
1. You will have sample job and format definition XML files included in your package. These files will usually include the application name in the file name (i.e. SampleBogJob1.xml in the image above is a sample job file for the BOG application).
...
9. Edit the XML elements and attributes in the format definitions XML file to include the specific database fields that you want to download into your college's SIS. Use the following items to assist you in editing and validating this XML file:
the XML schema file for the format definitions file
the Data Fields for each of the student applications (CCCApply Standard and International, and CC Promise Grant)
the Data Dictionaries for each of the student applications
When you are done creating and validating the format definitions XML file, save the file by using Save As, and rename the file to the name of your choice. It's best practice to include the application name in the file name. (e.g. StandardFormat.xml for the CCCApply Standard application.)
...
the following items to assist you in editing and validating this XML file:
the XML schema file for the format definitions file
the Data Fields for each of the student applications (CCCApply Standard and International, and CC Promise Grant)
the Data Dictionaries for each of the student applications
When you are done creating and validating the format definitions XML file, save the file using Save As, and rename the file to the name of your choice. It's best practice to include the application name in the file name. (e.g. StandardFormat.xml for the CCCApply Standard application.)
| Note |
|---|
Note: Your format file must always be stored in the formats directory of the Download Client files in order for it to be processed. |
| Note |
|---|
Downloading Noncredit Applications The CCCApply Noncredit application is a separate (optional) workflow within the CCCApply Standard application that allows students enrolling exclusively in noncredit courses to complete the application in an expedited manner, using skip logic to hide non-applicable and residency-related questions. If implemented, you can download submitted Noncredit applications using your existing Standard application Job File XML by adding the following two Noncredit Application fields to the format definition XML: <integrity_fg_81> and <non_credit>. These two fields are detailed further in the CCCApply Standard & Noncredit Application Data Dictionary. |
Running a Download Job
After installing the Download Client and configuring your job and format XML files, use the following steps to run a job to download your college's student applications (in order to import them into your college's SIS).
Open a command prompt (Start Menu -> type command for Windows) or open your Terminal window (Mac/ *nix).
At the command, navigate to the directory where your job and format definitions XML files are located and then type the following command:
For Windows:
download.bat jobs\StandardJob.xmlFor Mac/*nix: .
/download.sh jobs/StandardJob.xml

Press your enter key and the download file will run.
You can navigate to the downloaded file and open it in a text editor to see the downloaded data (remember that you set the directory for the download file to be saved to in the job XML file's file element directory attribute, in step 9, above). The data for all student applications that have not previously been downloaded appears in a single row, per student as in the image below.
Follow the data import steps for your college's SIS to import the download file data. It is highly recommended you perform this for a test SIS database to ensure the downloaded data imports into your SIS correctly.
| Infotip |
|---|
Tip: You can set up a chron Chron job to automate your application data downloads to occur on a regular basis. |
...
Fields in the download file appear in the order they are defined in the format definitions XML file.
Attributes
Attribute Name | Value |
|---|---|
outputFormat | Set the value to fixed or delimited. |
Delimiter | For delimited files, specify the delimiter. The default is comma (",") if unspecified. Examples of delimited file: outputFormat="delimited" delimiter="|" (pipe is the delimiter). Note: You can use multiple characters as a delimiter, if desired. outputFormat="delimited" delimiter="	" (tab is the delimiter; the 	 delimiter value results in tab delimited output) |
applicationType | Specifies which type of applications you are downloading (Standard, CC Promise Grant, or International). If not specified, it will default to Standard applications. For BOG, applicationType="bogfw". For International, applicationType="intl". |
stripDiacritics | The stripDiacritics attribute will convert certain diacritic (non-English or foreign) characters to standard ascii characters. If omitted, the data will be sent as originally entered in the application. To convert diacritic characters, add stripDiacritics="true". Important note: If you use this attribute, be sure to test thoroughly before using it in production so you know you are getting the results you expect. |
charset | Sets the charset that the output from the download client will utilize. |
Child Elements
<fieldList>
...
The simpleMapper formatter provides a way to make simple translations of data.
| Note |
|---|
Note: The simpleMapper only works for string data types (i.e. it does NOT work with smallint, boolean, etc.). |
<field len="2" name="res_status">
<simpleMapper>
<unmatched>D4</unmatched>
<map>
<from>1</from>
<to>A1</to>
</map>
<map>
<from>2</from>
<to>B2</to>
</map><map>map>
<map>
<from>3</from>
<to>C3</to>
</map>
</simpleMapper>
</field>
The following example translates the res_status field as follows:
...
<field len="15" name="mainphone">
<phoneFormatter pattern="(999) 999-9999"/>
</field>
Attribute Name | Description |
|---|---|
len | Specifies the length of the output field |
pattern | See following table for sample patterns |
name | Name of the input field |
...
<field name="dep_other_income" len="20">
<numberFormatter format="%,d.00"/>
</field>
Attribute Name | Description |
|---|---|
name | Name of the input field |
len | Specifies the length of the output field |
format | See the following table for sample formats |
Database Field Value | Format | Download Field Result |
|---|---|---|
25000 | "$%,d.00" | $25,000.00 |
25000 | "%,d.00" | 25,000.00 |
| Note |
|---|
Note: To view more format value examples, see: http://docs.oracle.com/javase/7/docs/api/java/util/ Formatter.html#syntax |
...
Data Fields
CCCApply Standard and Noncredit Applications
...