Introduction
This guide provides an overview of the implementation configuration for establishing a direct access connection (ODBC/JDBC) to the CCC Data Warehouse for authorized California Community Colleges (CCC) districts and colleges.
Secure access to CCC Data is provided to institutional researchers, college and district administrators, and other decision makers at the California Community Colleges, district offices, and the Chancellor’s Office, where these critical data may be used to support instructional and institutional decision-making aligned with the Chancellor's Office Vision 2030.
Contents
About the CCC Data Warehouse
The CCC Data Warehouse is developed by the CCC Technology Center (CCCTC) in coordination with, and at the direction of, the CCC Chancellor's Office. A part of the Data Services Program initiative from the California Community Colleges Chancellor's Office, the CCC Data Warehouse provides the necessary infrastructure to the California Community College System to aggregate data from across disparate systems to an enterprise data warehouse.
Direct Access Connection
For authorized researchers at CCC institutions who want to connect local applications to data sources within CCC Data, the CCCTC supports direct access connection to the CCC Data Warehouse as an alternate or additional option to the CCC Data Warehouse (Jaspersoft) Report Server. Local applications at CCC colleges/districts may include an analytics or business intelligence application such as Tableau or Power BI.
Once connected to the CCC Data Warehouse, your college or district will be able to:
Connect to available data sources through a site-to-site VPN using service account login credentials (provided)
Run SQL queries against available data sources
Connect a local analytics/BI application through ODBC or JDBC access
Connect CCC Data to a local data warehouse by setting up these data as external tables within your local data warehouse
IMPORTANT: The CCC Data Warehouse should not be used as a staging ground for data distribution to your local data warehouse. This type of usage will not be permitted, as it places an undue load and cost on the CCC Data infrastructure.
Available Data Sources
Direct access connection is supported for the following data sources within the CCC Data Warehouse:
CCCApply: Application (Credit and Non-Credit App)
CCCApply: International Application
California College Promise Grant Application
Multiple Measures Placement Service (MMPS)
MyPath Data
Canvas Data (Opt-in required)
Chancellors Office Curriculum Inventory (COCI)
Course Identification Numbering System (C-ID)
NOVA (CCCCO Only)
Launchboard (CCCCO Only)
MIS (CCCCO Only)
CTEOS (CCCCO Only)
Table A: Data Availability Chart
Source Data Set | CCCCO Access | College Access | Requires Opt-In for inclusion | ||
|---|---|---|---|---|---|
DW Direct | DW | DW Direct | DW | ||
CCCApply Standard Application |
|
|
|
| |
CCCApply Noncredit Application |
|
|
|
| |
CCCApply International Application |
|
|
|
| |
California College Promise Grant Application |
|
|
|
| |
Decrypted LGBTQ Data (and Report) |
|
|
|
| |
Multiple Measures Placement Service (MMPS) |
|
|
|
| |
MyPath |
|
|
|
| |
COCI: Chancellor's Office Curriculum Inventory |
|
|
|
| |
C-ID: Course ID Numbering System |
|
|
|
| |
Canvas Data 2 (Opt-in required) |
|
|
| ||
CO-MIS |
| ||||
NOVA |
| ||||
Launchboard |
| ||||
CTEOS |
| ||||
Data dictionaries for the above data sources are available on the CCC Data Warehouse documentation site.
Implementation Process
When a request is received from an authorized individual at a college or district office (often the Dean overseeing institutional research), the CCCTC Enabling Services (ES) team will work directly with the college IT group to configure a custom site-to-site VPN based on the system used by the college. Enabling Services will then establish a secure direct access connection to the CCC Data Warehouse from the college (or district). After successful implementation and query validations, the ES Support team will be able to provide post-implementation (live) support through the CCCTechnology.info support channel.
Process Overview
The process to implement a direct access connection to the CCC Data Warehouse (Redshift) is described below, beginning with a summary of the roles and responsibilities for participants.
Participants, Roles, and Responsibilities
Participant | Is responsible for… |
|---|---|
College/District Researcher |
|
Enabling Services (ES) College Relationship Manager (CEM) |
|
ES Implementation Configuration Engineer (ICE) |
|
College/District IT/Network Admin |
|
ES Implementation Configuration Engineer (ICE) |
|
ES Support Services |
|
IMPORTANT: Colleges and districts that use their own analytics/BI applications are responsible for their own support in using those tools.
Request Access
The following are the general steps to establish a direct access connection (ODBC/JDBC) to the CCC Data Warehouse.
An authorized individual at the college or district makes the request directly to the CEM assigned to the college. This request is typically made by the Vice Chancellor or the Dean overseeing institutional research.
Upon approval of the request, the CEM initiates the implementation process by passing the required information to Enabling Services (ES).
The ES implementation team then creates the college’s custom VPN and sets up the account credentials.
Provide the following information to the CEM when requesting direct access:
-Contact name and email address of the primary researcher responsible for the account login credentials
-Contact name and email address of primary IT/network admin who will work with ES to establish site-to-site VPN connection
-System configuration information such as firewall make, model, and version, as well as IP information
Note: The initial direct connection request should be made to your College Experience Manager. If you do not have the name of the CEM for your college, send an email to cems@ccctechcenter.org.
Establish VPN Configuration
The ES Implementation Configuration Engineer (ICE) works with your primary IT contact(s) to facilitate the configuration of the VPN and to establish the account credentials.
A secure direct access (ODBC/JDBC) connection between your college or district (MIS scope) and the CCC Data Warehouse Redshift cluster is enabled using a custom site-to-site VPN tunnel and a service account with authorized user credentials. The data that is accessible by the college or district is based on the scope of access authorized to the organization.
Setting up the VPN and the service account can occur simultaneously; however the configuration of the VPN should be handled first, as it often requires more time to implement (due to required approvals and IT resources).
Note: Ensure that the ES ICE has all necessary system configuration information, including the firewall make, model, and version, as well as IP information.
Establish Account Credentials
In order to access the (Redshift) databases, a service account must be established based on the scope of your authorized access (MIS scope). The ES ICE establishes the service account and provides the account login credentials to the primary IT contact at the college/district. (The login credentials consist of the username and password.)
The ES ICE also provides the database endpoint (DNS) and schema roles to the college or district’s primary IT contact via secure transmission. (The schema roles are also provided in this document.)
Note: The login credentials are a Service Account. While they are issued to an individual, they are intended to be used to connect applications (such as Tableau) to the CCC Data Warehouse. Protecting these credentials is the responsibility of the college/district.
Scope of Access
Authorized access to the CCC Data Warehouse for colleges and districts using direct access connection (ODBC/JDBC) is permitted through secure login credentials to your local network VPN.
Configuration of the authorized user’s account credentials are based on the scope of their access, where the scope is defined by their 3-digit MIS code. In this context, the scope of their access is defined as <misScope>. For example, authorized district users will have a scope of access that is represented by their district MIS code (example: 210). Authorized college users will have a scope represented by their college MIS code (example: 211).
The <misScope> will appear in the user’s credentials (username) and also in the database schema formats used in SQL queries during the Connect using SQL Workbench validations.
Connect to the Data Warehouse (Redshift Cluster)
This section is designed for authorized colleges who want to gain access to the CCC Data Warehouse Redshift cluster databases. AWS Redshift is a secure, cloud-based data warehouse service used for collecting and storing large-scale data sets and enables users to analyze data using various BI tools.
Note: Colleges achieve direct connection access to the CCC Data Warehouse using SQL Workbench.
Connection Requirements
In order to complete the connection process (SQL Workbench install) and access the CCC Data Warehouse (Redshift cluster), the college/district will need to meet the requirements below.
Complete VPN Configuration & Log In from Internal Network: Log in and connection to the Redshift cluster must originate from your local network.
Account Login Credentials: Obtain your account credentials (username and password) and the database endpoint (DNS), provided by your ES implementation team.
Database Connection Strings & Schemas: Ensure the database names, connection strings, and schema roles are correct to access specific databases (see Table B: Application Database Names below).
Remote Connection: If you are working remotely and the district has authorized it, you will need to establish a connection to the district’s internal network using a separate VPN client that the district has provided for this purpose.
IMPORTANT: Below are instructions for implementing SQL Workbench to connect to the CCC Data Warehouse. SQL Workbench is supported by the CCC Technology Center, and is recommended to assist with initial data validation but is not a requirement.
Connect using SQL Workbench
Follow the instructions in this section to install SQL Workbench and configure database access connection. SQL Workbench is a database GUI used for accessing many different databases. The instructions below are similar to those found on the AWS website for SQL Workbench, but are more in-depth regarding the specific installation steps.
The process for connecting to the Data Warehouse using SQL Workbench is as follows:
Prerequisite: Install Java (v11 or higher recommended)
For more information, visit the AWS website for Connecting to Your Cluster Using SQL Workbench.
Prerequisite: Install Java
SQL Workbench requires a Java version 11 (or higher) runtime environment. You can use either a JRE ("Runtime") or a JDK ("Development Kit").
For more information, see Section 4.1: Installing and Starting SQL Workbench in the SQL Workbench Manual.
Download & Install SQL Workbench
Download SQL Workbench/J here: https://www.sql-workbench.eu/downloads.html.
Select the generic installation package for all systems with optional libraries. (We recommend saving the package on your local machine with an informative name that is easy to access.)
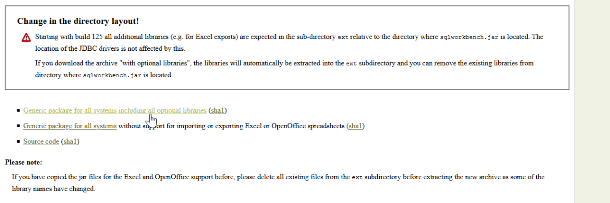
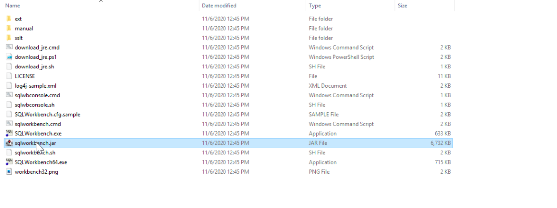
Unzip the downloaded folder and select the sqlworkbench.jar (JAR) file inside to open SQL Workbench.
IMPORTANT: Follow these instructions to generate an SQL Workbench executable file:
https://www.sql-workbench.eu/macos-binary.html.
More details about installing and configuring the application can be found in the SQL Workbench manual.
IMPORTANT: It is necessary to configure the necessary JDBC driver(s) for your database before you can connect to a database. Please refer to the chapter JDBC Drivers in the SQL Workbench manual for details on how to make the JDBC driver available to SQL Workbench/J.
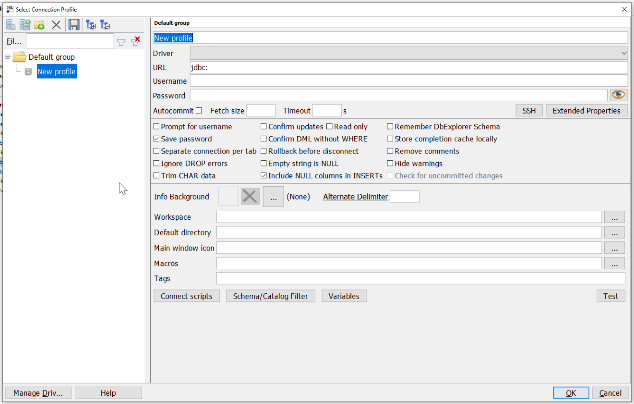
The application is now installed and the Select Connection Profile screen appears.
Download Redshift Drivers and Test Connection
Download the Amazon Redshift JDBC driver version 2.0 to enable SQL Workbench to communicate with Redshift. Below is the zip file to download:
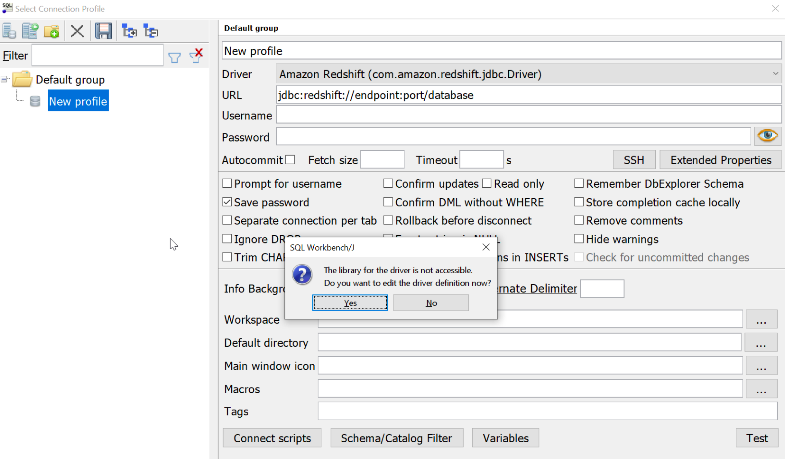
Once you have downloaded and unzipped the Redshift drivers to a directory you choose on your machine, go back to the SQL Workbench installed and select 'Amazon Redshift' from the Driver dropdown.
At the prompt asking you to configure the driver, select ‘Yes,’ as shown below.
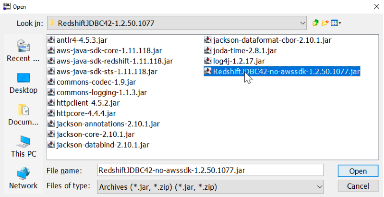
The Manage Drivers menu will appear. Click the Folder icon and navigate to the directory that contains the driver package that you recently unzipped, as shown below.
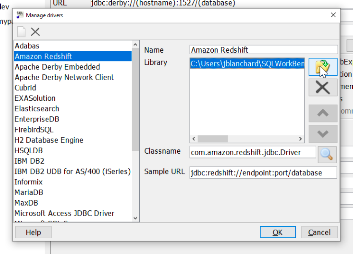
Select the Redshift driver, which will be named ‘Redshift*.jar,’ then click ‘Open.’ See the example below.
Once the driver file is selected, click ‘OK’ on the Manage Drivers screen.
Configure the Database Connection String
Configure the Connection Profile screen with your account credentials (username and password) and the connection string.
With the drive selected, a sample endpoint will autofill in the URL field. This endpoint needs to be modified, and several other fields need to be completed. See the example below.

The essential fields to configure are as follows:
Name: The name for the connector that you will reference later to access this database again. This is for your use only, so make it clearly descriptive for the database you will be accessing. Identifying the environment in the name is highly recommended. (For example, if you are going to query the COCI DB, a name such as `DWH-COCI` might be appropriate.)
URL: Where to reach the database. Edit the auto-filled string in this field with the custom endpoint (example shown below).
Environment | Endpoint |
|---|---|
Production | jdbc:redshift://dwh-prod.ccctechcenter.org:5439/{{database}} Ex: jdbc:redshift://dwh-prod.ccctechcenter.org:5439/canvas2 IMPORTANT: Replace {{database}} with the specific Database Name shown in Table B below for the database to which you are trying to connect. |
Username: The PostgreSQL username you are using to login.
Password: The password for the username above.
Place a checkmark in the Autocommit box, as shown in the example below.
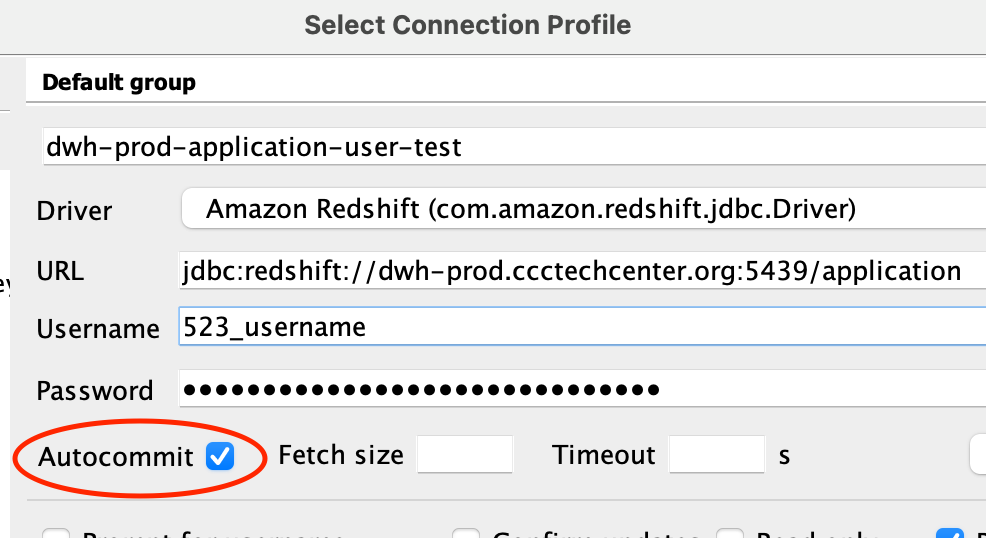
Click Test in the lower right to verify you have connected successfully. Then click OK.
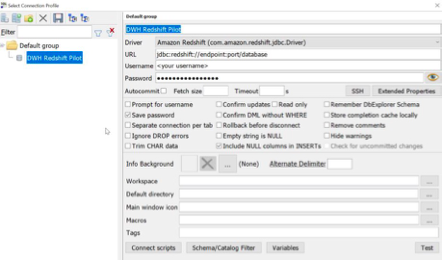
Table B: Application Database Names and Schema Formats
The value of <misScope> can be derived from the prefix of your Data Warehouse Direct user name which is in the format of <misScope>_<firstInitial><lastName> i.e. 000_jdoe, where 000 represents the MIS scope value. An example of the resulting schema for accessing tables within the Application database = dw_apply_read_000.
Application (Data Source) | Database Name | Query Schema Format |
|---|---|---|
CCCApply Application | application | dw_apply_read_<misScope> |
CC College Promise Grant | bogfw_application | dw_apply_read_<misScope> |
CCC International Application | intl_application | dw_apply_read_<misScope> |
Multiple Measures Placement Service (MMPS) | mmps | dw_apply_read_<misScope> |
Chancellor's Office Curriculum Inventory (COCI) | coci | dw_coci_read_<misScope> |
Course Identification Numbering System (C-ID) | cid | dw_cid_read_<misScope> |
Canvas Data 2 | canvas2 | dw_canvas2_read_<misScope> |
Note: Data dictionaries for the above data sources are available on the CCC Data Warehouse documentation site.
IMPORTANT: For troubleshooting if the connection test fails, the two most common fixes are as follows:
Verify you have entered the URL, username, and password correctly.
Ensure you are connected to the college’s VPN.
Data Access Validation & Testing
Once connected to the CCC Data Warehouse with your own tool, colleges are encouraged to conduct a series of data access tests and activities, which may include:
Test Query Data Sources
Through local resources, the participant is able to connect to, and run at least one query against each of the available datasets (CCCApply application, CCCApply international application, CCCApply Promise Grant, and Multiple Measures Placement Service).
Connect Data to Local Data Warehouse
If a local data warehouse is available, configure a CCC Data Warehouse table as an external table in the local database source. This supports data within the CCC Data Warehouse to be connected to your local data warehouse without the need to copy data to the local machine or district server.
Note: CCCTC College Staff Support is available to assist with issues connecting to the CCC Data Warehouse.
ES will work with colleges to validate initial data queries.
Using provided user documentation (such as this user guide), the college configures their BI tool to connect to the Data Warehouse.
The college confirms local connection and successful login, and also performs optional data validation activities.
Online documentation is available to support data access validation activities for researchers.
Work with your ES ICE (engineer) to confirm access validation and query tests. Discuss any unfinished implementation steps before hand-off to ES Support.
Canvas Data 2 with DW Direct Connect Service
Colleges may request to access their Canvas Data 2 (CD2) data through the CCC Data Warehouse via direct access connection (ODBC/JDBC). The ability to access CD2 data will require the college Canvas Administrator to generate and pass their Canvas Data 2 API credentials to the CCCTC Enabling Services (ES) Implementation Configuration Engineer (ICE) as part of the configuration process. Once received and implemented, the Canvas v2 data warehouse integration will be configured to pass your CD2 data to the CCC Data Warehouse. Following that initial pass, the data will be updated per a configured schedule.
To get started, send an email requesting Canvas Data 2 Data Warehouse Direct Connect access for your college to your College Experience Manager (CEM) at CCCTC Enabling Services.
Important: Colleges must be live with the basic DW Direct Connect service in order to implement Canvas Data 2 Direct Connect access. If your college has not yet configured site-to-site VPN access with the CCC Data Warehouse, please contact Enabling Services to get started.
For more information about the Canvas Data 2 Direct Connect service, including the college preparatory requirements before and during the implementation process, refer to the following link: Accessing Canvas Data 2 in the Data Warehouse.
For information about the latest Canvas Data 2 updates to the CCC Data Warehouse, refer to the following link: Canvas Data 2 Changes to Data Warehouse.
Access In-Progress Application Data in the CCC Data Warehouse
The CCCApply “in_progress_applications” table is available in the Data Warehouse via Direct Connect Access to make it easier for researchers to perform quick queries without having to include the joins manually for every query.
See related content in Accessing In-Progress Application Data in the CCC Data Warehouse, featuring tables and query information.
Making Queries
After the database connection is validated, you will be given the following prompt that will allow you to enter SQL Queries.
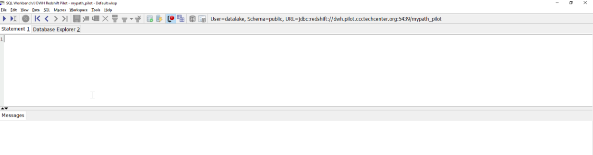
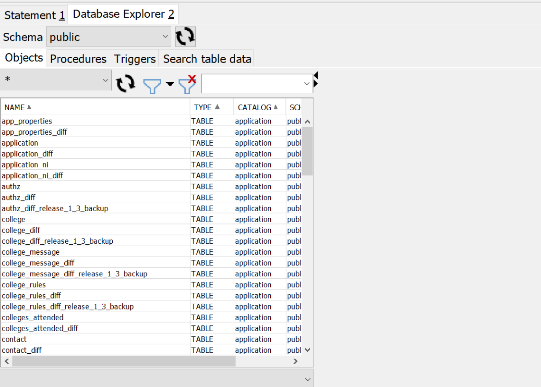
A tab labeled Database Explorer displays more information about the database that your user has access to. Table names can be found there, as well as some additional basic information about the DB.
You can also run SQL against objects your DB user has access to.
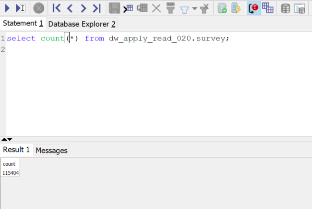
Example Query to run on Data Warehouse Data
To get a row count of a table, run the following query:
select count(*) from dw_apply_read_523.contact;
You will need to replace the dw_apply_read_523 with the appropriate schema your user has access to. You can also use the database explorer in SQL workbench to navigate the data.
CCC Data Warehouse Direct Access FAQs
Q: Can I have more than one VPN connection for my district?
A. Not at this time. If this is needed, please discuss with your CEM.
Q: My IT department does not want to create a site-to-site VPN, can I just have an individual VPN connection?
A. No, the CCC Tech Center is not staffed to handle individual user VPN requests.
Q: Can I have more than one individual at the college (or district office) connect to the VPN at a time?
A: While the login credentials are intended to serve as a Service Account for the connection of local applications to the CCC Data Warehouse, individual accounts may be requested for authorized users where this is needed.
More Information: See CCC Data Warehouse - Frequently Asked Questions for more frequently asked questions.
To Get Help and Share Info: After successful implementation, if you need help using the CCC Data Warehouse, access the CCCTechnology.info support channel. In that forum, you can get help from the ES Support team. In addition, you can discuss use of the CCC Data Warehouse with other colleges and districts.