| Info |
|---|
Recommended: This is a This page contains two versions of our pre-migration activities checklist for the CCCApply Administrator Production Admin 1.0 that can be used while going through pre-migration and implementation support sessions. The main objective is to keep a copy of your current data, settings and custom rules and questions. We recommend that you go through each module within the Administrator and ensure you capture a record of your data by using the Export features (Terms, Majors, Supplemental Questions), or in the modules that don't support an export feature, snap a screen shot/capture of each Summary page and the top portion of each Rule source logic. The most expedient way to go through this checklist it to have the following applications, webpages, checklists, and other resources open and accessible. |
NOTE: Once we migrate to the new system, this system will be deprecated. Your data will be migrated safely, but for security reasons it's a good idea to reserve a record of your data and settings for reference/ historical purposes.
Goals for Pre-Migration Activities
Log in to the Production CCCApply Administrator (v.1.0) and review your administrator data one more time before the data migration to Admin 2.0 on September 28*. Once you've logged in and landed on the homepage, select CCCApply from the "Applications" drop down menu. Snap a screen shot of the homepage with the "Applications" menu open to show which Applications that you're authorized to access.Go through the CCCApply admin module and snap screen shots of each module's Summary page. Even in the modules that have an export function, it's recommended that you snap screenshots of each Summary table, each Rule source logic, and the Users table for your college. Repeat this activity for application that you currently manage in Admin 1.0, such as the BOG, International, and Report Center. Don't forget to capture the User accounts table for your college in each application, including the Report Center.
After snapping screenshots, click on the Terms tab and export your college Terms to a CSV file and save this copy for future reference. As a suggestion, consider saving the file name in this format: <your college name>.<Application>.<Module>.<Admin1.0>.<current date or release date>. << Butte.CCCApply.Terms.Admin1.0.092818.CSV >>Do the same thing for your college Majors: click on the Majors tab and export to a CSV file using the same file name format. NOTE: If you have plans to implement the new "Major Category" filter in the new Admin 2.0, you may want to make a copy of the export file and save with a variation of the file name which you will use to prepare your "meta majors" or other custom categories file and import into Admin 2.0. (For information on implementing categories for your majors in Admin 2.0, click here: Using the New CCCApply Major Category Filter.)
If you have implemented Supplemental Questions in your CCCApply application, repeat the export process for each page of your Supplemental Questions, even if the page is "Not Active". NOTE: Supplemental Questions are built using XML; therefore the Supplemental Questions pages will export in an XML format. We recommend that you save each "Page ID" of questions with the following file name format: <college name>.<Application>.<SuppQuestions>.<PageID or page name>.<Admin1.0>.<date>.XML. << Butte.CCCApply.SuppQuestions.Page101.Admin1.0.092818.XML >>
Capturing a copy of your custom Rules and corresponding Messages will require a little bit more effort because there is no export function in these modules. We recommend the following process:
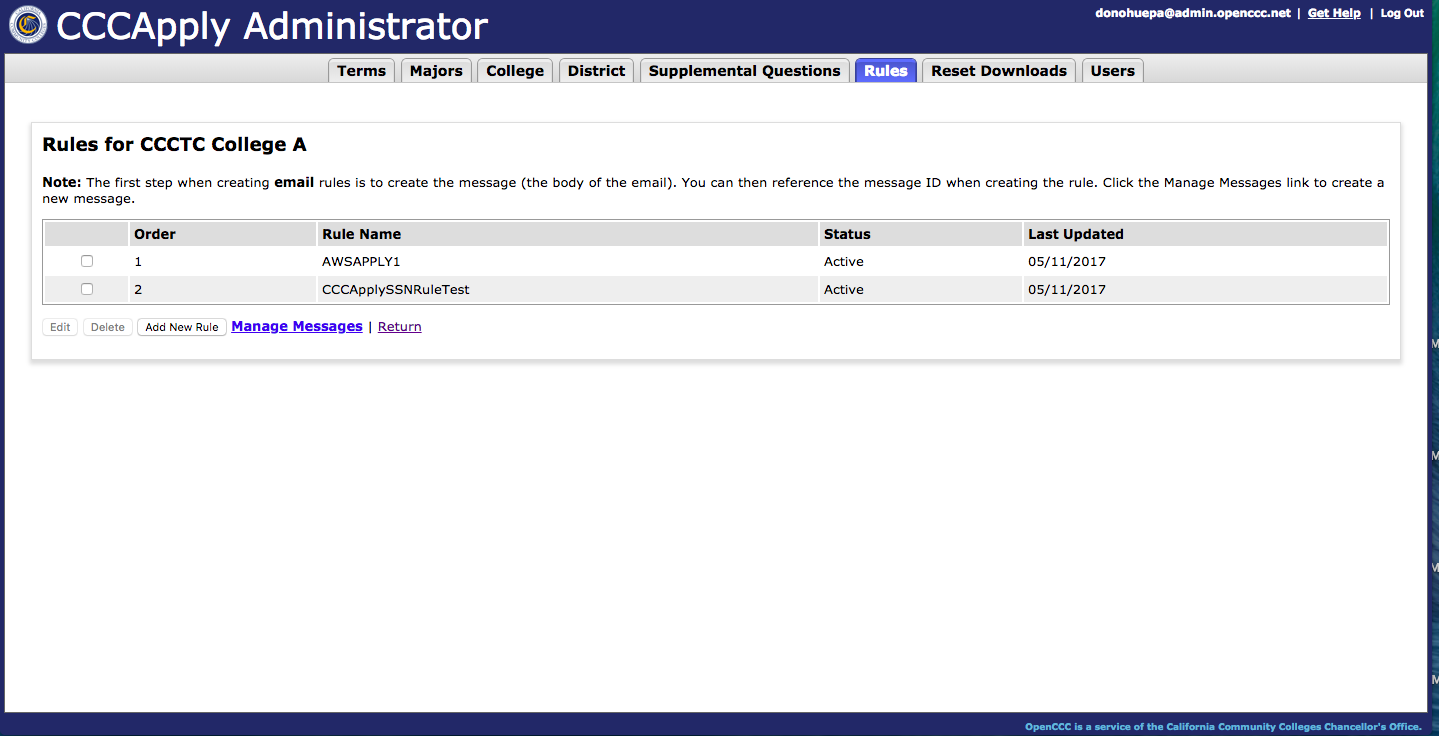
Snap a screenshot of the Rules Summary page (for each application in which you have implemented Rules).
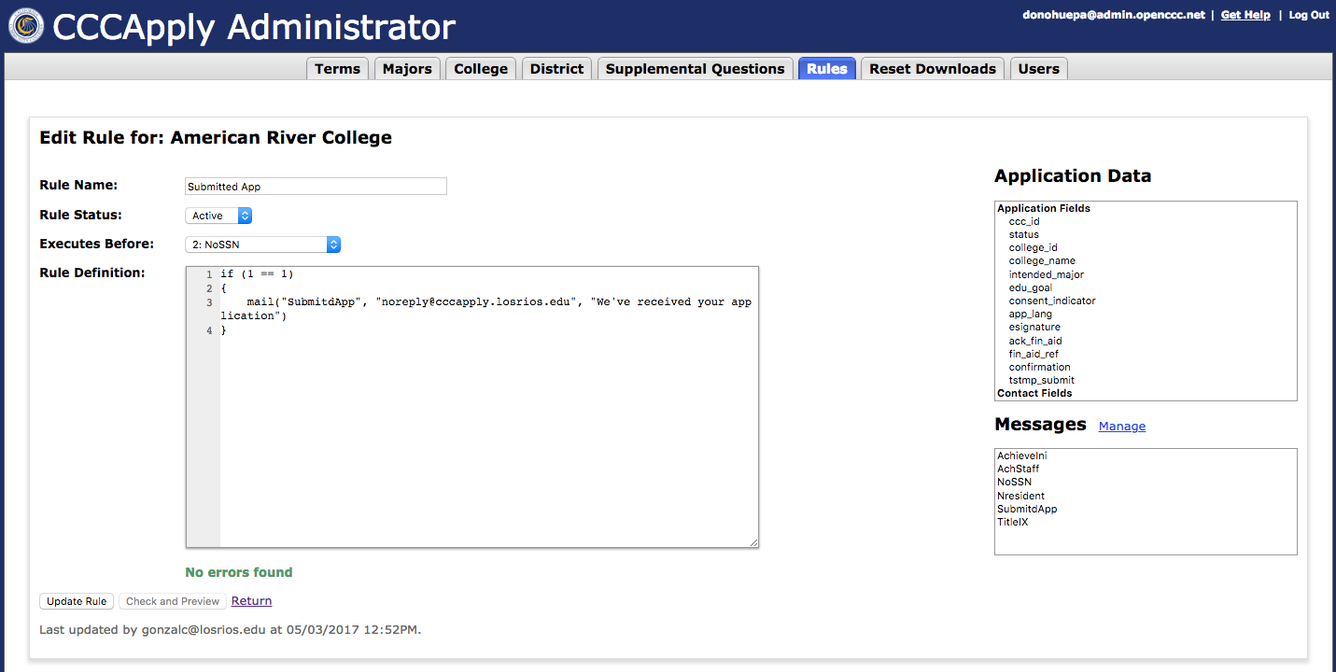
Open each Rule (click on Edit) and snap a screenshot of the top portion of the Rule modal which displays the Rule editor displaying the rule logic
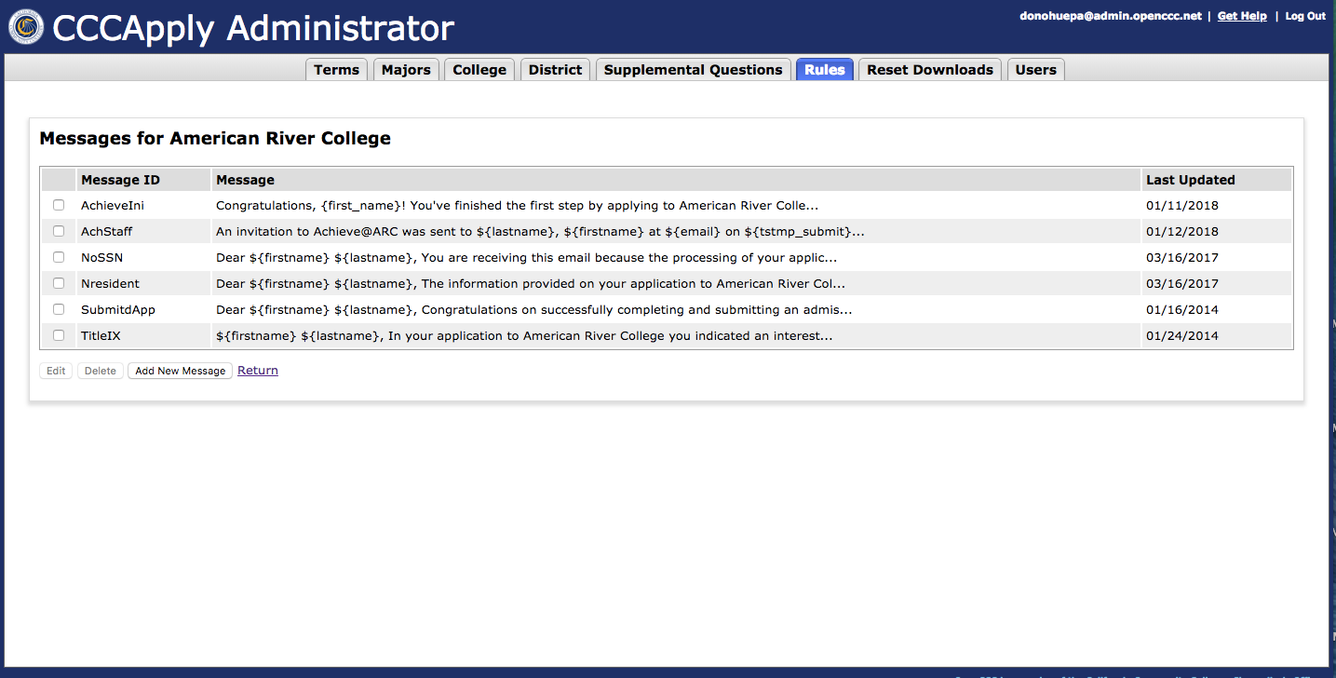
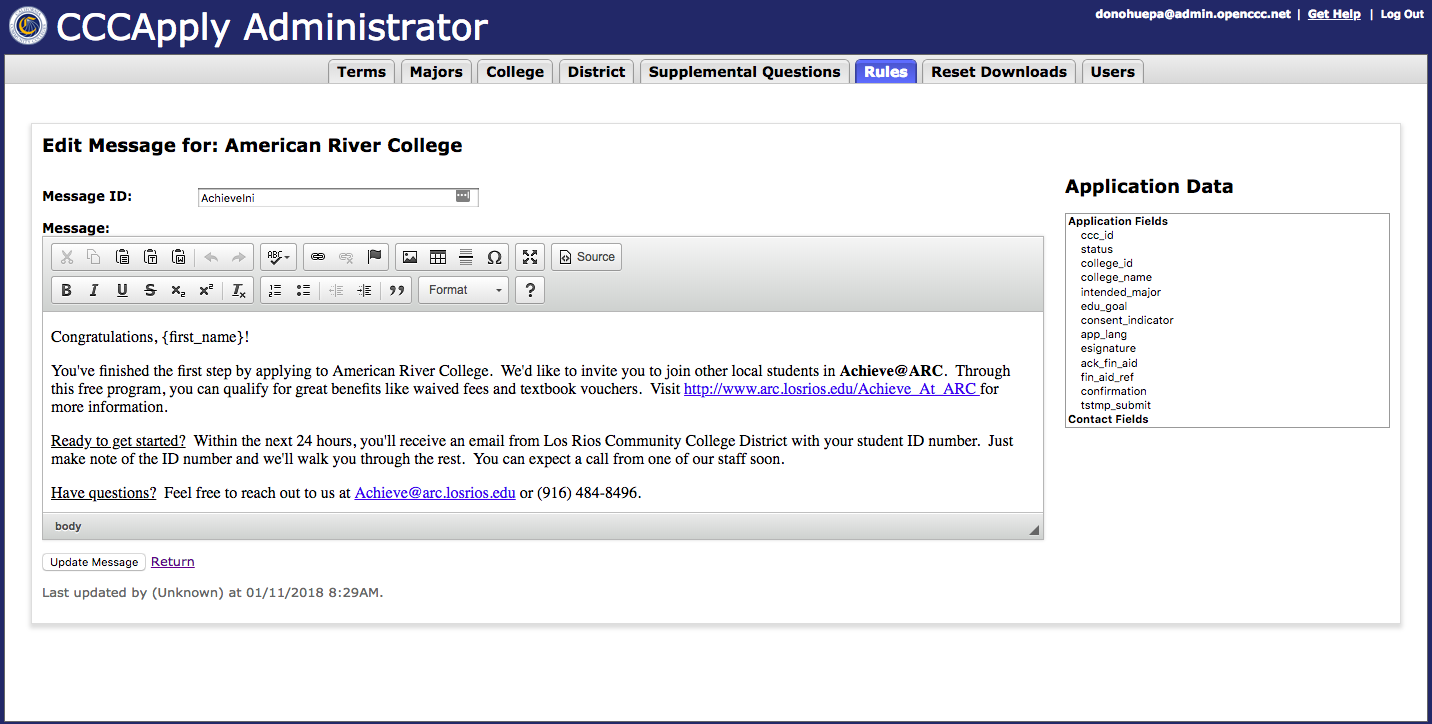
- Click on "Manage Messages". Snap a screen shot of the Messages Summary table. Open each individual message and snap a screen shot of the Message ID with message data at the top and the Message text editor and message in the screenshot.
- Copy all the contents within the message text
- to view the text editor
a new core admin system that manages IdP authentication for users, access, and single sign-on authorization across integrated applications.
For this first release, the core admin service - known as the CCC Administrator - integrates with CCCApply, Canvas College Adaptor, and the CCC Report Center; however in the future your URL and user accounts for CCCApply Administrator, is also your account for the Report Center, MyPath, Course Exchange, Canvasis filled with the user accounts service also for user and access management and launching system user management includesthe current CCCApply Administrator for the Standard Application, International Application, and the BOG Fee Waiver Applications* and user management quickly go through each module (Terms, Majors, Rules, Users, etc.), for each college you represent (district-users should perform this task for each college in your district).
In addition, export your data from Terms, Majors, and Supplemental Questions, and save for future reference.
(select CCCApply from the Application drop down)
NOTE: In Admin 1.0, each application has its own User accounts, including the Report Center. Be sure to review your college User accounts for each application (don't forget the Report Center) and snap a screen shot of the Users summary table of each (i.e., CCCApply, BOG, International, Report Center).
The export standard format is CSV file.
CCCApply Standard Application
Sign In
Sign in to your college or district IdP then navigate to the Production CCCApply Administrator 1.0 using your college URL.
Admin 1.0 (Prod) User Guide
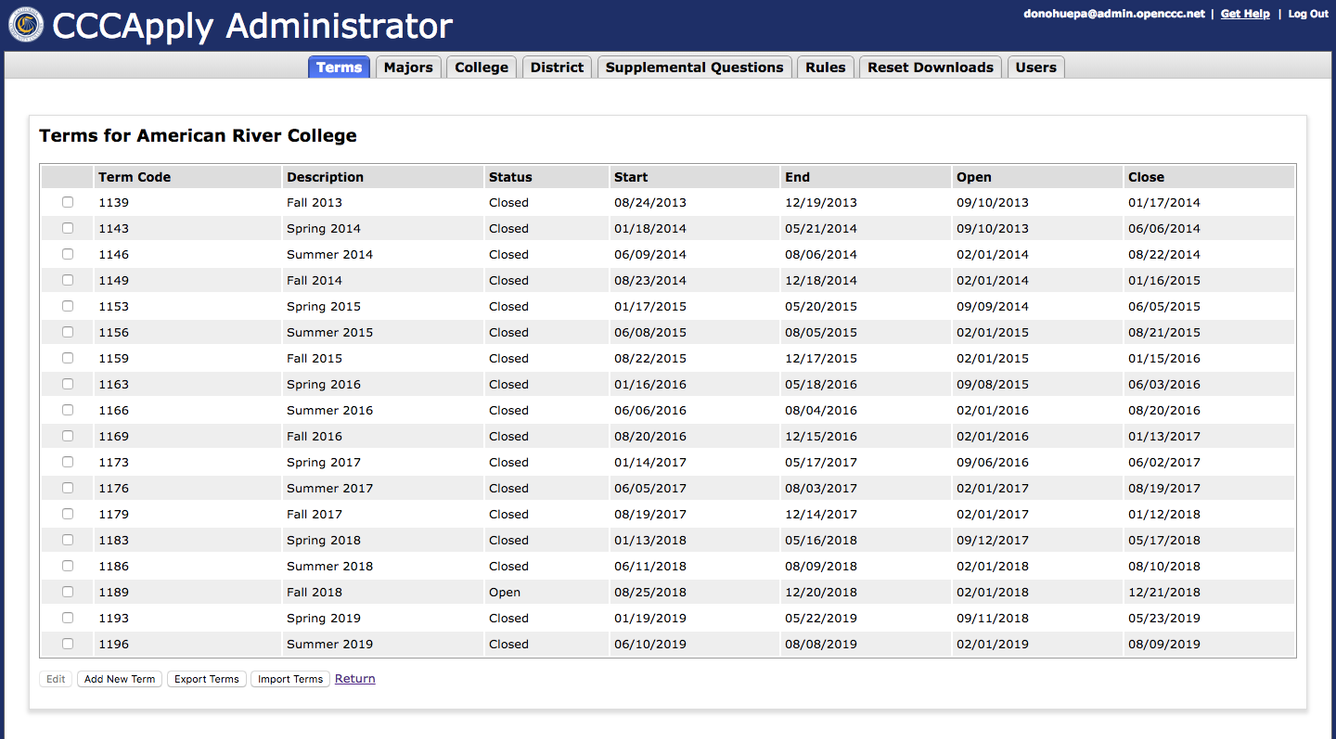
Terms
Review the list of Terms entered for accuracy & validity
Ensure Term Codes & Descriptions are clean, unique - no duplicates
Ensure Term Start & End Dates are correct
Ensure Term Open Dates are before Term Start, Term End, and Term Close Dates
I.e., "Butte.Terms.Admin1.0" and/or include the date: "Butte.Terms.Admin1.0.092818"
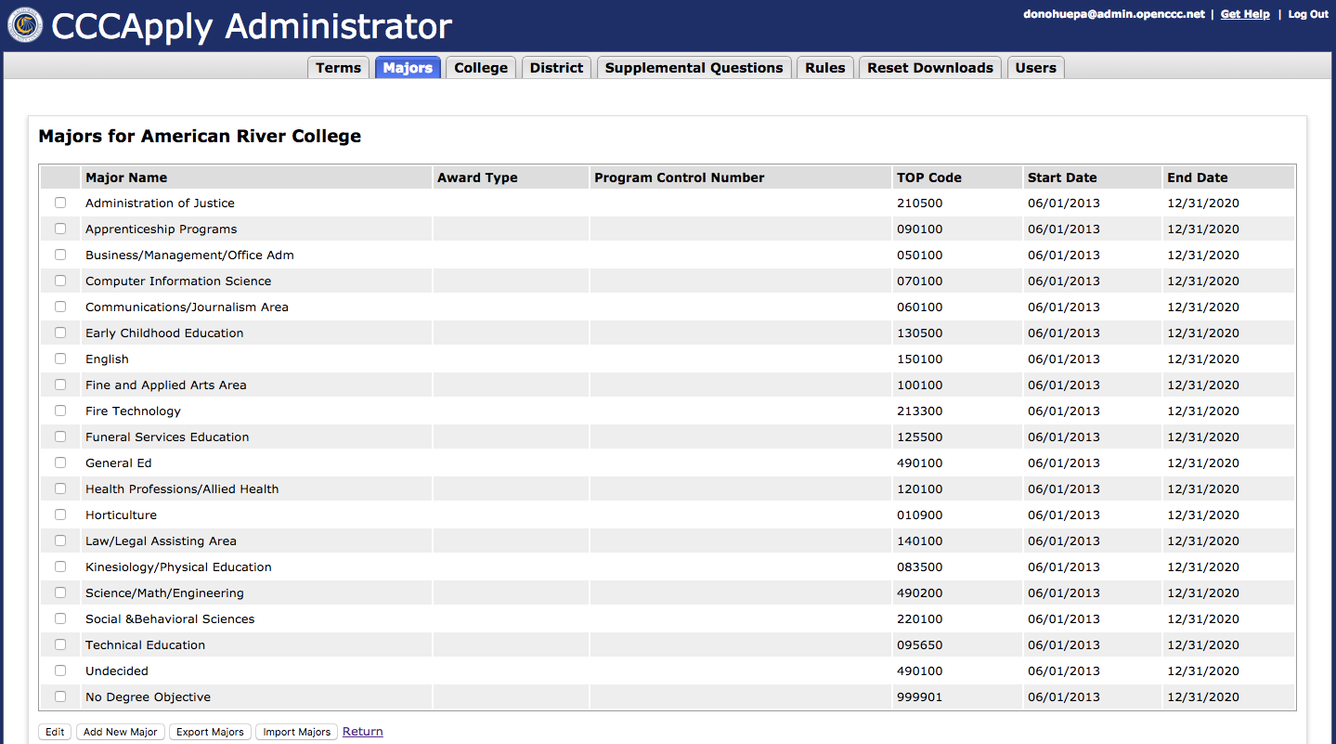
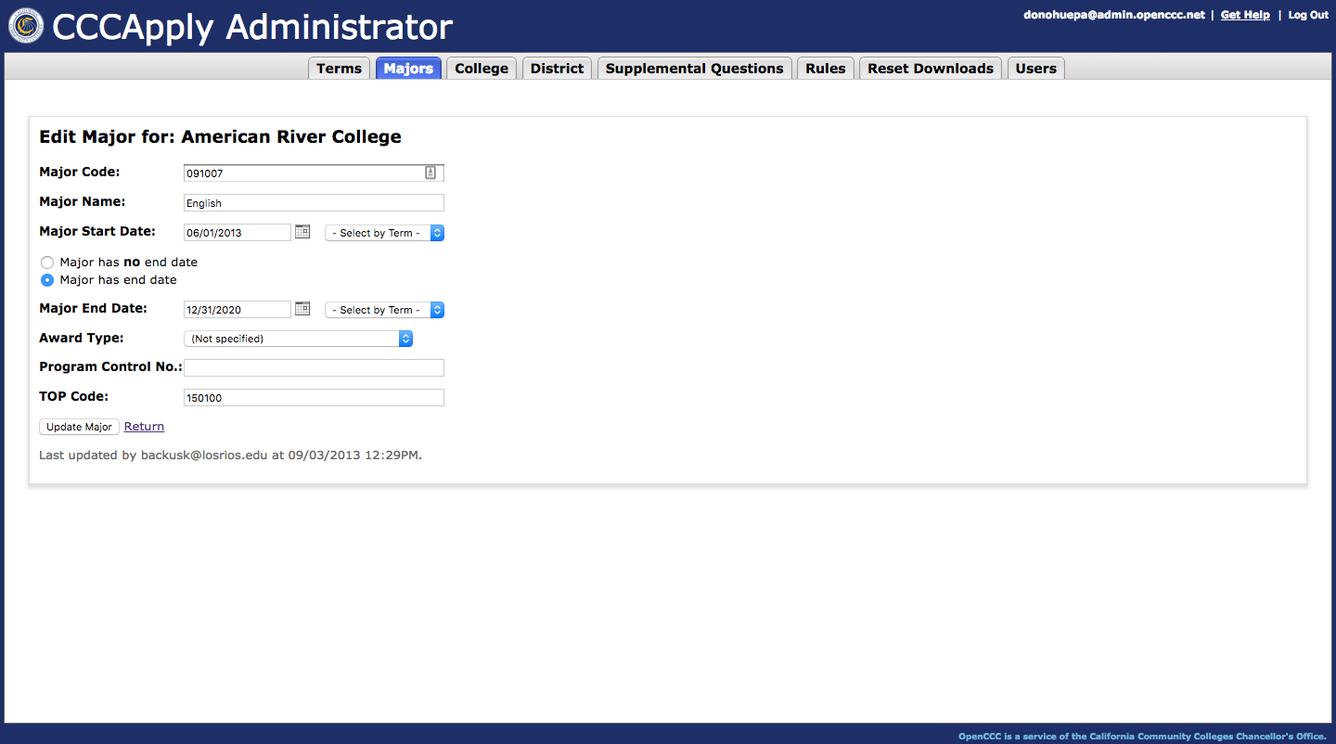
Majors
Review full list of Majors entered to ensure all are entered correctly and up-to-date
Ensure all Major Codes are unique (no duplicates)
Ensure all Major Names are concise and unique (no duplicates)
Ensure every Major has an accurate and valid Start Date
Ensure every Major has an accurate and valid End Date OR check the box indicating "No End Date". If the Major has an End Date, ensure the End Date is after the Start Date
Optional: The Major Award Type field is not required; however you may choose to enter an award type for each major if you choose.
Optional: The Major Program Control Number is not required; however if you choose to enter program control numbers for your majors, ensure they are entered correctly to avoid errors during import in the CCCApply Administrator 2.0. PCN must be Character(5)
Optional: The Major TOP Code is not required; however if you choose to enter a TOP code for each major, ensure they are entered correctly to avoid errors during migration to the new Admin 2.0 system.
Export your list of Majors in CSV format and store on your network or desktop for future reference.
College Information
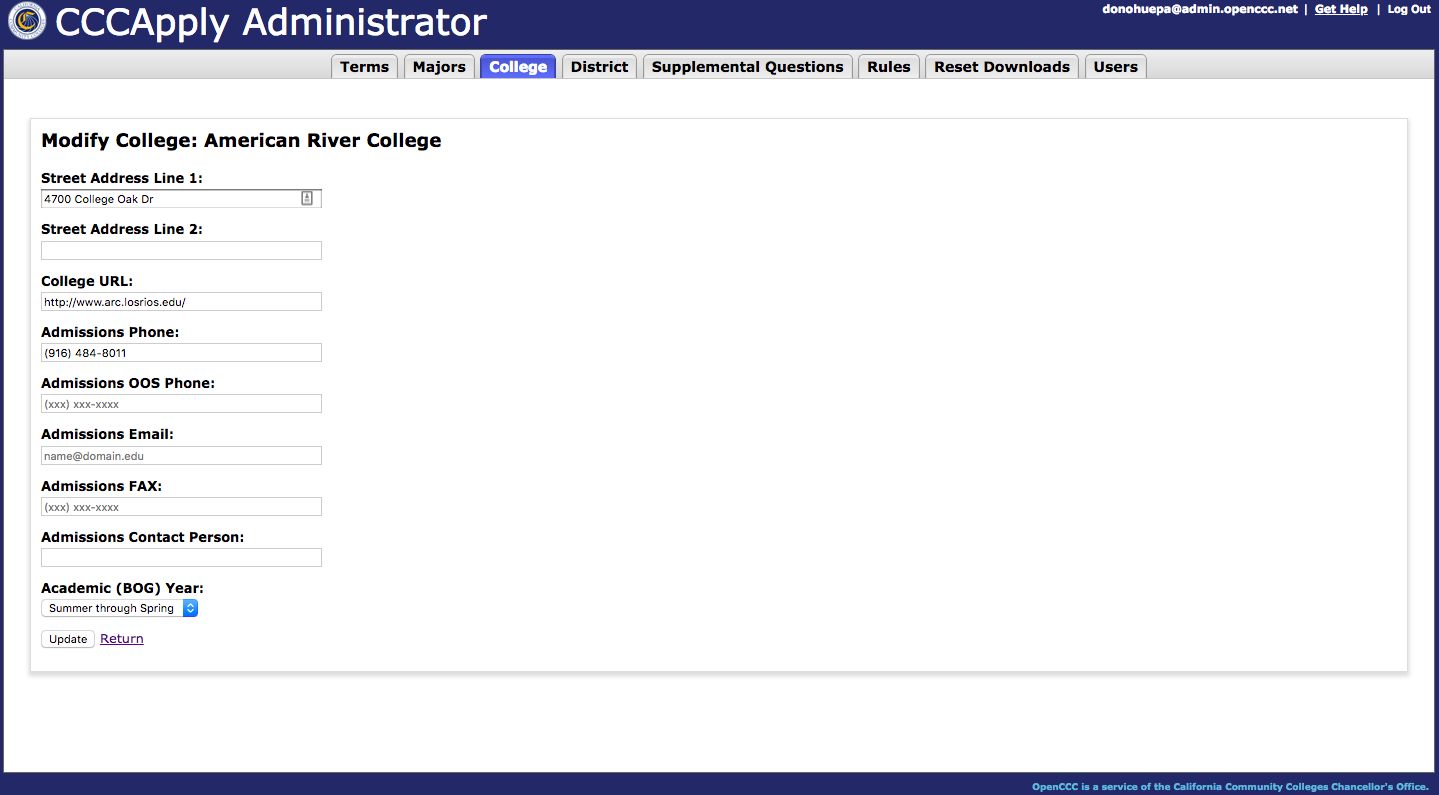
Click on the "College" tab to review your college address & admissions office contact information.
If necessary, snap a screen shot for reference.
District Information
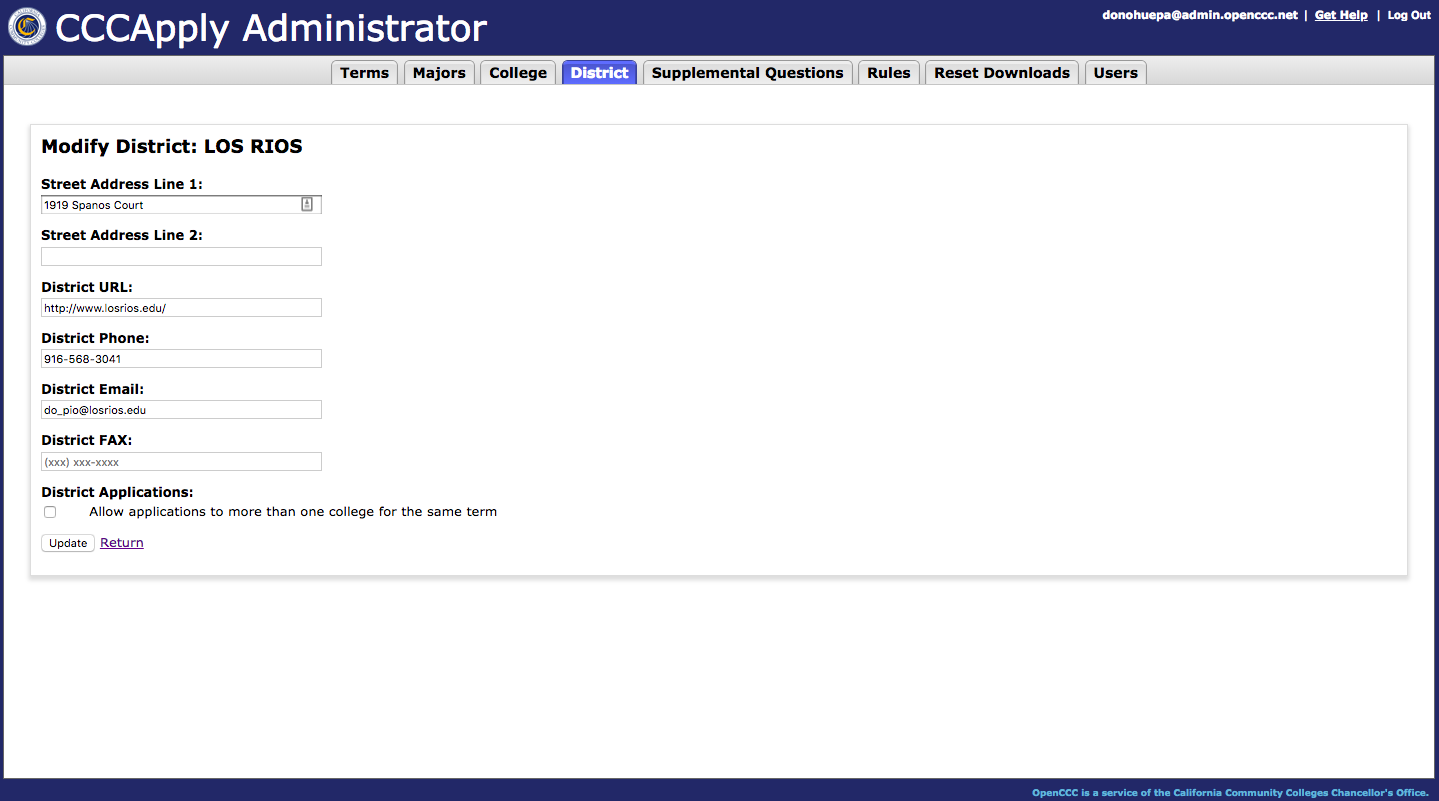
Click on the "District" tab to review your disrict address information.
If necessary, snap a screen shot for reference.
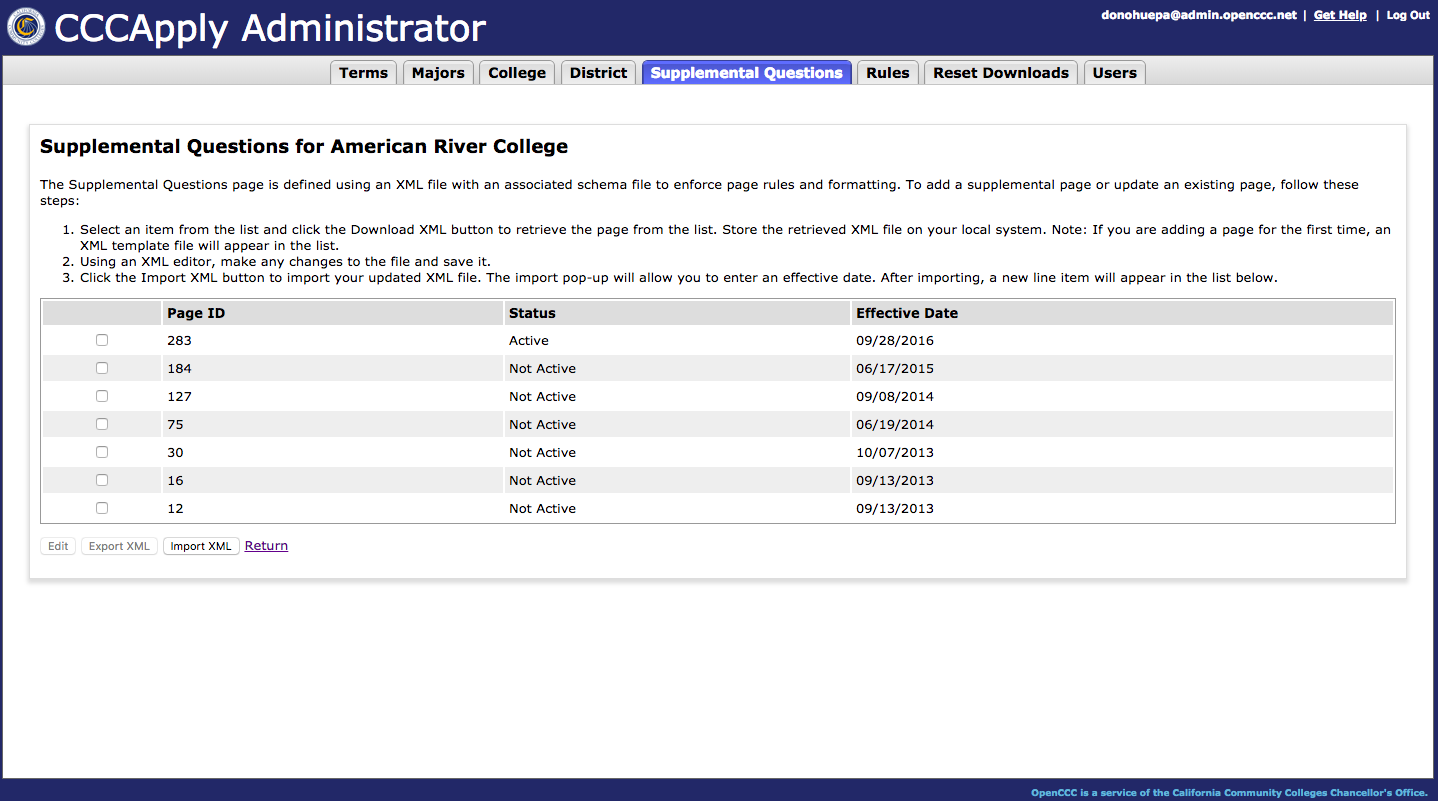
Supplemental Questions
NOTE: Implementing Supplemental Questions is optional. However, if you are currently using supplemental questions in CCCApply, only one page of questions (XML file) can be "Active" at a time. We recommend that a copy of each page of Supplemental Questions be exported and saved for future reference. As a reminder, save each page file with the name of the Page ID + Active or Inactive in the file name.
Click on the Supplemental Questions module tab to display the Supplemental Questions summary page. Snap a screen shot of the summary table for reference.
Place a checkmark to the left of each Page ID and click on "Export" at the bottom of the table to save a copy of each XML page for reference.
Rules
Review all existing Rules that display in the Rules summary table for accuracy. Snap a screen shot of the page
Review each Active and Inactive Rule by placing a checkmark to the left of each Rule and clicking "Edit" to open and display the code logic for each individual rule.
Snap a screen shot of the upper portion of each "Edit Rule for: <college>" for reference. Repeat this process for each Active and Inactive Rule.
Messages
NOTE: The purpose of this exercise is to ensure that a copy of all your Production Admin 1.0 Rules and Messages are preserved as part of this migration process. As a safety measure, you would be able to quickly recreate any active Rule or Message once we've moved out of Admin 1.0 and into the new CCCApply Administrator 2.0 system.
Reset Downloads
Reset Downloads is a utility service which allows colleges to reset the download status on any submitted application that may have already been downloaded but needs to be downloaded again. There is no migration activity associated with this module.
Users
The Users module, including adding, editing, and deleting User accounts within the CCCApply Administrator, is restricted to authorized College or District Administrators in Admin 1.0. The following migration tasks should be completed by an authorized "Add User" only.
International Application
Terms (International)
Review the list of Terms entered for accuracy & validity
Ensure Term Codes & Descriptions are clean, unique - no duplicates
Ensure Term Start & End Dates are correct
Ensure Term Open Dates are before Term Start, Term End, and Term Close Dates
Majors (International)
Review full list of Majors entered to ensure all are entered correctly and up-to-date
Ensure all Major Codes are unique (no duplicates)
Ensure all Major Names are concise and unique (no duplicates)
Ensure every Major has an accurate and valid Start Date
Ensure every Major has an accurate and valid End Date OR check the box indicating "No End Date". If the Major has an End Date, ensure the End Date is after the Start Date
Optional: The Major Award Type field is not required; however you may choose to enter an award type for each major if you choose.
Optional: The Major Program Control Number is not required; however if you choose to enter program control numbers for your majors, ensure they are entered correctly to avoid errors during import in the CCCApply Administrator 2.0. PCN must be Character(5)
Optional: The Major TOP Code is not required; however if you choose to enter a TOP code for each major, ensure they are entered correctly to avoid errors during migration to the new Admin 2.0 system.
Export your list of Majors in CSV format and store on your network or desktop for future reference.
English Proficiency (International)
Click on the English Proficiency tab to display the English Proficiency settings page.
Ensure all the EP tests types that are accepted are selected in the first column, which will appear in the Test Types dropdown menu.
Ensure that you've Indicated if the score field should appear if the corresponding test type is selected by the applicant.
Supplemental Questions (International)
NOTE: Implementing Supplemental Questions is optional. However, if you are currently using supplemental questions in CCCApply, only one page of questions (XML file) can be "Active" at a time. We recommend that a copy of each page of Supplemental Questions be exported and saved for future reference. As a reminder, save each page file with the name of the Page ID + Active or Inactive in the file name.
Click on the Supplemental Questions module tab to display the Supplemental Questions summary page. Snap a screen shot of the summary table for reference.
Place a checkmark to the left of each Page ID and click on "Export" at the bottom of the table to save a copy of each XML page for reference.
Rules (International)
Review all existing Rules that display in the Rules summary table for accuracy. Snap a screen shot of the page
Review each Active and Inactive Rule by placing a checkmark to the left of each Rule and clicking "Edit" to open and display the code logic for each individual rule.
Snap a screen shot of the upper portion of each "Edit Rule for: <college>" for reference. Repeat this process for each Active and Inactive Rule.
Messages (International)
NOTE: The purpose of this exercise is to ensure that a copy of all your Production Admin 1.0 Rules and Messages are preserved as part of this migration process. As a safety measure, you would be able to quickly recreate any active Rule or Message once we've moved out of Admin 1.0 and into the new CCCApply Administrator 2.0 system.
Reset Downloads (International)
Reset Downloads is a utility service which allows colleges to reset the download status on any submitted application that may have already been downloaded but needs to be downloaded again. There is no migration activity associated with this module.
Users (International)
The Users module, including adding, editing, and deleting User accounts within the CCCApply Administrator, is restricted to authorized College or District Administrators in Admin 1.0. The following migration tasks should be completed by an authorized "Add User" only.
BOG Fee Waiver
Rules (BOG)
Click on the Rules module tab to display to Rules summary page.
Review all existing Rules that display in the Rules summary table for accuracy. Snap a screen shot of the page
Review each Active and Inactive Rule by placing a checkmark to the left of each Rule and clicking "Edit" to open and display the code logic for each individual rule.
Snap a screen shot of the upper portion of each "Edit Rule for: <college>" for reference. Repeat this process for each Active and Inactive Rule.
checklist: 1) a "quick checklist" which limits the checklist to only high priority tasks; and 2) a full preparation checklist, which contains an expanded set of prep tasks. The full checklist is definitely recommended; however due to time limitations prior to migration t is not required. Once you have completed the activities on either, or both, checklists, click here to complete the pre-migration survey and provide feedback. |
| Table of Contents | ||
|---|---|---|
|
Priority Goals for Pre-Migration Activity
The goal of this process is to ensure that an authorized Admissions and IT staff member of your college (or district) has reviewed and saved copies (and screenshots) of your production CCCApply Administrator data settings and user accounts before the legacy system is deprecated and replaced by the Admin 2.0 upgrade system on September 28, 2018.
The most efficient way to complete this checklist is to have the following Applications & web pages open in your browser, and have a copy of the Pre-Migration checklist (this page) open in another tab or window.
- Open the CCCApply Administrator 1.0 Production environment (use your college URL and make sure you are signed in to your college or district IdP)
- CCCApply Admin 2.0 Pre-Migration Survey
- CCCApply Administrator V.2016.1
- Working with Supplemental Questions User Guide V.2016.1
- CCC Report Center User Guide V.2016.1
Pre-Migration Quick Checklist
This is a pre-migration activities checklist for the CCCApply Administrator Production Admin 1.0 that can be used for preparing for migration and implementation to the new Admin 2.0 system.
Log in and quickly review your existing data settings
Log in to the Production CCCApply Administrator (v.1.0) and review your administrator data one more time before the data migration to Admin 2.0 on September 28*. Once you've logged in and landed on the homepage, select CCCApply from the "Applications" drop down menu. If possible, snap a screen shot of the homepage with the "Applications" menu open, showing which Applications you were authorized to access at the time of migration.Take screenshots of each module's Summary page
Next, go through each CCCApply admin module and take screen shots of each module's Summary table. Even in the modules that have an export feature, take a screenshot of the Summary table, including Terms, Majors, Rules, Messages, Supplemental Questions, and Users. In the modules that don't have summary tables, take a screen shot of the page, such as with the College information page and the District information page. Repeat this activity for each Application that you manage in Admin 1.0, such as the BOG, International, and Report Center. Don't forget to screen capture the Users summary table for each application, including the Report Center.Export a copy of your college Terms to CSV file
After taking screenshots in each module, go back to the Terms tab and export your college Terms to a CSV file and save this copy for future reference. As a suggestion, consider saving the file name in this format: <your college name>.<Application>.<Module>.<Admin1.0>.<current date or release date>.CSV << Butte.CCCApply.Terms.Admin1.0.092818.CSV >>Export a copy of your college Majors to a CSV file
Do the same thing for your college Majors: click on the Majors tab and export to a CSV file using the same file name format. NOTE: If you have plans to implement the new "Major Category" filter in the new Admin 2.0, you may want to make a copy of the export file and save with a variation of the file name which you will use to prepare your "meta majors" or other custom categories file and import into Admin 2.0. (For information on implementing categories for your majors in Admin 2.0, click here: Using the New CCCApply Major Category Filter.)Export a copy of each page of Supplemental Questions to XML file
If you have implemented Supplemental Questions in your CCCApply application, repeat the export process for each page of your Supplemental Questions, even if the page is "Not Active". NOTE: Supplemental Questions are built using XML; therefore the Supplemental Questions pages will export in an XML format. We recommend that you save each "Page ID" of questions with the following file name format: <college name>.<Application>.<SuppQuestions>.<PageID or page name>.<Admin1.0>.<date>.XML. << Butte.CCCApply.SuppQuestions.Page101.Admin1.0.092818.XML >>Copy each Rule logic and make a copy of each Message template
If your college has implemented Rules & Messages for CCCApply, capturing a copy of each rule and message will require a bit more effort because there is no export functionality in these modules. Also, implementing CCCApply Rules is optional; however if your college are using the Email Rules and Error Rules, we recommend the following process for capturing a record of your custom configurations:Open the Rules module and snap a screenshot of the Rules Summary page, capturing a view of all Active and Inactive Rules.
Open each Rule individually (click on Edit) and take a screenshot of the Rule logic that's been configured in the code text editor (and it will show the status of the Rule logic in green below the editor). Repeat this process for each Rule, regardless of whether the Rule is Active or Inactive.
- Then click on the "Manage Messages" hyperlink on the Rules summary page and take a screen shot of the Messages Summary table.
- Open each Message and snap a screen shot of the entire screen, including the Message ID (name) and other record info at the top of the page, and all or part of the message text content, visible in the text editor in the middle of the screen.
- After snapping the screenshot of the message content, place your cursor in the body of the text message in the text editor, and copy+ paste the contents in a separate document or Google document, for future reference. Copies of these messages in separate external doc files will be helpful when making revisions in the future.
- Repeat this process for each CCCApply Application you've adopted
Ensure you repeat this process for any other applications that you are currently managing in the Administrator, such as the BOG Fee Waiver application, the International application, and the Report Center.
Full Pre-Migration Activities Checklist
This full pre-migration checklist
CCCApply Standard Application | ||
| Task | Documentation | |
Sign In | ||
Sign in to your college or district IdP then navigate to the Production CCCApply Administrator 1.0 using your college URL. | CCCApply College URLS | |
| Optional for Multi-College Districts: If you are completing pre-migration tasks for a multi-college district, you may want to open the Administrator in multiple tabs or browser windows and walk through each set of tasks for each module for each college in your district at the same time. | ||
| Optional: Open the CCCApply Administrator User Guide for reference. | Admin 1.0 (Prod) User Guide | |
Terms | ||
| Click on the Terms tab to display the Terms summary page. | ||
Review the list of Terms entered for accuracy & validity | ||
| Ensure Terms are entered through Spring 2019, at a minimum | ||
Ensure Term Codes & Descriptions are clean, unique - no duplicates | ||
Ensure Term Start & End Dates are correct | ||
Ensure Term Open Dates are before Term Start, Term End, and Term Close Dates | ||
| Ensure Term End dates are AFTER Term Start, Term Open Dates | ||
| WARNING: The Terms configured for your college in the Administrator appear to your students on the Enrollment page of the CCCApply Application. It is required that open and valid Terms are configured in the CCCApply Administrator. Ensuring that your college Terms are entered correctly, especially the Term Start Date and Term End Date, are critical and the application is dependent on these data fields and dates being correct. If there are no open or valid terms, students will not be able to submit an application to your college. | ||
Export your list of Terms in CSV format and store for reference NOTE: As a suggestion, consider saving the export filename in this format: <College Name>.<Application>.<Module>.<Admin1.0>.<current date or release date>.CSV | ||
Majors | ||
| Click on the Majors tab to display the Majors summary page. | ||
Review full list of Majors entered to ensure all are entered correctly and up-to-date | ||
Ensure all Major Codes are unique (no duplicates) | ||
Ensure all Major Names are concise and unique (no duplicates) | ||
Ensure every Major has an accurate and valid Start Date | ||
Ensure every Major has an accurate and valid End Date OR check the box indicating "No End Date". If the Major has an End Date, ensure the End Date is after the Start Date | ||
Optional: The Major Award Type field is not required; however you may choose to enter an award type for each major if you choose. | ||
Optional: The Major Program Control Number is not required; however if you choose to enter program control numbers for your majors, ensure they are entered correctly to avoid errors during import in the CCCApply Administrator 2.0. PCN must be Character(5) | ||
Optional: The Major TOP Code is not required; however if you choose to enter a TOP code for each major, ensure they are entered correctly to avoid errors during migration to the new Admin 2.0 system. | ||
| WARNING: The Majors configured for your college in the CCCApply Administrator appear to your students on the Enrollment page of the CCCApply Application. | ||
Export your list of Majors in CSV format and store on your network or desktop for future reference. NOTE: If you plan to implement meta majors, or any other custom categories to your list of majors, using the new "Major Category" filter in the new Admin 2.0, we recommend that you save a second copy of the export file to use for configuring your categories for import into the Admin 2.0 Majors module. (For information on implementing the Major Category filter in Admin 2.0, click here: Using the New CCCApply Major Category Filter.) | ||
College Information | ||
Click on the "College" tab to review your college address & admissions office contact information. | ||
| Ensure that current and valid Admissions Phone, Out-of-State (OOO) Phone, Email, and Contact Person information is entered for your college. | ||
| Ensure that the correct "Academic (BOG) Year" setting is set in the drop down menu. | ||
| Make sure to click "Update" to save any new or updated information. | ||
If necessary, snap a screen shot for reference. | ||
District Information | ||
Click on the "District" tab to review your disrict address information. | ||
| Ensure that current and valid District information is entered for your District. | ||
| Multi-College Districts: If you are in a multi-college district and you allow your students to apply to more than one college in your district for the same term, check the box indicating this is permitted. | ||
| Make sure to click "Update" to save any new or updated information. | ||
If necessary, snap a screen shot for reference. | ||
Supplemental Questions | ||
NOTE: Implementing Supplemental Questions is optional. However, if you are currently using supplemental questions in CCCApply, only one page of questions (XML file) can be "Active" at a time. We recommend that a copy of each page of Supplemental Questions be exported and saved for future reference. As a reminder, save each page file with the name of the Page ID + Active or Inactive in the file name. | ||
Click on the Supplemental Questions module tab to display the Supplemental Questions summary page. Snap a screen shot of the summary table for reference. | Working with Supplemental Questions User Guide | |
Place a checkmark to the left of each Page ID and click the "Export" button at the bottom of the table to save a copy of each XML page for future reference. | ||
| Configuring Supplemental Questions requires some experience with XML programming. For instructions and information on implementing Supplemental Questions, download the Working with Supplemental Questions User Guide. | ||
| NOTE: Supplemental Questions are configured using XML in a specific template provided by CCCApply; therefore Supplemental Questions pages will export to an XML file format. We recommend that each "Page ID" of questions is exported using the following file name format: <college name>.<Application>.<SuppQuestions>.<PageID or page name>.<Admin1.0>.<date>.XML. Example: << Butte.CCCApply.SuppQuestions.Page101.Admin1.0.092818.XML >> | ||
Rules | ||
| Click on the Rules module tab to display to Rules summary page. | ||
Review all existing Rules that display in the Rules summary table for accuracy. Snap a screen shot of the page | ||
Review each Active and Inactive Rule by placing a checkmark to the left of each Rule and clicking "Edit" to open and display the code logic for each individual rule. | ||
Recommended process for capturing your Rules & Messages data
| ||
| Creating Email Rules:The first step in creating email Rules is to first create the Message template which is then referenced in the Rule logic. For more information on implementing Rules & Messages, see the CCCApply Administrator User Guide. | ||
Messages | ||
| The Messages module is nested within the Rules module in Admin 1.0. To get to the Messages module, click on "Manage Messages" link that lives at the bottom of the Rules module summary page. | ||
| From the Rules module summary page, click on the "Manage Messages" link to display the Messages module summary page. | ||
| Review all existing Messages that appear in the Message summary table for accuracy. Snap a screen shot of the page. | ||
| Review each Message by placing a checkmark to the left of each Message ID and click "Edit" at the bottom of the table. | ||
| Recommended: Save a copy of each Message by selecting All then Copy + Paste into a Word doc, Google Doc, or text file and save as the name of each existing Message Ensure each message is accurate and up-to-date. | ||
| Reminder: Any changes made to Messages may affect existing Rules. | ||
NOTE: The purpose of this exercise is to ensure that a copy of all your Production Admin 1.0 Rules and Messages are preserved as part of this migration process. As a safety measure, you would be able to quickly recreate any active Rule or Message once we've moved out of Admin 1.0 and into the new CCCApply Administrator 2.0 system. | ||
Reset Downloads | ||
Reset Downloads is a utility service which allows colleges to reset the download status on any submitted application that may have already been downloaded but needs to be downloaded again. There is no migration activity associated with this module. | ||
| For reference: CCCApply Download Client User Guide V.2016.3 | ||
Users | ||
The Users module, including adding, editing, and deleting User accounts within the CCCApply Administrator, is restricted to authorized College or District Administrators in Admin 1.0. The following migration tasks should be completed by an authorized "Add User" only. | ||
| For Authorized "College" Add Users - Click on the Users tab to review all of the User accounts authorized to manage your college's CCCApply data settings for your college. | ||
| For Authorized "District" Add Users - Click on the Users tab to review all of the Users authorized to manage the CCCApply data settings for individual colleges in your district (identified by MIS code) or for all of the colleges in your district (MIS code should end in zero). | ||
| Add, Edit or Delete Users as needed. If any of the users displayed for your college or district are no longer employed at your college, or if any of the users are no longer authorized to manage users or data settings for your college, place a checkmark to the left of their MIS Code and click "Delete" at the bottom of the User summary table. | ||
| Snap a screen shot of the final list of current Users for reference. | ||
| NOTE: For security reasons, we recommend that only one or two authorized Admissions Office, or IT Office, staff have access to your admin configuration settings in the CCC Administrator. | ||
International Application | ||
Terms (International) | ||
| Click on the Terms tab to display the Terms summary page. | ||
Review the list of Terms entered for accuracy & validity | ||
| Ensure Terms are entered through Fall 2019, at a minimum | ||
Ensure Term Codes & Descriptions are clean, unique - no duplicates | ||
Ensure Term Start & End Dates are correct | ||
Ensure Term Open Dates are before Term Start, Term End, and Term Close Dates | ||
| Ensure Term End dates are AFTER Term Start, Term Open Dates | ||
| WARNING: The Terms configured for your college in the Administrator appear to your students on the Enrollment page of the CCCApply Application. It is required that open and valid Terms are configured in the CCCApply Administrator. Ensuring that your college Terms are entered correctly, especially the Term Start Date and Term End Date, are critical and the application is dependent on these data fields and dates being correct. If there are no open or valid terms, students will not be able to submit an application to your college. | ||
Export your list of Terms in CSV format and store for reference NOTE: As a suggestion, consider saving the export filename in this format: <College Name>.<Application>.<Module>.<Admin1.0>.<current date or release date>.CSV | ||
Majors (International) | ||
| Click on the Majors tab to display the Majors summary page. | ||
Review full list of Majors entered to ensure all are entered correctly and up-to-date | ||
Ensure all Major Codes are unique (no duplicates) | ||
Ensure all Major Names are concise and unique (no duplicates) | ||
Ensure every Major has an accurate and valid Start Date | ||
Ensure every Major has an accurate and valid End Date OR check the box indicating "No End Date". If the Major has an End Date, ensure the End Date is after the Start Date | ||
Optional: The Major Award Type field is not required; however you may choose to enter an award type for each major if you choose. | ||
Optional: The Major Program Control Number is not required; however if you choose to enter program control numbers for your majors, ensure they are entered correctly to avoid errors during import in the CCCApply Administrator 2.0. PCN must be Character(5) | ||
Optional: The Major TOP Code is not required; however if you choose to enter a TOP code for each major, ensure they are entered correctly to avoid errors during migration to the new Admin 2.0 system. | ||
| WARNING: The Majors configured for your college in the CCCApply Administrator appear to your students on the Enrollment page of the CCCApply Application. | ||
Export your list of Majors in CSV format and store on your network or desktop for future reference. NOTE: If you plan to implement meta majors, or any other custom categories to your list of majors, using the new "Major Category" filter in the new Admin 2.0, we recommend that you save a second copy of the export file to use for configuring your categories for import into the Admin 2.0 Majors module. (For information on implementing the Major Category filter in Admin 2.0, click here: Using the New CCCApply Major Category Filter.) | ||
English Proficiency (International) | ||
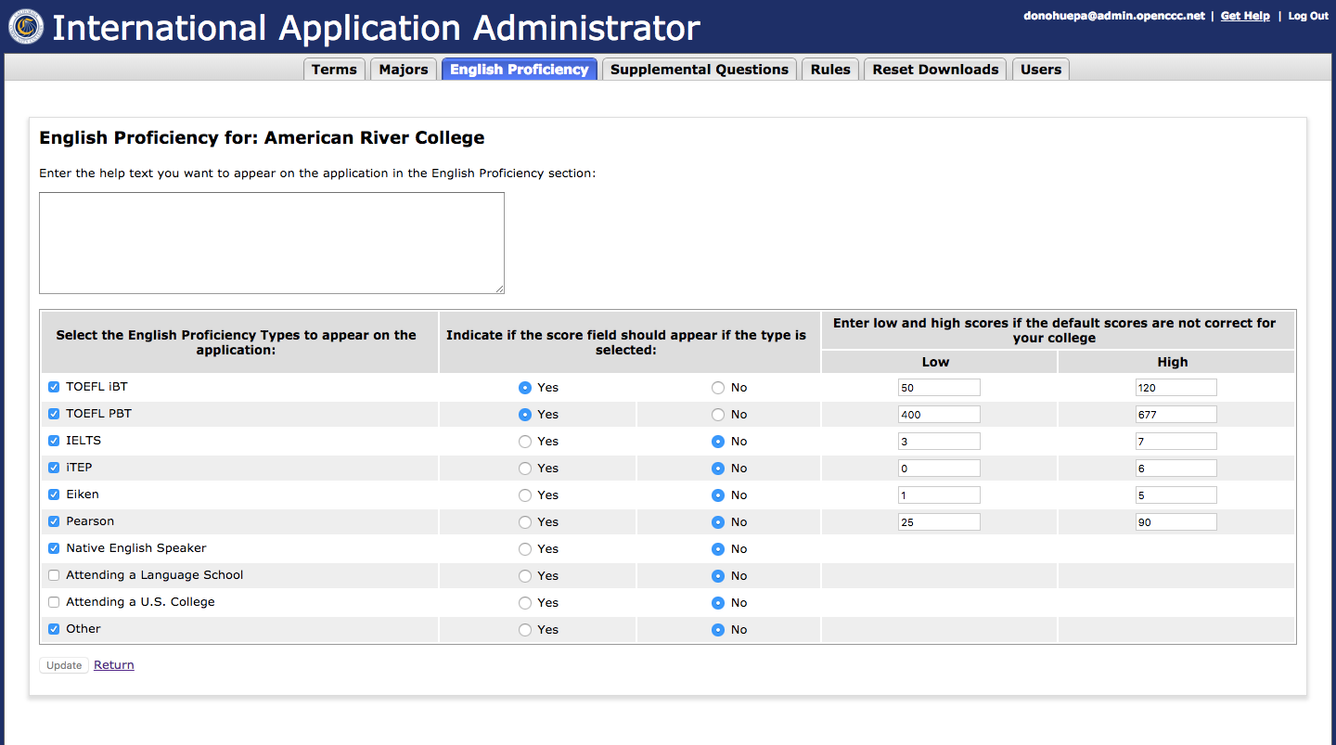
| NOTE: The English Proficiency section is OPTIONAL. If your college DOES NOT have an English Proficiency requirement, you must leave the English Proficiency Help Text box at the top of the page EMPTY. This is what tells the application to display or not display this section to the applicant. However if your college does have an EP test requirement, enter custom pre-requisite Help text in the text box at the top of the English Proficiency module page. For more information, download the CCCApply International Application Data Dictionary. | ||
Click on the English Proficiency tab to display the English Proficiency settings page. | ||
| IMPORTANT: if you want the optional English Proficiency section to display in the CCCApply International Application, enter custom, English Proficiency "instructive" pre-requisite text in the Help text box. | ||
Ensure all the EP tests types that are accepted are selected in the first column, which will appear in the Test Types dropdown menu. Ensure that you've Indicated if the score field should appear if the corresponding test type is selected by the applicant. | ||
| Ensure you've entered corresponding low and high scores if the default scores are not correct for your college. | ||
| Snap a screen shot of the English Proficiency section for reference. | ||
Supplemental Questions (International) | ||
NOTE: Implementing Supplemental Questions is optional. However, if you are currently using supplemental questions in CCCApply, only one page of questions (XML file) can be "Active" at a time. We recommend that a copy of each page of Supplemental Questions be exported and saved for future reference. As a reminder, save each page file with the name of the Page ID + Active or Inactive in the file name. | ||
Click on the Supplemental Questions module tab to display the Supplemental Questions summary page. Snap a screen shot of the summary table for reference. | ||
Place a checkmark to the left of each Page ID and click on "Export" at the bottom of the table to save a copy of each XML page for reference. | ||
| NOTE: Configuring Supplemental Questions requires some experience with XML programming. For instructions and information on implementing Supplemental Questions, download the CCCApply Supplemental Questions User Guide. | ||
Rules (International) | ||
| Click on the Rules module tab to display to Rules summary page. | ||
Review all existing Rules that display in the Rules summary table for accuracy. Snap a screen shot of the page | ||
Review each Active and Inactive Rule by placing a checkmark to the left of each Rule and clicking "Edit" to open and display the code logic for each individual rule. | ||
Recommended process for capturing your Rules & Messages data
| ||
| Creating Email Rules:The first step in creating email Rules is to first create the Message template which is then referenced in the Rule logic. For more information on implementing Rules & Messages, see the CCCApply Administrator User Guide. | ||
Messages (International) | ||
| The Messages module is nested within the Rules module in Admin 1.0. To get to the Messages module, click on "Manage Messages" link that lives at the bottom of the Rules module summary page. | ||
| From the Rules module summary page, click on the "Manage Messages" link to display the Messages module summary page. | ||
| Review all existing Messages that appear in the Message summary table for accuracy. Snap a screen shot of the page. | ||
| Review each Message by placing a checkmark to the left of each Message ID and click "Edit" at the bottom of the table. | ||
| Recommended: Save a copy of each Message by selecting All then Copy + Paste into a Word doc, Google Doc, or text file and save as the name of each existing Message Ensure each message is accurate and up-to-date. | ||
| Reminder: Any changes made to Messages may affect existing Rules. | ||
NOTE: The purpose of this exercise is to ensure that a copy of all your Production Admin 1.0 Rules and Messages are preserved as part of this migration process. As a safety measure, you would be able to quickly recreate any active Rule or Message once we've moved out of Admin 1.0 and into the new CCCApply Administrator 2.0 system. | ||
Reset Downloads (International) | ||
Reset Downloads is a utility service which allows colleges to reset the download status on any submitted application that may have already been downloaded but needs to be downloaded again. There is no migration activity associated with this module. | ||
| For reference purposes: CCCApply Download Client User Guide V.2016.3 | ||
Users (International) | ||
The Users module, including adding, editing, and deleting User accounts within the CCCApply Administrator, is restricted to authorized College or District Administrators in Admin 1.0. The following migration tasks should be completed by an authorized "Add User" only. | ||
| For Authorized "College" Add Users - Click on the Users tab to review all of the User accounts authorized to manage your college's CCCApply data settings for your college. | ||
| For Authorized "District" Add Users - Click on the Users tab to review all of the Users authorized to manage the CCCApply data settings for individual colleges in your district (identified by MIS code) or for all of the colleges in your district (MIS code should end in zero). | ||
| Add, Edit or Delete Users as needed. If any of the users displayed for your college or district are no longer employed at your college, or if any of the users are no longer authorized to manage users or data settings for your college, place a checkmark to the left of their MIS Code and click "Delete" at the bottom of the User summary table. | ||
| Snap a screen shot of the Users remaining in the Users summary table for reference. | ||
| Please note: For security reasons, we recommend that only one or two authorized Admissions Office, or IT Office, staff have access to your admin configuration settings in the CCC Administrator. | ||
BOG Fee Waiver | ||
Rules (BOG) | ||
Click on the Rules module tab to display to Rules summary page. | ||
Review all existing Rules that display in the Rules summary table for accuracy. Snap a screen shot of the page | ||
Review each Active and Inactive Rule by placing a checkmark to the left of each Rule and clicking "Edit" to open and display the code logic for each individual rule. | ||
Snap a screen shot of the upper portion of each "Edit Rule for: <college>" for reference. Repeat this process for each Active and Inactive Rule. | ||
Recommended process for capturing your Rules & Messages data
| ||
| Creating Email Rules: The first step in creating email Rules is to first create the Message template which is then referenced in the Rule logic. For more information on implementing Rules & Messages, see the CCCApply Administrator User Guide. | ||
Messages (BOG) | ||
The Messages module is nested within the Rules module in Admin 1.0. To get to the Messages module, click on "Manage Messages" link that lives at the bottom of the Rules module summary page. | ||
From the Rules module summary page, click on the "Manage Messages" link to display the Messages module summary page. | ||
Review all existing Messages that appear in the Message summary table for accuracy. Snap a screen shot of the page. | ||
Review each Message by placing a checkmark to the left of each Message ID and click "Edit" at the bottom of the table. | ||
Recommended: Save a copy of each Message by selecting All then Copy + Paste into a Word doc, Google Doc, or text file and save as the name of each existing Message Ensure each message is accurate and up-to-date. | ||
Reminder: Any changes made to Messages may affect existing Rules. | ||
NOTE: The purpose of this exercise is to ensure that a copy of all your Production Admin 1.0 Rules and Messages are preserved as part of this migration process. As a safety measure, you would be able to quickly recreate any active Rule or Message once we've moved out of Admin 1.0 and into the new CCCApply Administrator 2.0 system. | ||
Reset Downloads (BOG) | ||
Reset Downloads is a utility service which allows colleges to reset the download status on any submitted application that may have already been downloaded but needs to be downloaded again. There is no migration activity associated with this module. | ||
| For reference: CCApply Download Client User Guide V.2016.3 | ||
Users (BOG) | ||
The Users module, including adding, editing, and deleting User accounts within the CCCApply Administrator, is restricted to authorized College or District Administrators in Admin 1.0. The following migration tasks should be completed by an authorized "Add User" only. | ||
| For Authorized "College" Add Users - Click on the Users tab to review all of the User accounts authorized to manage your college's CCCApply data settings for your college. | ||
| For Authorized "District" Add Users - Click on the Users tab to review all of the Users authorized to manage the CCCApply data settings for individual colleges in your district (identified by MIS code) or for all of the colleges in your district (MIS code should end in zero). | ||
| Add, Edit or Delete Users as needed. If any of the users displayed for your college or district are no longer employed at your college, or if any of the users are no longer authorized to manage users or data settings for your college, place a checkmark to the left of their MIS Code and click "Delete" at the bottom of the User summary table. | ||
| Snap a screen shot of the Users remaining in the Users summary table for reference. | ||
| Please note: For security reasons, we recommend that only one or two authorized Admissions Office, or IT Office, staff have access to your admin configuration settings in the CCC Administrator. | ||
Report Center | ||
| Sign in to your college or district IdP then navigate to the Production CCC Report Center using your existing college URL. | CCC Report Center User Guide V.2016.1 | |
| The purpose of this activity is to ensure your college URL is working for the Production Report Center. | ||
Reference: Admin 1.0 Screen Shots
Terms Summary Page
Edit Terms Screen
Majors Summary Table
Edit Major Screen
College Information Screen
District Information Screen
Supplemental Questions Summary Page
Rules Summary Page
Edit Rule Logic Screen
Messages Summary Page
Edit Message Screen
English Proficiency Screen