| Panel | ||||||
|---|---|---|---|---|---|---|
| ||||||
The CCCApply Administrator User Guide can be exported to PDF or Word by selecting the “Export” option in the More Actions menu in the upper right of this page. |
...
| Note |
|---|
Getting to the new CCCApply Administrator requires staff users to sign in to the CCC Administrator using their college-specific URL. Click here to find Administrator URLs or contact College Support Services at staffsupportccctc@openccc.zendesk.com |
...
System Administrator
(Applications->System Administrator)
The System Administrator module provides:
SSO-based authentication to all CCC colleges through custom college-specific URLs configured to their college or district IdP
User management for all authorized CCC college staff and faculty users
Access management to all integrated CCCTC administrator applications and services through a single point-of-entry
User Manager
(Applications->System Administrator->User Manager)
The User Manager module allows authorized users to view, add, edit, and delete* users within the scope of their own authorized user permissions. The User Manager section provides the ability for users with authorized role(s) to create new users and permissions for your college or district.
...
Launching the CCCApply Administrator
(Applications->CCCApply Administrator)
If your credentials include permission to configure the CCCApply Standard application, CCCApply International application, and/or CC Promise Grant (BOG Application) for your college or district, you can access those via the CCCApply Administrator.
...
Have ready an edited .csv file of terms for importing. See Editing the Exported Terms CSV File for details.
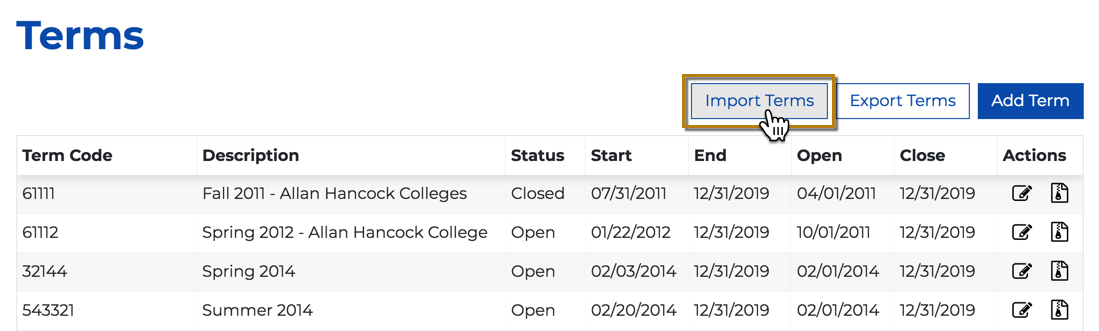
From the Terms Summary table, click Import Terms to display…
...the Import Terms dialog box: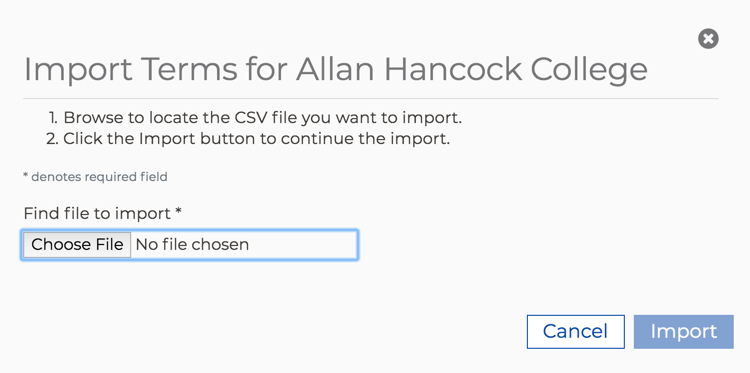
Click Choose File to display your computer’s file navigator.
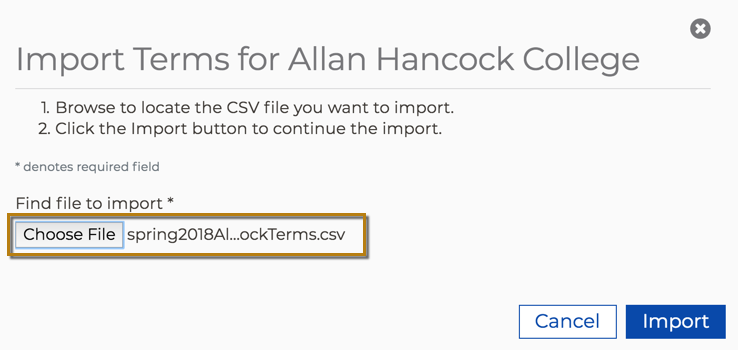
Navigate and select the terms .csv file you want to import. The file name for the file you selected displays next to the Choose File button.
Click Import to import the terms .csv file, close the Import Terms dialog box, and display the Terms Summary table where all rows are replaced/updated and the terms list refreshes to match your imported values.
...
Configuring Majors
The Majors module is where you can add, edit, archive (currently “archive” functions as a delete in CCCApply Administrator), import, and export majors. The Majors module is available only for the CCCApply Standard, Noncredit, and International applications.
...
Field / Attribute | CSV Column Heading | Required | Important Configuration Notes | ||||
|---|---|---|---|---|---|---|---|
Header Row | YES | IMPORTANT: The header row is required for your .csv file to import correctly and the values to be stored properly by the CCCApply Administrator. | |||||
Application | application | YES |
| ||||
Major Code | code | YES |
| ||||
Major Description | description | YES |
| ||||
Category | category | NO |
| ||||
TOP Code | topCode | NO |
| ||||
Program Control Number | programControlNumber | NO |
| ||||
Award Type | awardType | YES* | The Award Type field must be populated in the system. If you are adding or editing an individual major using the Add/Edit Major screen, you can bypass selecting a value in the dropdown menu; however, if you do this a value of “None” will be system-generated and stored as the Award Type for that major. The Award Type field/column is:
| ||||
Application Type | applicationType | YES |
| ||||
CIP Code | cipCode | NO |
| ||||
Education Goals | eduGoals | NO | Leave this column in place and LEAVE IT EMPTY. Do not enter ANY data or values in the EduGoals column. If any values accidentally get entered into the column, your students may not be able to select a Major in CCCApply.
| ||||
Start Date | start | YES |
| ||||
End Date | end | YES |
| ||||
Create Date | NO |
|
| Warning |
|---|
VERY IMPORTANT: The “EduGoal” and the "Created" columns are not currently used, but MUST remain in your majors CSV file and should be BLANK to import properly. |

Award Type Field Values
Char (1) | Value | Description |
1 | = AA_degree | Associate of Arts degree |
2 | = AS_degree | Associate of Science degree |
3 | = Certificate | Certificate of Study |
4 | = Other | None / Other Award Type |
5 | = AA-T_degree | Associate of Arts degree for Transfer |
6 | = AS-T_degree | Associate of Science degree for Transfer |
Y | = BA_degree | Baccalaureate of Arts (BA) degree |
Z | = BS_degree | Baccalaureate of Science (BS) degree |
...
The new default sort order for all majors and programs of study that appear in the Intended Major or Program of Study dropdown menu in the CCCApply Standard, Noncredit, and International applications is alphabetical order of the Major Description field. Colleges can edit the Major Description of each major in the Majors module in the Administrator.
Configuring the Major Category Filter
The optional Categories field in the CCCApply Administrator’s Majors module allows colleges to group majors and programs of study into custom categories, such as meta majors. When implemented, these categories display on the CCCApply and/or International applications’ Enrollment Information tab. Students will be required to select a Major Category when completing the application. There is no limit on Major Category options you can define.
...
| Note |
|---|
Display of Major Categories: When adding a new category to a new or existing major, you must hit "Enter" after entering the category name in the Categories text input field. Categories will display in the Summary table in the order they were created. However, in CCCApply application user interface, categories display in alphabetical order. |
Implementing the Major Category Filter
You can implement the major categories manually or, more efficiently, by importing them. Colleges must define their list of major categories and then align those categories to each major or program of study for their college.
To get started colleges should complete the The Major Category Implementation Worksheet, which provides a comprehensive step-by-step guide for setting up the Major Category field in CCCApply.
Disabling the Major Category Filter
The Major Category filter in CCCApply and/or International can be turned off by removing all custom categories created in the CCCApply Administrator’s Major module Categories field for every major. Once all Categories values for all majors are removed the Major Category drop-down list will not display in the CCCApply and/or International application. The Intended Major or Program of Study drop-down list will revert back to displaying the full list of majors and programs in alphabetical order (by Major Description).
...
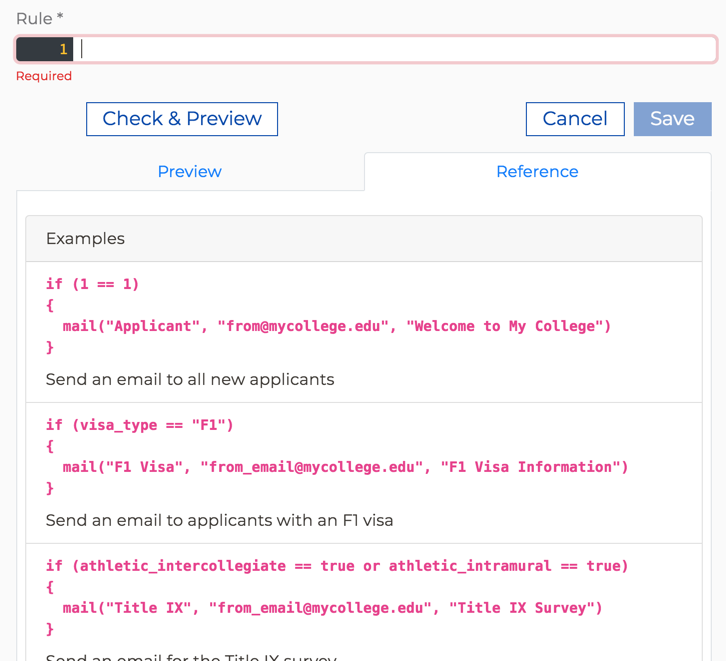
If there are syntax errors, they will display just below the Rule field in red-colored text allowing you to take corrective action and repeat the validation check again.
If there are no syntax errors, the Preview displays the results of your rule. For each field your rule checks, the preview will allow you to enter test values. For each test value you enter, the preview will show the result of the rule.
Detailed descriptions and examples of the rule syntax can be found on the Reference tab next to the Preview tab in the Add Rule dialog box and Edit Rule dialog box.
Creating an Email
...
Rule Examples
Use the steps below to create a rule to send a welcome email to applicants who are active in the military.
...
the field for military status is called "military_status"
the value that indicates active status in the military is "2"
| Tippanel | ||||||
|---|---|---|---|---|---|---|
| ||||||
Tip: Use Refer to the CCCApply Standard Application Data Dictionary or the CCCApply International Application Data Dictionary to review the valid value field values for various application data fields. Find them CCCApply Data Dictionaries here: CCCApply Standard and CCCApply International Data Dictionaries. |
...
The military_status field displays like this in the CCCApply application:
...
In this example we’ll write our rule to check the "military_status" field for a submitted application, and send the email when the field contains the value "2". For the purposes of this example, the message ID for the email is "Welcome Military" (see Prerequisite, above).
Enter (or copy/paste) the following rule text in the Rule field:
if(military_status == "2")
{
mail("Welcome Military", "admissions@yourCollege.edu", "Welcome to College!")
}Note that the keyword “mail” is followed by a parenthetical, comma-separated statement consisting of the Message ID in quotes, the “from” email value (for your college), and the email subject text.
...