| Panel | ||||||
|---|---|---|---|---|---|---|
| ||||||
The CCCApply Administrator User Guide can be exported to PDF or Word by selecting the “Export” option in the More Actions menu in the upper right of this page. |
...
This Guide does not address application “front-end” specifications such as application questions and responses, format definitions, display conditions, algorithms, or data element specifications. These specs are addressed in the CCCApply data dictionaries, crosswalks, user guides, and other end-user documents located throughout the CCCApply Public Documentationsite.
Glossary of Terms
Term | Description |
|---|---|
CCC Administrator | The central administrator tool providing SSO-based authentication, system and user management, and a single point-of-entry for the CCCApply Administrator. |
CCCApply Administrator | The back-end admin configuration tool for setting up and maintaining individual CCCApply applications for CCC colleges. |
CCCApply Standard Application | The official domestic (US) online application for admission for the California Community Colleges. |
CCCApply Noncredit Application | The streamlined workflow within the CCCApply Standard application exclusively for students enrolling in noncredit courses. |
CCCApply International Application | The official international (non-US) online application for admission for the California Community Colleges. |
CC Promise Grant Application | The official online California Colleges Promise Grant application for the California Community Colleges Chancellor’s Office. |
CCCApply Report Center | The real-time, integrated BI reporting tool for all CCCApply submitted applications. |
CCC Data Warehouse Report Server | The business intelligence and reporting tool for the CCC Data Warehouse data restricted to college and district IRPE researchers. |
CCCMyPath | The customized student onboarding portal for California Community Colleges. |
CEM | The College |
Experience Manager ( |
CEM) serves as the sales and service representative between the CCCTC Enabling Services and individual colleges. | |
Download Client | A software tool that facilitates the download of applications submitted to individual colleges from the CCCApply download server. |
Enabling Services | The Enabling Services division of the CCC Technology Center provides direct sales, implementation, and support of systemwide technology applications. |
English Proficiency Test | An optional, customizable module for the International application only that allows colleges to configure form fields to gather information on English proficiency tests taken. |
Majors / Programs of Study | Applicants are required to select a Major or Program of Study from a list configured and uploaded by the individual college being applied to. |
Major Categories | Major Categories - also known as meta majors - are custom groupings of majors/programs of study defined by the individual college. |
Messages | Messages are custom content configured by the college to display as email messages or onscreen error messages based on a configured Rule in CCCApply. |
OpenCCC | OpenCCC is the federated identity initiative and student account system for the California Community Colleges. OpenCCC is integrated with CCCApply. |
Pilot Environment | The Pilot Environment is a sandbox system providing a copy of the production environment for application implementation, staging, and admin testing. |
Reset Downloads | The Reset Downloads function is a utility in the CCCApply Administrator that allows colleges to re-download one or more submitted applications. |
Rules | Rules can be created and enabled to send email messages or prevent the submission of an application based on custom logic configured by the college. |
Supplemental Questions | Supplemental Questions is a feature that allows a college to ask additional questions and collect response data as part of the CCCApply application. |
Spam Filter | CCCApply spam filter utility allows colleges to view/manage submitted applications that have been flagged as possible fraud before they reach the college SIS or downloads. |
SuperGlue for Apply | SuperGlue for Apply is the data delivery pipeline between CCCApply databases and the college’s student information system (SIS) or downloads. |
System Administrator | The System Administrator is an application within the CCC Administrator system houses the User Manager application. |
Terms | Applicants are required to select the Term to which they are applying from a list configured and uploaded by the individual college. |
User Manager | The User Manager is an application in the CCC Administrator that enables authorized users to manage user accounts for their college or district. |
Utilities | The Utilities module enables colleges to manage resetting downloaded applications and processing applications suspended as potentially fraudulent. |
Development Environments: Use and Support
...
The Enabling Services team strives to build strong, customer-centric relationships with colleges throughout the implementation process with the following support representatives:
Enabling Services Team Member | Supporting Role |
|---|---|
College |
Experience Management ( |
CEM) | Serve as your first point-of-contact for all things related to CCCTC products and services, including scheduling a demo. |
Product Implementation Readiness (IPM) | Works with the |
CEMs and the implementation engineers (ICE) to ensure your implementation project says on track. | |
Implementation & Configuration Engineers (ICE) | Provides hands-on implementation setup and configuration support to prepare your college to go live with CCCTC products and services. |
College Support Services Representatives (SUP) | Provides post-implementation support for CCCTC products and services. |
| Panel | ||||||
|---|---|---|---|---|---|---|
| ||||||
Get Started with Implementation: Contact yourCollege |
...
Experience Manager ( |
...
CEM) to discuss new products and upgrades at |
...
| Note |
|---|
Technical Support: Visit the online support community for college staff and faculty: ccctechnology.info |
Related Documents & Supporting Resources
...
| Note |
|---|
Getting to the new CCCApply Administrator requires staff users to sign in to the CCC Administrator using their college-specific URL. Click here to find Administrator URLs or contact College Support Services at staffsupportccctc@openccc.zendesk.com |
...
System Administrator
(Applications->System Administrator)
The System Administrator module provides:
SSO-based authentication to all CCC colleges through custom college-specific URLs configured to their college or district IdP
User management for all authorized CCC college staff and faculty users
Access management to all integrated CCCTC administrator applications and services through a single point-of-entry
User Manager
(Applications->System Administrator->User Manager)
The User Manager module allows authorized users to view, add, edit, and delete* users within the scope of their own authorized user permissions. The User Manager section provides the ability for users with authorized role(s) to create new users and permissions for your college or district.
...
Launching the CCCApply Administrator
(Applications->CCCApply Administrator)
If your credentials include permission to configure the CCCApply Standard application, CCCApply International application, and/or CC Promise Grant (BOG Application) for your college or district, you can access those via the CCCApply Administrator.
...
The table below provides a summary of the CCCApply Administrator’s global links’ functionality.
Global Links & Menus | Function |
|---|---|
CCCApply link (upper left corner) | Returns focus to the CCCApply Administrator landing page |
Colleges & Districts drop-down list | Displays editable college or district contact information that displays on the CCCApply application Note: After you navigate to the College Information and/or District Information pages you will need to reselect your CCCApply/International/CC Promise Grant application from the Applications drop-down list to navigate back to it for any continued administration. |
Applications drop-down list | Displays the three different applications available for configuration:
|
Sign Out link | Logs you out of your CCCApply Administrator session and displays the successful log out screen Note: The CCC Administrator tab session remains open and active unless you close it. You will also remain logged into your college or district IdP session. |
Select a College drop-down list | Displays the colleges available for configuration based on your credentials. The value displayed here defaults to only your college unless you are a multi-college district, in which case all of your district colleges display here for selection. |
The table below provides a summary of the CCCApply Administrator’s application-specific link functionality.
Application Links & Menus | Function |
|---|---|
CCCApply link International link CC Promise Grant link | Displays the application you’ve selected from the Applications drop-down list and returns focus to the application’s home page. |
Terms link | Displays all of the configured terms for the selected college and application. You can import, export, add, edit, and archive terms. Note: It is strongly advised you take caution when editing terms in production that may have been used in submitted applications. Available for: CCCApply and International applications |
Majors link | Displays all of the configured majors for the selected college and application. You can import, export, add, edit, and archive majors. Note: It is strongly advised you take caution when editing majors in production that may have been used in submitted applications. Available for: CCCApply and International applications |
English Proficiency | Displays the configurable English Proficiency options for your International application. Available for: International applications only |
Rules link | Displays all of the configured rules for the selected college and application. You can add, edit, and delete rules. Available for: CCCApply, International, and CC Promise Grant applications |
Messages link | Displays all of the configured messages for the selected college and application. You can add and edit messages. Available for: CCCApply, International, and CC Promise Grant applications |
Supplemental Questions link | Displays all of the configured supplemental questions for the selected college and application. You can import, edit, and download supplemental question XML content. Available for: CCCApply and International applications |
Utilities drop-down list | Displays the following configurable options:
Available for: CCCApply, International, and CC Promise Grant applications
Available for: CCCApply applications only |
Date Fields & Best Practices
...
College Information Data Table & Settings
Field Label | Required | Meaning / Usage |
|---|---|---|
College Name | Yes | Not editable. Name of the college. |
College MIS | Yes | Not editable. Name of the college |
Street Address 1 | No | Recommended. College main street address. Editable field. |
Street Address 2 | No | Recommended. College alternate street address. Editable field. |
City | Yes | Not editable. City in which the main campus resides. |
Postal Code | Yes | Not editable. Postal code of the college main campus. |
College URLs | No | Recommended. College main website or admissions office URL. |
Admissions Office Contact | No | Recommended. Optional text input field. If populated, this field is merged/used in several ways in the post-submission application process, including:
|
Admissions Office Email | No | Recommended. Optional text input field. If populated, this email address is used in multiple ways in the post-submission application process, including:
|
Admissions Office Phone | No | Recommended. Optional text input field. If populated, this information appears to the applicant on the post-submission confirmation screen. |
Admissions Out-Of-State Phone | No | Recommended. Optional text input field. If populated, this information appears to the applicant on the post-submission confirmation screen. |
Admissions Office Fax | No | Recommended. Optional text input field. If populated, this information appears to the applicant on the post-submission confirmation screen. |
Academic (BOG) Year | Yes | Required. Toggle used to indicate the college's academic year setting for financial aid. |
District Information Data Table & Settings
Field Label | Required? | Meaning / Usage |
|---|---|---|
District Name | Yes | Not editable. Name of the district. |
District MIS Code | Yes | Not editable. MIS code of the district. |
District Street Address 1 | No | Recommended. District main street address. Editable field. |
District Street Address 2 | No | Recommended. District alternate street address. Editable field. |
District City | Yes | Not editable. City in which the district office resides. |
District Postal Code | Yes | Not editable. Postal code of the district office. |
District Applications | No | Not applicable. |
| Note |
|---|
IMPORTANT: The updated information displays on the CCCApply, International, and CC Promise Grant (BOG) applications when the student completes the application. |
...
Terms Table: Fields & Usage
Field Label | Required? | Meaning/Usage | ||
|---|---|---|---|---|
Term Code | Yes | The 15-character code that identifies your college’s unique term.
| ||
Term Start Date | Yes | The date on which the college-defined term starts (i.e., first day of classes). Used to determine the RDD (Residency Determination Date) in the CCCApply Standard Application, which by state law is one day before the term start date. The term Start Date must be formatted as: mm/dd/yyyy hh:mm a - in the Import CSV file. | ||
Term End Date | Yes | The date on which the college-defined term ends. The term End Date must be formatted as: mm/dd/yyyy hh:mm a - in the Import CSV file. | ||
Open Date | Yes | The date when the Term Description appears in the Term Applying For drop-down menu in on the Enrollment Information page in the CCCApply applications. This is the date a student can begin an application for this term. The current date and time must be between the Open Date and the Close Date (inclusive). The term Open Date must be formatted as: mm/dd/yyyy hh:mm a - in the Import CSV file. | ||
Close Date | Yes | The last date a student can begin or submit an application for this term. When the current date is past the Close Date value, the college-defined term no longer appears in the Term Applying For drop-down list on the Enrollment Information tab in the CCCApply application. This is the last date that the Term Description appears in the Term Applying For drop-down menu in the CCCApply applications. The term Close Date must be formatted as: mm/dd/yyyy hh:mm a - in the Import CSV file. | ||
Description | Yes | The Description is an alphanumeric value that identifies the Term being applied to and is what displays in the Term Applied For drop-down list on the Enrollment Information tab in the CCCApply application for active terms (those in which the current date is between their open and close date).
| ||
Application Type | Yes | The Application Type field specifies which application(s) the Term applies to and will display. The three options are: Standard, Noncredit, or Both.
|
| Info |
|---|
NEW The Application Type field allows colleges to configure different terms for the Noncredit Application, or for use in both the Standard and Noncredit applications at the same time. |
...
| Note |
|---|
Standard/Noncredit terms cannot be mixed with International Application terms in the same .csv file at this time. |
Terms CSV File Element | Purpose |
|---|---|
Header row (i.e. row 1 that reads left to right: code, description, start, etc.) | The header row is required in order for your .csv file to import correctly and the values to be stored properly by the CCCApply Administrator. |
Date format | Must be in mm/dd/yyyy format. You may need to apply non-default formatting to date fields you enter in an Excel application to ensure it matches the required format. Simple text editors will likely not apply a default date format to the .csv file, but the display may not be as organized. |
Time format | The time format must be in hh:mm a (or hh:mm p) format. I.e. 07:00 AM or 10:00 PM. |
Once you are done adding/editing terms, save the .csv file using your software’s Save As option.
Edit the file name to be unique and confirm that the file extension displays as .csv.
Your terms .csv file is now ready to be imported.
...
The table below details the add and update functionality for terms imports (no deleting or archiving of any terms occurs upon import).
If you import a Terms CSV file and... | ...then |
|---|---|
no existing term(s) values were changed but new terms are added to the .csv file | the new terms are added to the CCCApply Administrator Terms Summary table and depending on the Term Open Date(s) will appear in the CCCApply application(s) |
existing term(s) values were changed | the edited terms will be updated in the CCCApply Administrator Terms Summary table and depending on the Term Open Date(s) will appear in the CCCApply application(s) |
existing term(s) values were changed AND new term(s) were added | the new term(s) will be added and the edited terms will be updated in the CCCApply Administrator Terms Summary table and depending on the Term Open Date(s) will appear in the CCCApply application(s) |
Use the following steps to import terms.
Have ready an edited .csv file of terms for importing. See Editing the Exported Terms CSV File for details.
From the Terms Summary table, click Import Terms to display…
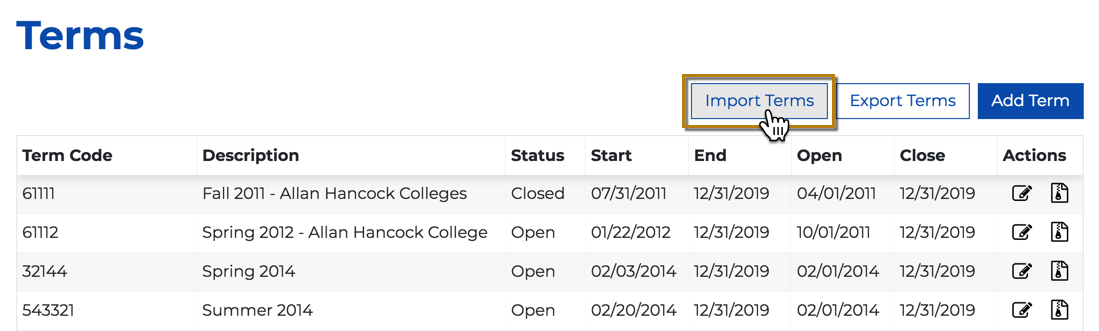
...the Import Terms dialog box: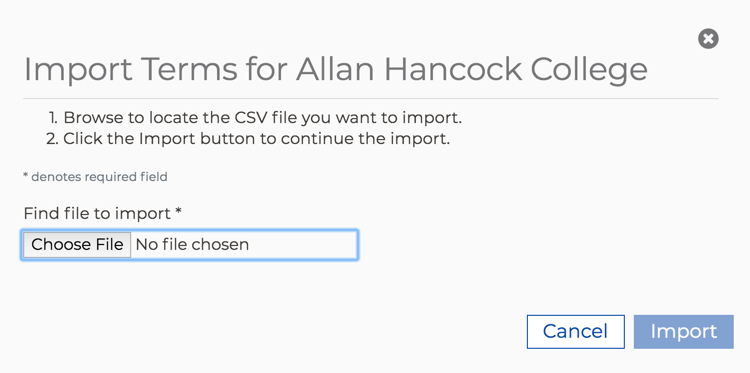
Click Choose File to display your computer’s file navigator.
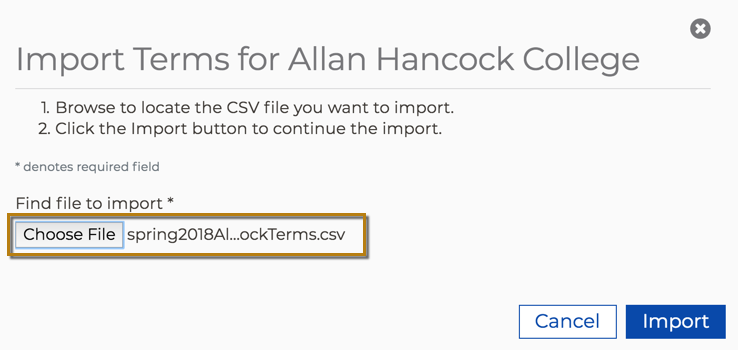
Navigate and select the terms .csv file you want to import. The file name for the file you selected displays next to the Choose File button.
Click Import to import the terms .csv file, close the Import Terms dialog box, and display the Terms Summary table where all rows are replaced/updated and the terms list refreshes to match your imported values.
...
8. Click Save to display the new major in the Majors table. Your newly-created major will display in the CCCApply and/or International application environment in which you’re working (Pilot or Production) in the Intended Major or Program of Study drop-down list as long as the current date is between major’s configured Major Start Date and Major End Date.
Field | Best Practice | ||||||
|---|---|---|---|---|---|---|---|
Major Description | Enter your college’s description for a particular major, in 100 characters or less.
| ||||||
Major Code | Enter your college’s code for the major, up to 30 characters.
| ||||||
Major Start Date | Enter the date when this major will start being available for selection by an applicant in either the CCCApply or International application(s)’ Intended Major or Program of Study drop-down list. | ||||||
Major End Date | Enter the date in which this major will no longer be available for selection by an applicant in either the CCCApply or International application(s)’ Intended Major or Program of Study drop-down list. For a major to appear in the application’s drop-down list, the current date must be between ‘major:date_start’ and ‘major: date_end’ (inclusive). If you do not want to end-date your major, you must select the Major has no end date check box. | ||||||
Major has no end date check box | Select this check box if the major will have no end date. When this check box is selected, the Major End Date field becomes hidden. | ||||||
TOP Code | Using this field is OPTIONAL: Enter the major’s six-character Taxonomy of Programs (TOP) code from the CCCCO (Chancellor’s Office).
| ||||||
Program Control # | Using this field is OPTIONAL: Enter the unique code for every major or program of study from the Chancellor’s office. May be used to identify CCCCO Program Control Number.
| ||||||
Application Type | You can select an option from the Application Type drop-down list so that the major you are configuring will display in only the Standard application, Noncredit application, or both. 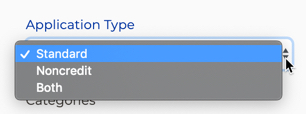 | ||||||
Categories | Using this field is OPTIONAL: Major categories can be added, edited or removed by the college to filter or group their list of majors that appear in the CCCApply applications. Major categories are customized by each college. The new, optional Major Categories field allows you to align as many custom categories to a single major so that students are guided systematically to their educational goals. The values you enter in the Categories field for a major display in the Major Category drop-down list in the CCCApply and/or International applications, and affect which majors display in the Intended Major or Program of Study drop-down list.

When you enter a value in the optional Categories field for a major you must press the Enter key in order for your entries to be accepted (and then displayed beneath the Categories field).
See /wiki/spaces/PD/pages/758546724 for further details. | ||||||
CIP Code | Using this field is OPTIONAL field. If you choose to populate the CIP Code field, enter the Classification of Instructional Programs (CIP) code. | ||||||
Award Type drop-down list | REQUIRED. Select the optional award type that the major aligns to from the Award Type drop-down list. |

Editing a Major
Use the following steps to edit a major:
...
Open the downloaded majors .csv file on your computer using the application of your choice (Excel or another spreadsheet program is recommended).
Edit the majors data as needed. It is assumed your intention is to add new majors and/or edit the majors displayed in order to import them for new values for your CCCApply application(s). Use the table below as a guide.
Once you are done adding new majors and/or editing the majors, save the file using your software’s Save As option.
Edit the file name to be unique and confirm that the file extension is .csv.
Your majors .csv file is now ready to be imported.
CSV Column Heading | Required | Important Configuration Notes | ||||
|---|---|---|---|---|---|---|
Header Row | YES | IMPORTANT: The header row is required in order for your .csv file to import correctly and the values to be stored properly by the CCCApply Administrator. | ||||
Application | YES |
| ||||
Major Code | YES |
| ||||
Major Description | YES |
| ||||
Category | NO |
| ||||
TOP Code | NO |
| ||||
Program Control Number | NO |
| ||||
Award Type (AwardType) | YES | The Award Type (AwardType) field values are slightly different in the new Admin 2.0 system. The following notes pertain to implementing this field in the new system:
| ||||
Application Type | NO |
| ||||
CIP Code | NO |
| ||||
Education Goals (eduGoals) NOT APPLICABLE in this version | NO | Leave this column in place and leave it empty.
| ||||
Start Date | YES |
| ||||
End Date | YES |
| ||||
Create Date | NO |
|
| Warning |
|---|
VERY IMPORTANT: The “EduGoal” and the "Created" columns do not pertain to this version of the Majors module in Admin 2.0 - BUT the data columns MUST remain in your Import Majors file and should be left BLANK in your CSV file. The code value cannot be duplicated so your for-credit and Noncredit courses, even if they are the same course, must have a unique code. |

...
The table below details the add and update functionality for majors imports (no deleting or archiving of any majors occurs upon import).
If you import a majors CSV file and... | ...then |
|---|---|
no existing major(s) values were changed but new majors are added to the .csv file | the new majors are added to the CCCApply Administrator Majors table and will appear in the CCCApply application(s)/Noncredit or International applications |
existing major(s) values were changed | the changed majors are updated in the CCCApply Administrator Majors table and will appear changed in the CCCApply/Noncredit or International application(s) |
existing major(s) values were changed AND new major(s) were added | the new major(s) are added and the changed majors are updated in the CCCApply Administrator Majors table and will appear in the CCCApply/Noncredit or International application(s) |
Use the following steps to import majors.
...
To get started colleges should complete the The Major Category Implementation Worksheet, which provides a comprehensive step-by-step guide for setting up the Major Category field in CCCApply.
...
Email Rules
Error Message Rules
Email Rules | Error Messaging Rules |
|---|---|
A customizable email can be sent to the student and/or to a college staff member upon application submission, depending on how the student filled out the application. Note: This requires a message be created in the /wiki/spaces/PD/pages/758546724. | The application can be validated for specific errors and its submission prevented along with immediate messaging indicating to the student the remedy so they can correct and re-submit the application. Note: You do not need to create messages for rules that report an error to the user in the application. Messages for error rules are entered directly in the rule definition itself. |
| Warning |
|---|
Adding a Rule around a Boolean Field When adding or editing a rule that includes a boolean field, there should be no quotations around the values: true, false or null. This applies to ALL boolean fields. For example: if (dsps == true) OR if (athletic_interest == false) See the rule examples provided in the Reference tab of the Rule Preview box for more examples. |
...
| Note |
|---|
Note the key words of “mail,” “staffmail,” and “error” in the table below. |
Step 1: Specify the conditions that should cause the rule to perform an action | Step 2: Specify the action to be performed | ||
|---|---|---|---|
Examples: if(military_status == "2") if(ssn == null) | Examples: For email (students): {
For error messages: { | ||
Use the Application Data Fields, a scrollable list of field names from the student application, to build the “if” part your rule. When you click on one of these fields, it appears in the Rule field at the cursor. You can also simply type the name of the field you wish to check. The field names are only used in the "if" part of your rule. | For email (students): The structure of the action statement is: {
{ | ||
Use the Messages drop-down list, which includes a list of message IDs you have defined in the Messages module, when forming a "mail" or "staffMail" rule, as it indicates the name of the message that should be sent. Note: The Messages drop-down list is only used for email rules, not for error rules. |
10. Click Check & Preview to validate your rule for correctness and to preview it in the Preview tab.
...
Use the table below to determine how best to implement Supplemental Questions vis-a-vis the CCCApply Standard application and the Noncredit application.
If you: | Then: |
|---|---|
Do not want to implement Supplemental Questions in either the CCCApply Standard OR Noncredit applications... | Do nothing. Do not upload any Supplemental Questions XML files for either application. |
Don't currently implement Supplemental Questions but want to for either the CCCApply Standard application OR the Noncredit application or both... | You will need to:

|
Already have the Supplemental Questions implemented in your CCCApply Standard application... | Those CCCApply Standard application Supplemental Questions will continue to display for your CCCApply Standard application. If you want to also implement the Noncredit application and include Supplemental Questions in it, you will need to import a separate XML file specifically for the Noncredit application that includes the ApplicationType attribute set to "Noncredit" as mentioned above. The easiest way to implement supplemental questions for your Noncredit application is to export your existing CCCApply Standard application Supplemental Questions XML file, edit it as you wish, add the ApplicationType attribute as mentioned above, save the file with a new name, and then import it. You will then see active Supplemental Questions for both your Standard and Noncredit applications. 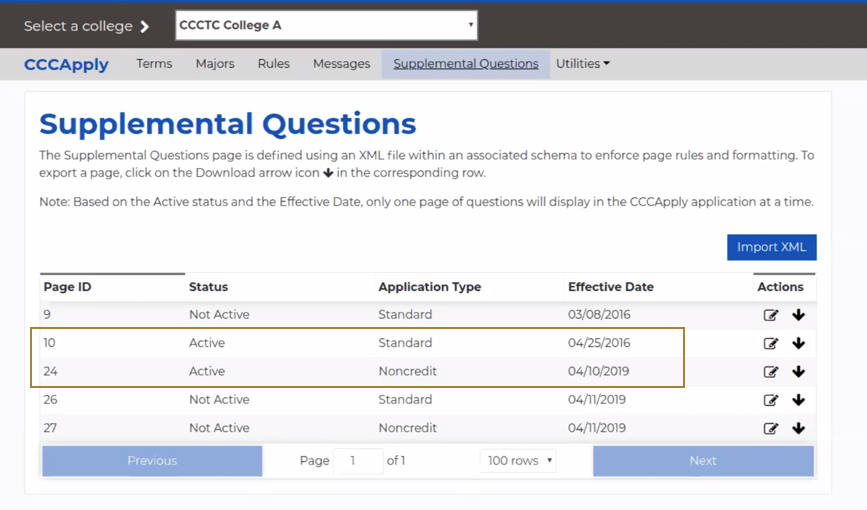 |
Importing Supplemental Questions
...
7. Click Confirm to make the application(s) available for download by the Download Client. The Reset Downloads dialog box closes automatically, and the Reset Downloads module displays with a confirmation message. When you next run the Download Client, these applications will be included in the download file.
...
Change Notifications
Date | Change Description | Notification |
|---|---|---|
For additional change details, see the Change Log page.
...