Last Update: November 17, 2021
...
Supplemental questions are written in XML and validated with XSD. You can create one or more sets of supplemental questions to be added to either your college's CCCApply Standard Application and/or the Noncredit Application. Only one supplemental question set can be active/display at a time. The Configuring Application Supplemental Questions section of the CCCApply Administrator User Guide provides details on importing, updating, and downloading your Supplemental Question XML files.
...
Note: The Noncredit application is a workflow and subset of the CCCApply Standard applications questions that skips the residency check and military status for students who are only taking noncredit courses. See the Noncredit Application section of the CCCApply Standard & Noncredit Application Data Dictionary for more details.
...
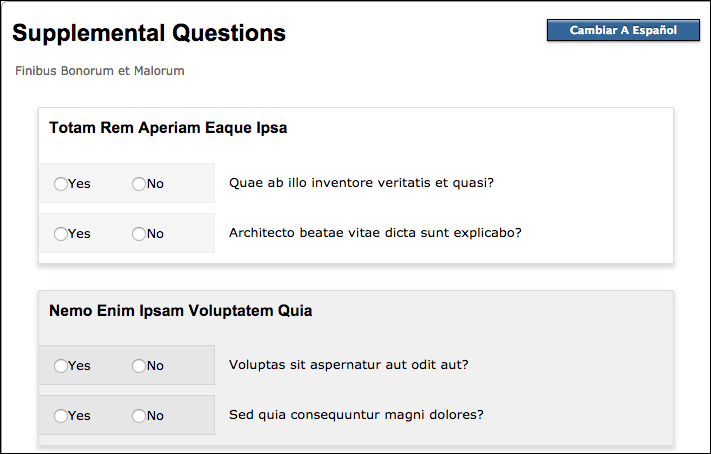
Consider the following example that shows questions that have been imported into the Supplemental Questions module in the CCCApply Administrator application.
...
If today were March 8, 2016, the questions with Page ID 9 would show up on your college's CCCApply Standard student application. Page ID 10 would not show up, because although it is marked Active and has the latest effective date, that date would be in the future (assuming March 8, 2016 as an example). When the date became April 25, 2016 Page ID 10 would take precedence and the questions on Page ID 9 would no longer display on the application.
...
Most of the contents of your XML file will depend on the questions you want to ask and the responses you expect to receive. For details on creating questions and guiding the student through the application process see Supplemental Questions: Layout And User Experience and Supplemental Questions: Response Elements.
Setting up Your XML File
...
Response elements can contain both <Label> and <HoverHelp> child elements to help guide the user through the application process. Certain attributes such as default and required can also be assigned to response elements for guiding the user. See Supplemental Questions: Layout And User Experience for details.
Each type of response element is associated with a group of fields in the database. Responses to <Checkbox> elements, for example, are stored in a group of fields whose names follow the pattern of supp_check_ followed by a two-digit number. There are 50 supp_check fields in the database, from supp_check_01 to supp_check_50. The id attribute you assign to each response element will determine which particular field the response is stored in.
For example, the response to <Checkbox id="42"> will be stored in the field called supp_check_42. When you are ready to download student data to your college's Student Information System, you will use these field names to tell the Download Client which data you want.
The following table shows the association between a response element and the supplemental questions database.
Element Name |
|---|
...
Element Name | Database Field Name | Prefix Number of Fields | |
|---|---|---|---|
Checkbox | supp_check | 50 | |
CountryList | supp_country | 5 | |
Date | supp_date | 5 | |
Encrypted Text | supp_secret | 5 | |
Menu | supp_menu | 30 | |
PhoneNumber | supp_phonenumber | 5 | |
StatesList | supp_state | 5 | |
Text | supp_text | 20 | |
YesNo | supp_yesno | 30 |
The database fields for most of these elements have a fixed size. For example, because a <YesNo> element accepts only a yes or a no, the corresponding database field is only one character long, allowing either a "1" for yes or a "0" for no. Some of the response elements correlate to fields that can contain more information. It is not required that you fill a database field, but it is legal to do so.
Element Name | Capacity of Database Field |
|---|---|
Menu | 60 characters |
PhoneNumber | 25 characters |
Text | 250 characters |
Below are some details on how to use each type of response element.
...
This element creates a simple check box that the applicant can either select or leave untouched, for a simple checked/ unchecked result. Check boxes are typically used in groups, to allow the applicant to provide multiple answers to a single question.
For example:
<Section>
<Header>Are you interested in any of the following extracurricular activities? Check all that apply.</Header>
<Checkbox <Checkbox id="1"><Label>Chess club</Label></Checkbox>
<Checkbox id="2"><Label>Athletic sports</Label></Checkbox>
<Checkbox id="3"><Label>Online gaming</Label></Checkbox>
<Checkbox <Checkbox id="4"><Label>Martial arts</Label></Checkbox>
</Section>
...
In the database (and Download Client results, if downloaded), the , the example answers in the image above would result in a "0" being stored in supp_check_01 and supp_check_04, while a "1" would be stored in supp_check_02 and supp_check_03.
...
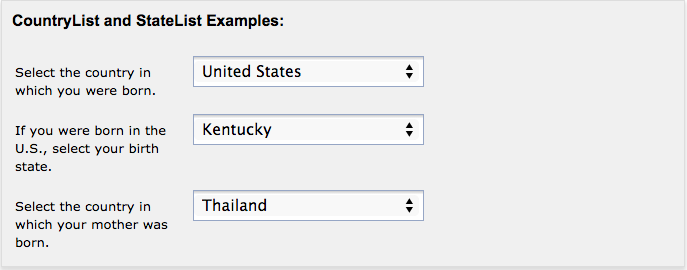
These two elements provide similar functionality but differ slightly in their details. The <CountryList> element creates a drop-down menu that lists the countries recognized by the CCC Tech Center. The <StatesList> element creates a drop-down menu that lists U.S. states and various associated territories. For example:
<Section>
<Header>CountryList and StateList Examples:</Header>
<CountryList <CountryList id="1"><Label>Select the country in which you were born.</Label></CountryList>
<StatesList id="1"><Label>If you were born in the U.S., select your birth state.</Label></StatesList>
<CountryList <CountryList id="2"><Label>Select the country in which your mother was born.</Label></CountryList>
</Section>
...
This would result in "US" being stored in supp_country_01, "KY" in supp_state_01, and "TH" in supp_country_02. For details on the two-character codes for countries and states, see the data dictionaries for either the Standard or International applications.
...
The EncryptedText element creates a text input field that is a hidden password validator field, displaying asterisks (*) for the characters entered.
Note: Though this element is called EncryptedText, it is not really handling encryption, but is only validating the password the user enters to ensure it matches your regular expression entered in the regex attribute. The data entered by the user in this supplemental question field will be encrypted in the database after they submit their application, and that is where the encryption takes place.
The id attribute sets the id for the field. You can have up to five EncryptedText elements.
The required attribute can be either true or false. When true, the user is required to enter values in the fields before submission.
The reenter attribute can be either true or false. When true, the user must reenter the value in the second field that displays.
The maxLength attribute sets the maximum length of the text entry.
The regex attribute is where you define the regular expression to be applied to the fields, and validates the user entry to your requirements.
The example below specifies a 6-to-20 character string with at least one digit, one upper case letter, one lower case letter and one special symbol (“@#$%”). You may provide your own regular expression that suits your needs here.
<Section>
<Header>Hidden <Header>Hidden Password Example:</Header>
<EncryptedText <EncryptedText id="1" required="true" reenter="true" maxLength="20" regex="((?=.*\d)(?=.*[a-z])(?=.*[A-Z])(?=.*[@#$%]).{6,20})">
<Label>Temporary <Label>Temporary Password</Label>
< </EncryptedText>
</Section>
The <Menu> Element
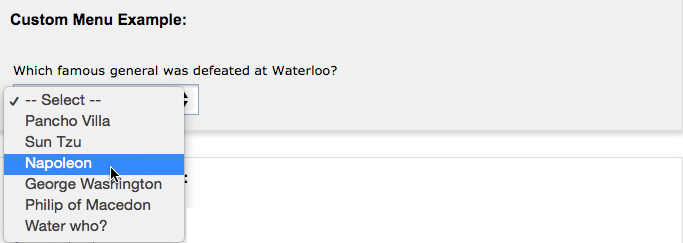
This element allows you to create a custom drop-down menu that allows the applicant to select a single item from a list. Use one <MenuItem> child element to define each item in your drop-down menu. The label attribute of <MenuItem> is the text that will display to the user in the drop-down menu. The value attribute indicates the data that will be stored for the selected <MenuItem> element.
For example:
<Section>
<Header>Custom Menu Example:</Header>
<Menu id="27">
<Label>Which <Label>Which famous general was defeated at Waterloo?</Label>
<MenuItem <MenuItem value="0" label="Pancho Villa"/>
<MenuItem <MenuItem value="1" label="Sun Tzu"/>
<MenuItem <MenuItem value="2" label="Napoleon"/>
<MenuItem value="3" label="George Washington"/>
<MenuItem value="4" label="Philip of Macedon"/>
<MenuItem <MenuItem value="5" label="Water who?"/>
</Menu>
</Section>
...
The example above would result in the value "2" being stored in supp<supp_menu_27 27> in the database. It is best practice, for the sake of simplicity, to use numeric values to represent your menu selections. However, you can use any alphanumeric string up to 60 characters long. Also, although you would typically assign a unique value to each item, it is legal to assign the same value to multiple items. The obvious drawback is that you would not later be able to distinguish between the selections made by applicants, but the system allows you to make this choice if your situation calls for it.
...
Beside the system-imposed maximum length, the difference between <PhoneNumber> and <Text> is that <PhoneNumber> allows you to use the <Format> child element to restrict the applicant to a particular phone number format, or set of formats. The applicant can type anything into the field, but the system will halt the application process and display an error if the user attempts to submit the page with a phone number that doesn't match at least one of the specified formats. To allow free-form entry into the phone number field, create a <PhoneNumber> element without any <Format> child elements.
Note: The phone number text field that is rendered in the application has default help text below the text field indicating that the format of (xxx) xxx-xxxx is the acceptable format. If you want to allow for other formats than this hard-coded UI display, it is recommended that you show the applicant the acceptable format(s) in your <Label> element. Naturally, this will be difficult if you allow many different formats. You could minimize wordiness by leaving out the <Format> element altogether, but that will allow the applicant to enter something that isn't a phone number at all. Balance the complexity of your phone number prompts against your college's willingness to accept ill-formatted phone numbers, including input that may not be a phone number at all.
Note: If you use the <Format> child element for a <PhoneNumber>, the application will behave as though you had set required"=
...
true”. That is, the applicant will not be allowed to leave the field blank, even if you set required"=
...
false”. If you wish to allow the field to be left blank, you must leave out the <Format> child element altogether. It is legal, although of limited usefulness, to set required"=
...
true” for a <Format>-less <PhoneNumber> element, because although input would be required, any input, no matter how useless, would be accepted by the application.
<Section>
<Header>Phone <Header>Phone Number Examples:</Header>
<PhoneNumber
<PhoneNumber id="1">
<Label>Enter your home phone number:</Label>
<Format> <Format>(999) 999-9999</Format>
</PhoneNumber>
<PhoneNumber id="2">
<Label>Enter <Label>Enter your cell phone number:</Label>
<Format> <Format>(999) 999-9999</Format>
<Format>999-999-9999</Format>
<Format>(99) 99 9999 9999</Format>
<Format>99 <Format>99 99 99 99</Format>
<</PhoneNumber>
<PhoneNumber id="3">
<Label>Enter <Label>Enter your emergency contact's cell phone number:</Label>
< </PhoneNumber>
</Section>
In the example above, the <PhoneNumber> element with the id"="1 would allow a phone number in the one format indicated. The <PhoneNumber> with id"="2 would accept a phone number in any one of the four formats indicated. The <PhoneNumber> with id"="3 would accept any alphanumeric input or keyboard symbols, up to 25 characters long because no child format element is specified. The data entered into the three resulting phone number fields, including spaces and punctuation marks as accepted by their <Format> child elements, would be stored in supp_phonenumber_01, supp_phonenumber_02, supp_phonenumber_03.
...
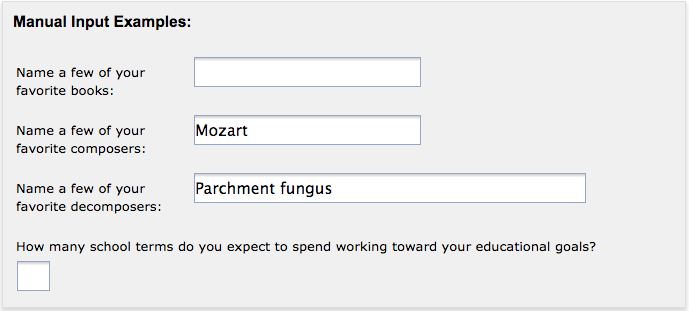
You can also require numeric-only input by using numeric"=tru"e. Setting this attribute will prevent the applicant from typing anything other than digits in the field. It is recommended that you use maxLength whenever you use numeric"=tru"e, to impose an approximately reasonable maximum number that can be entered into the field.
For example:
<Section>
<Header>Manual <Header>Manual Input Examples:</Header>
<Text <Text id="16"><Label>Name a few of your favorite books:</Label></Text>
<Text <Text id="17" default="Mozart"><Label>Name a few of your favorite composers:</Label></Text>
<Text id="18" default="Parchment fungus" maxLength="50">
<Label>Name <Label>Name a few of your favorite decomposers:</Label> <Label>
</Text>
<Text id="19" numeric="true" maxLength="2">
<Label>How <Label>How many school terms do you expect to spend working toward your educational goals?</Label><Label>
</Text>
</Section>
...
If the student were to submit the application without adding to these input fields, the effect in the database would be as follows:
An empty string would be stored in supp_text_16. (The field would be left blank.)
"Mozart" would be stored in supp_text_17.
"Parchment fungus" would be stored in supp_text_18.
And supp_text_19 would be left blank.
Note: Setting numeric"=tru"e affects only the applicant's interaction with the input field, not the content in the database. If, for example, the applicant leaves the field blank, then the corresponding database field (supp_text_19 in the example above) will also be left blank, as opposed to containing a zero.
The <YesNo> Element
This element allows you to create a simple yes/no question.
For example:
<Section>
<YesNo id="1">
<Label>While <Label>While attending classes, do you intend to work more than 40 hours per week?</Label>
</YesNo>
</Section>
...
In the database, a "1" would be stored into supp_yesno_01 if the applicant selected "Yes", or a "0" if the applicant selected.