| Panel | ||||||
|---|---|---|---|---|---|---|
| ||||||
| Panel | ||||||
| ||||||
The CCCApply Administrator User Guide can be exported to PDF or Word by selecting the “Export” option in the More Actions menu in the upper right of this page. |
...
Term | Description |
|---|---|
CCC Administrator | The central administrator tool providing SSO-based authentication, system and user management, and a single point-of-entry for the CCCApply Administrator. |
CCCApply Administrator | The back-end admin configuration tool for setting up and maintaining individual CCCApply applications for CCC colleges. |
CCCApply Standard Application | The official domestic (US) online application for admission for the California Community Colleges. |
CCCApply Noncredit Application | The streamlined workflow within the CCCApply Standard application exclusively for students enrolling in noncredit courses. |
CCCApply International Application | The official international (non-US) online application for admission for the California Community Colleges. |
CC Promise Grant Application | The official online California Colleges Promise Grant application for the California Community Colleges Chancellor’s Office. |
CCCApply Report Center | The real-time, integrated BI reporting tool for all CCCApply submitted applications. |
CCC Data Warehouse Report Server | The business intelligence and reporting tool for the CCC Data Warehouse data restricted to college and district IRPE researchers. |
CCCMyPath | The customized student onboarding portal for California Community Colleges. |
CEM | The College Experience Manager (CEM) serves as the sales and service representative between the CCCTC Enabling Services and individual colleges. |
Download Client | A software tool that facilitates the download of applications submitted to individual colleges from the CCCApply download server. |
Enabling Services | The Enabling Services division of the CCC Technology Center provides direct sales, implementation, and support of systemwide technology applications. |
English Proficiency Test | An optional, customizable module for the International application only that allows colleges to configure form fields to gather information on English proficiency tests taken. |
Majors / Programs of Study | Applicants are required to select a an Intended Major or Program of Study from a list configured and uploaded by the individual college being applied to. |
Major CategoriesCategory | Major Categories - also known as meta majors - are custom groupings of majors/programs of study defined by the individual college. |
Messages | Messages are custom content configured by the college to display as email messages or onscreen error messages based on a configured Rule in CCCApply. |
OpenCCC | OpenCCC is the federated identity initiative and student account system for the California Community Colleges. OpenCCC is integrated with CCCApply. |
Pilot Environment | The Pilot Environment is a sandbox system providing a copy of the production environment for application implementation, staging, and admin testing. |
Reset Downloads | The Reset Downloads function is a utility in the CCCApply Administrator that allows colleges to re-download one or more submitted applications. |
Rules | Rules can be created and enabled to send email messages or prevent the submission of an application based on custom logic configured by the college. |
Supplemental Questions | Supplemental Questions is a feature that allows a college to ask additional questions and collect response data as part of the CCCApply application. |
Spam Filter | CCCApply spam filter utility allows colleges to view/manage submitted applications that have been flagged as possible fraud before they reach the college SIS or downloads. |
SuperGlue for Apply | SuperGlue for Apply is the data delivery pipeline between CCCApply databases and the college’s student information system (SIS) or downloads. |
System Administrator | The System Administrator is an application within the CCC Administrator system houses the User Manager application. |
Terms | Applicants are required to select the Term to which they are applying from a list configured and uploaded by the individual college. |
User Manager | The User Manager is an application in the CCC Administrator that enables authorized users to manage user accounts for their college or district. |
Utilities | The Utilities module enables colleges to manage resetting downloaded applications and processing applications suspended as potentially fraudulent. |
...
Colleges are provided an integrated, end-to-end Pilot environment for each of the CCCApply applications implemented. Authorized college staff are given Pilot user accounts and custom application URLs, configured to their college or district MIS code. Access to the CCCApply Pilot Environmentenvironment by way of secure IdP is available Monday - Friday, from 78:00am - 4:00pm PST.
Pilot Use & Support
...
The CCC Administrator is the central admin configuration and user management tool for the CCCApply Applications, the CC Promise Grant Online Application, and other integrated systemwide applications. Providing a single point-of-entry, college staff and faculty the ability to configure application settings and customize rules and messages, this scalable service provides a launch pad to integrated admin tools from a single point-of-entry.
Colleges are provided custom college-specific URLs - configured to their college/district IdP and integrated with the SSO proxy - which authenticates users as they land on the home page. Integrated admin tools, such as the CCCApply Administrator system, no longer have direct URL access.
...
| Note |
|---|
Getting to the new CCCApply Administrator requires staff users to sign in to the CCC Administrator using their college-specific URL. Click here to find Administrator URLs or contact College Support Services at staffsupportccctc@openccc.zendesk.com |
...
System Administrator
(Applications->System Administrator)
The System Administrator module provides:
SSO-based authentication to all CCC colleges through custom college-specific URLs configured to their college or district IdP
User management for all authorized CCC college staff and faculty users
Access management to all integrated CCCTC administrator applications and services through a single point-of-entry
User Manager
(Applications->System Administrator->User Manager)
The User Manager module allows authorized users to view, add, edit, and delete* users within the scope of their own authorized user permissions. The User Manager section provides the ability for users with authorized role(s) to create new users and permissions for your college or district.
...
Launching the CCCApply Administrator
(Applications->CCCApply Administrator)
If your credentials include permission to configure the CCCApply Standard application, CCCApply International application, and/or CC Promise Grant (BOG Application) for your college or district, you can access those via the CCCApply Administrator.
You’ll select CCCApply Administrator from the Applications drop-down menu on the CCC Administrator home page to launch the CCCApply Administrator application in a new browser tab or window with the following modules that you can manage:
Terms, majors Majors, and collegeCollege- and district-level informationDistrict Information
Custom supplemental questions Supplemental Questions for the CCCApply Standard and CCCApply International applications
Details of the English proficiencyProficiency section in the CCCApply International application
Automate rules Rules and messages Messages you configure for emails and error messages that display for application submissions
Reset downloads Downloads of previously downloaded student applications
Manage suspended fraudulent applications in the Spam Filter
...
Date Fields & Best Practices
We recommend you use using the Calendar widget when entering dates in date fields instead of free-form text entry. This will ensure correctly-entered date data format for your CCCApply applications.
...
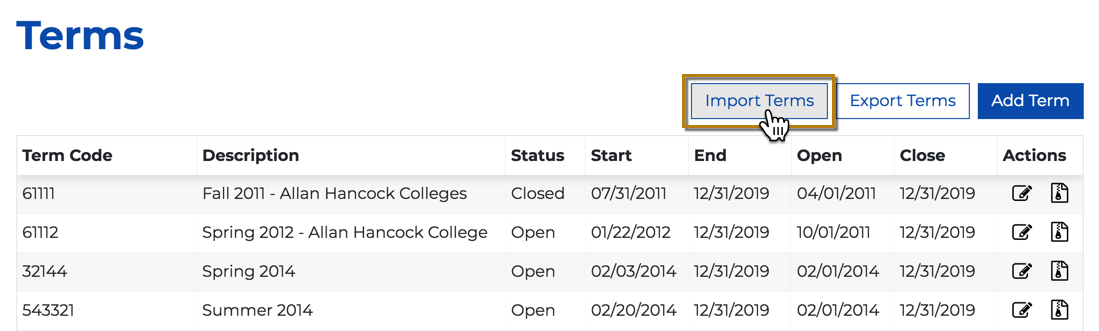
Terms Table: Fields & Usage
Field Label | Required? | Meaning/Usage | ||
|---|---|---|---|---|
Term Code | Yes | The 15-character code that identifies your college’s unique term.
|
| ||||
Term Start Date | Yes | The date on which the college-defined term starts (i.e., first day of classes). Used to determine the RDD (Residency Determination Date) in the CCCApply Standard Application, which by state law is one day before the term start date. The term Start Date must be formatted as: mm/dd/yyyy hh:mm a - in the Import CSV file. | ||
Term End Date | Yes | The date on which the college-defined term ends. The term End Date must be formatted as: mm/dd/yyyy hh:mm a - in the Import CSV file. | ||
Open Date | Yes | The date when the Term Description appears in the Term Applying For drop-down menu in on the Enrollment Information page in the CCCApply applications. This is the date a student can begin an application for this term. The current date and time must be between the Open Date and the Close Date (inclusive). The term Open Date must be formatted as: mm/dd/yyyy hh:mm a - in the Import CSV file. | ||
Close Date | Yes | The last date a student can begin or submit an application for this term. When the current date is past the Close Date value, the college-defined term no longer appears in the Term Applying For drop-down list on the Enrollment Information tab in the CCCApply application. This is the last date that the Term Description appears in the Term Applying For drop-down menu in the CCCApply applications. The term Close Date must be formatted as: mm/dd/yyyy hh:mm a - in the Import CSV file. | ||
Description | Yes | The Description is an alphanumeric value that identifies the Term being applied to and is what displays in the Term Applied For drop-down list on the Enrollment Information tab in the CCCApply application for active terms (those in which the current date is between their open and close date).
| ||
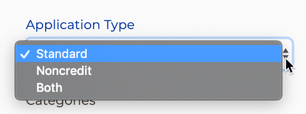
Application Type | Yes | The Application Type field |
allows colleges to configure different terms for the Noncredit Application, or for use in both the Standard and Noncredit applications at the same time. The three Application Type options are: Standard, Noncredit, or Both. |
If the Application Type value is unspecified, the system default value will be “Standard” and the term will not display in the Noncredit application. |
| Panel | |||||||
|---|---|---|---|---|---|---|---|
| NEW
| ||||||
The Application Type field allows colleges to configure different terms for the Noncredit Application, or for use in both the Standard and Noncredit applications at the same time. |
...
Have ready an edited .csv file of terms for importing. See Editing the Exported Terms CSV File for details.
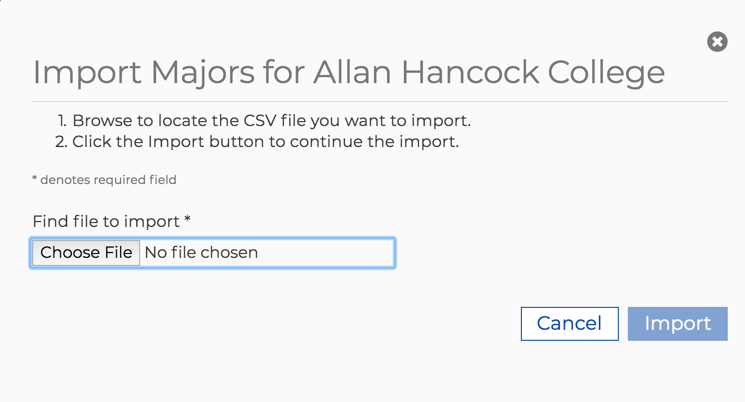
From the Terms Summary table, click Import Terms to display…
...the Import Terms dialog box: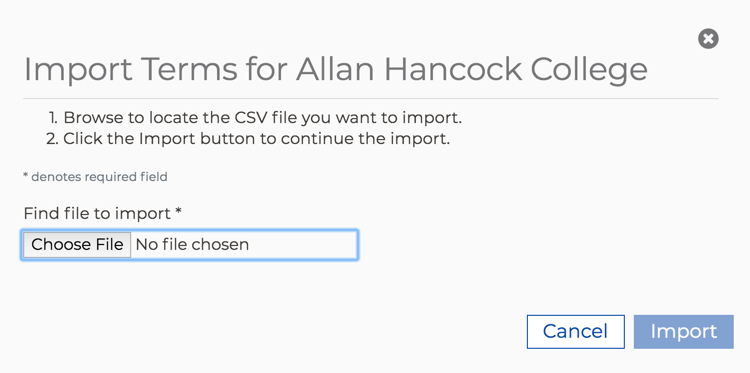
Click Choose File to display your computer’s file navigator.
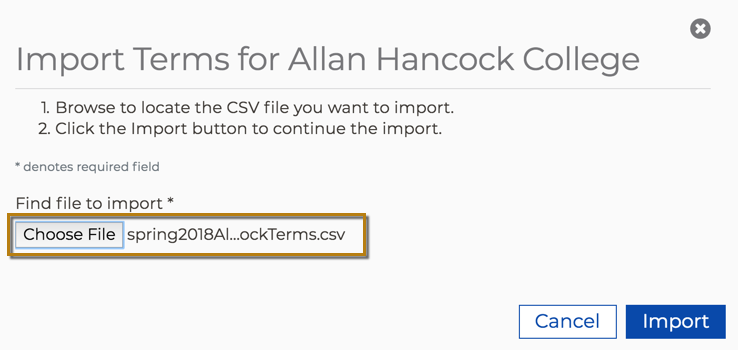
Navigate and select the terms .csv file you want to import. The file name for the file you selected displays next to the Choose File button.
Click Import to import the terms .csv file, close the Import Terms dialog box, and display the Terms Summary table where all rows are replaced/updated and the terms list refreshes to match your imported values.
...
...
| Panel | ||||||
|---|---|---|---|---|---|---|
| ||||||
Important: The Noncredit Application requires configuration of the Majors module. |
If your college is implementing the Noncredit Application for the very first time, you MUST identify which Majorsmajors/Programs of Study programs should appear in the Noncredit application (vs. the CCCApply Standard Application) or no majors will appear for the Noncredit Application. This applies to new and existing majors and programs. The most efficient way to ensure the appropriate majors are available in the Noncredit Application is to export your list of majors for the CCCApply Standard application in a CSV file, add/edit that file as needed for your Noncredit Application majors, set the appropriate Application Type setting for Standard, Noncredit, or Both, save the CSV file, and then re-import the file.
For more information, see the following sections in this document:
Exporting Majors
Editing the Majors CSV File
Importing Majors
Configuring Categories
Adding a Major
The majors you define for the CCCApply Standard, Noncredit, and International applications are not the same. Some amount of configuration is required for each application.
...
| Panel | ||||||
|---|---|---|---|---|---|---|
| ||||||
Majors are stored and managed in the Majors table in the CCCApply Administrator. All active majors will appear to end-users (students) in the appropriate CCCApply application as long as the current date is between the major’s configured Major Start Date and Major End Date. |
Majors Table
The table below provides details for populating each field and attribute in the Majors table. The row order below follows the single Add Major screen.
...
Name
...
Best Practice
...
Major Description
Enter your college’s description for a particular major, in 100 characters or less.
| Note |
|---|
The text you enter here displays in the Intended Major or Program of Study drop-down list that appears on the Enrollment Information tab of the CCCApply or International application(s). The majors display in alphabetical order regardless of the order you add or import your majors in the CCCApply Administrator. |
...
Major Code
Enter your unique college code for the major, up to 30 characters.
DO NOT EDIT AN EXISTING MAJOR CODE
| Warning |
|---|
The Major Code cannot be edited once it is added or imported to the major table and saved as a record. |
...
Major Start Date
...
Enter the date when this major will start being available for selection by an applicant in either the CCCApply or International application(s)’ Intended Major or Program of Study drop-down list.
...
Major End Date
...
Enter the date in which this major will no longer be available for selection by an applicant in either the CCCApply or International application(s)’ Intended Major or Program of Study drop-down list. For a major to appear in the application’s drop-down list, the current date must be between ‘major:date_start’ and ‘major: date_end’ (inclusive).
If you do not want to end-date your major, you must select the Major has no end date check box.
...
Major has no end date
check box
...
Select this check box if the major will have no end date. When this check box is selected, the Major End Date field becomes hidden.
...
TOP Code
OPTIONAL field.
If used, enter the major’s six-character Taxonomy of Programs (TOP) code from the CCCCO (Chancellor’s Office).
| Note |
|---|
The TOP Code is NOT a required field and is not delivered with submitted applications. |
...
Program Control #
OPTIONAL field.
If used, enter the CCCCO Program Control Number code for each major from the Chancellor’s office.
| Note |
|---|
The Program Control # is NOT a required field and is not delivered with submitted applications. |
...
Application Type
...
REQUIRED field. This value must be selected, else the major will default to the CCCApply Standard application.
Select the Application Type from the drop-down for which you are configuring majors.
...
Categories
OPTIONAL field.
Major categories may be added, edited or removed by the college to filter or group your list of majors. Major categories are defined by each college.
You may create multiple category values (pressing Enter after each entry) which can be associated with multiple majors. There is no limit to the number of categories you can add.
Each Categories value has a limit of 100 characters.
Click the “x” icon to remove a category from the Add Major screen.
When adding categories manually using the Add Major screen, you must hit ENTER after each correctly spelled category.
If used, the creation of one category will enable the Major Category Filter and display the Category drop down menu in the application.
If used, the applicant is required to select a category first, then select a major.
| Note |
|---|
When you configure the Categories field for a major, students will be required to select a Major Category in the application. |
| Warning |
|---|
Important: If you implement the Major Category Filter you must associate each major to at least one category. |
See Configuring Major Categories below for further details.
...
CIP Code
...
OPTIONAL field.
If you choose to populate the CIP Code field, enter the Classification of Instructional Programs (CIP) code.
...
Award Type
...
REQUIRED when implementing the Ed Goal / Majors Filter for Associate Degrees.
Select the Award Type option that best aligns to each major.
REQUIRED for importing the Majors CSV file.
The <awardType> column values must not contain any spaces and MUST be one of the following allowed values:
AA_T
AS_T
AA_degree
AS_degree
BA_degree
BS_degree
Certificate
Other
None
| Note |
|---|
If you do not have an award type aligned for a major, please enter “None". |
Not a deliverable field.
Editing a Major
Use the following steps to edit a major:
Select the Edit icon on the row for the major that you want to edit. This will display the Edit Major dialog box.
Make your edits and click Save to close the Edit Major dialog box and return focus to the Majors table.
Archiving a Major
Archiving majors in the CCCApply Administrator renders them inaccessible and should be thought of as the same as deleting them. Archive functionality will be extended to be fully functional in a future release.
Use the following steps to archive a major:
Select the Archive icon on the row for the major that you want to edit. This displays the Archive Major confirmation dialog box:
Click Confirm to archive the major. The Archive Major confirmation dialog box closes and focus returns to the Majors table where the archived major no longer displays.
| Note |
|---|
Note: The Archive feature for majors in the CCCApply Administrator behaves similarly to a delete function. Since majors no longer active cannot be deleted from the backend, archiving them will renders them inaccessible, no longer displayed to staff or end users, and is basically the same as deleting them. |
Exporting Majors
Use the following steps to export majors to a .csv file.
...
Click Confirm to immediately download an export of all of your majors to a .csv file on your computer’s default download location (i.e. the Downloads folder on a Mac).
Editing the Exported Majors CSV File
The export function produces a .csv file describing the majors, and the import function requires a .csv file in exactly the same format. Unless you have experience with text editors and CSV files, the best way to edit your .csv file may be with a spreadsheet application such as Microsoft Excel or OpenOffice Calc. However, these applications may have default date settings that may apply to dates you enter, so you may have to apply the correct date format (i.e. mm/dd/yyyy) to any new dates and/or times. Remember to save the file in CSV format when you are finished editing it.
Open the downloaded majors .csv file on your computer using the application of your choice (Excel or another spreadsheet program is recommended).
Edit the majors data as needed. It is assumed your intention is to add new majors and/or edit the majors displayed in order to import them for new values for your CCCApply application(s). Use the table below as a guide.
Once you are done adding new majors and/or editing the majors, save the file using your software’s Save As option.
Edit the file name to be unique and confirm that the file extension is .csv.
Your majors .csv file is now ready to be imported.
...
For Add/Edit Major Screen
...
For Major CSV Import File
...
Name
...
Required
...
Important Configuration Notes
...
CSV Column Heading
Note: case sensitive!
...
Required
...
Important Configuration Notes
...
Header Row
...
HEADER ROW
...
YES
...
IMPORTANT: The header row is required for your .csv file to import correctly and the values to be stored properly by the CCCApply Administrator.
The column heading labels MUST NOT BE CHANGED. If the heading changes case, the file will be rejected.
...
Application
...
application
...
YES
...
The Application column identifies the CCCApply application that the majors pertain to. The value must be in ALL CAPS and either be:
APPLY (for CCCApply application majors), OR,
INTERNATIONAL (for International application majors)
The Application data is system-generated and should not be changed.
When adding new Majors to your file, ensure the application is correct and in all caps.
Do not mix APPLY and INTERNATIONAL application majors in one .csv file at this time.
Do not remove or change this column.
| Note |
|---|
The Application column value must be in ALL CAPS. |
...
Major Code
...
YES
Enter your unique college code for the major, up to 30 characters.
DO NOT EDIT AN EXISTING MAJOR CODE
| Warning |
|---|
The Major Code cannot be edited once it is added or imported to the major table and saved as a record. |
...
code
...
YES
...
Adds a row to the Majors database table identifying a unique Major
...
Must be formatted based on layout in the Data Dictionary
...
Major Description
...
YES
Enter your college’s description for a particular major, in 100 characters or less.
| Note |
|---|
The text you enter here displays in the Intended Major or Program of Study drop-down list that appears on the Enrollment Information tab of the CCCApply or International application(s). The majors display in alphabetical order regardless of the order you add or import your majors in the CCCApply Administrator. |
...
description
...
YES
...
The “description” column field is required.
Provides a text description of the active major to the end-user.
Can be edited/modified by an authorized college/district user.
Must be formatted based on layout in the Data Dictionary
*This is the text that appears to the student in the "Intended Major or Program of Study" question dropdown in the appropriate CCCApply application.
...
Major Category
OPTIONAL field.
Major categories may be added, edited or removed by the college to filter or group your list of majors. Major categories are defined by each college.
You may create multiple category values (pressing Enter after each entry) which can be associated with multiple majors. There is no limit to the number of categories you can add.
Each Categories value has a limit of 100 characters.
Click the “x” icon to remove a category from the Add Major screen.
When adding categories manually via the Add Major screen, you must hit ENTER after each correctly spelled category.
If used, the creation of one category will enable the Major Category Filter and display the Category drop down menu in the application.
If used, the applicant is required to select a category first, then select a major.
| Note |
|---|
When you configure the Categories field for a major, students will be required to select a Major Category in the application. |
| Warning |
|---|
Important: If you implement the Major Category Filter you must associate each major to at least one category. |
...
category
...
NO
...
The “category” column is optional. See notes about adding your custom categories to this column in the section below.
See Configuring Major Categories below for further details.
...
Editing a Major
Use the following steps to edit a major:
Select the Edit icon on the row for the major that you want to edit. This will display the Edit Major dialog box.
Make your edits and click Save to close the Edit Major dialog box and return focus to the Majors table.
Archiving a Major
Archiving majors in the CCCApply Administrator renders them inaccessible and should be thought of as the same as deleting them. Archive functionality will be extended to be fully functional in a future release.
Use the following steps to archive a major:
Select the Archive icon on the row for the major that you want to edit. This displays the Archive Major confirmation dialog box:
Click Confirm to archive the major. The Archive Major confirmation dialog box closes and focus returns to the Majors table where the archived major no longer displays.
| Note |
|---|
Note: The Archive feature for majors in the CCCApply Administrator behaves similarly to a delete function. Since majors no longer active cannot be deleted from the backend, archiving them will renders them inaccessible, no longer displayed to staff or end users, and is basically the same as deleting them. |
Exporting Majors
Use the following steps to export your majors to a .csv file.
Click the Export Majors button to display the Export Majors confirmation dialog box.

Click Confirm to immediately export (download) your Majors CSV file to a secure default location (i.e., the Downloads folder on a Mac).
Editing & Formatting the Majors CSV File
The Export Majors function downloads your majors list to a .csv file. The Import Majors function requires this .csv file in the exact same format. Please be aware that editing and formatting this file correctly is critical for a successful import of your majors and categories. Be sure to save the file in CSV format when you have finished editing it.
| Panel | ||||||
|---|---|---|---|---|---|---|
| ||||||
Unless you have experience with text editors and CSV files, the best way to edit your Majors CSV file may be with a spreadsheet application such as Microsoft Excel or OpenOffice Calc. Please be aware that these applications may have default settings that may apply to formatting and dates entered, and take precaution to apply the correct date format (mm/dd/yyyy) to any new dates and/or times. |
Editing Steps
Open the downloaded Majors .csv file on your computer using the application of your choice (Excel or another spreadsheet program is recommended).
Edit the majors data as needed. Use the table below as a guide for configuring each data column.
Once you are done editing your majors or adding new majors, save the file using your software’s Save As option.
Edit the file name to be unique and confirm that the file extension is .csv.
Your Majors .csv file is now ready to be imported.
Ensure that you adhere to the following rules when you edit and populate your Majors CSV file.
Reminder: Majors for the International Application requires a separate Majors CSV file. The same file format and rules apply for the International Application (differences are specified where applicable).
Guide for using the Add/Edit Major Screen (single major) | Guide for Configuring the Majors CSV File | |||||||||||||||||||||||||||||||||||||
|---|---|---|---|---|---|---|---|---|---|---|---|---|---|---|---|---|---|---|---|---|---|---|---|---|---|---|---|---|---|---|---|---|---|---|---|---|---|---|
Name | Required? | Field Configuration Notes | CSV Column Heading | Required? | Important CSV File Configuration Notes | |||||||||||||||||||||||||||||||||
Header Row | Yes. | The header row pertains to the Majors CSV file only. Required for the CSV file | Header Row | YES | IMPORTANT: The file header row containing the column headings is required for your .csv file to import successfully and for the values to be stored correctly in the admin system.
| |||||||||||||||||||||||||||||||||
Application | Yes | System-generated based on which CCCApply application you are exporting from in the Administrator. For the CCCApply Standard & Noncredit applications, export your majors file from the CCCApply application in the Administrator. For the CCCApply International application, export and import your majors CSV file from the International application in the Administrator. | application | YES |
| |||||||||||||||||||||||||||||||||
Major Code | Yes | Enter your unique college code for each major, up to 30 characters. DO NOT EDIT AN EXISTING MAJOR CODE A <major_code> can be archived (only) manually by clicking on the Archive icon on the Majors Summary table.
| code | YES |
| |||||||||||||||||||||||||||||||||
Major Description | Yes | Enter the name or description for a particular major in 100 characters or less. The major description is the name or title of the major which displays alphabetically to the end-user in the application.
| description | YES |
| |||||||||||||||||||||||||||||||||
Major Category | No | OPTIONAL field.
| category | NO |
If your college has opted to implement Major Categories, then…
| |||||||||||||||||||||||||||||||||
TOP Code | No |
| topCode | NO |
| topCode | NO |
| ||||||||||||||||||||||||||||||
Program Control Number | No | OPTIONAL field. If used, enter the CCCCO Program Control Number code for each major from the Chancellor’s office. Note | | programControlNumber | NO |
| programControlNumber | NO |
| Award Type | REQUIRED for implementing
| awardType | YES* |
| ||||||||||||||||||||||||
Award Type | Yes | REQUIRED if implementing the Ed Goal / Major TransferMajors Filter for Associate Degrees. The <awardType> column values must not contain any spaces and MUST be one of the following allowed values:
Note | On the Add/Edit Major screen:
| Application Type | applicationType | YES |
| CIP Code | OPTIONAL field. If you choose to populate the CIP Code field, enter the Classification of Instructional Programs (CIP) code. | cipCode | NO |
| EduGoals | eduGoals | NO | Leave this column in place and LEAVE IT EMPTY. Do not enter ANY data or values in the EduGoals column. If any values accidentally get entered into the column, your students may not be able to select a Major in CCCApply.
| Major Start Date | Enter the date when this major will start being available for selection by an applicant in either the CCCApply or International application(s)’ Intended Major or Program of Study drop-down list. | start | YES |
| Major End Date | Enter the date in which this major will no longer be available for selection by an applicant in either the CCCApply or International application(s)’ Intended Major or Program of Study drop-down list. For a major to appear in the application’s drop-down list, the current date must be between ‘major:date_start’ and ‘major: date_end’ (inclusive). If you do not want to end-date your major, you must select the Major has no end date check box. | end | YES |
| Major has no end date | Select this check box if the major will have no end date. When this check box is selected, the Major End Date field becomes hidden. | Created Date | created | NO |
| ||||||
Field / Attribute
CSV Column Heading
Note: case sensitive!
Required
Important Configuration Notes
Header Row
YES
IMPORTANT: The header row is required for your .csv file to import correctly and the values to be stored properly by the CCCApply Administrator.
The column heading labels MUST NOT BE CHANGED. If the heading changes case, the file will be rejected.
Application
application
YES
The Application column identifies the CCCApply application that the majors pertain to. The value must be in ALL CAPS and either be:
APPLY (for CCCApply application majors), OR,
INTERNATIONAL (for International application majors)
The Application data is system-generated and should not be changed.
When adding new Majors to your file, ensure the application is correct and in all caps.
Do not mix APPLY and INTERNATIONAL application majors in one .csv file at this time.
Do not remove or change this column.
| Note |
|---|
The Application column value must be in ALL CAPS. |
Major Code
code
YES
Adds a row to the Majors database table identifying a unique Major
Must be formatted based on layout in the Data Dictionary
Major Description
description
YES
The “description” column field is required.
Provides a text description of the active major to the end-user.
Can be edited/modified by an authorized college/district user.
Must be formatted based on layout in the Data Dictionary
*This is the text that appears to the student in the "Intended Major or Program of Study" question dropdown in the appropriate CCCApply application.
Category
category
NO
The “category” column is optional. See notes about adding your custom categories to this column in the section below.
TOP Code
topCode
NO
The “Top Code” is an Optional field, but can be added by the college if desired.
Top Codes should be aligned to each individual Major
Does not appear to the end user
Program Control Number
programControlNumber
NO
The “Program Control Number” is an optional field, but can be added by the college if desired.
Program Control Numbers should be aligned to each individual major
Does not appear to the end user
Award Type
awardType
YES*
The Award Type field must be populated in the system. If you are adding or editing an individual major using the Add/Edit Major screen, you can bypass selecting a value in the dropdown menu; however, if you do this a value of “None” will be system-generated and stored as the Award Type for that major.
The Award Type field/column is:
REQUIRED when implementing the Ed Goal/Major Transfer Filter (new spring 2024).
REQUIRED when importing majors using the CSV file.
The <awardType> column values must not contain any spaces and MUST be one of the following allowed values:
AA_T
AS_T
AA_degree
AS_degree
BA_degree
BS_degree
Certificate
Other
None
| Note |
|---|
If you do not have an award type aligned for a major, please enter “None". |
Application Type
applicationType
YES
Required.
Setting the Application Type is
Enter "Standard" in your CSV file for the Standard application.
Enter "Noncredit" in your CSV file for the Noncredit application.
INTERNATIONAL APP: You can leave this value/column blank in the International Application ONLY.
REMINDER: You cannot combine the CCCStandard or Noncredit major codes in the same CSV with the International application major codes.
CIP Code
cipCode
NO
Optional field. May be added by the college, if desired.
Does not appear to the end user
Education Goals
NOT USED for the Ed Goal/Majors Filter
eduGoals
NO
Leave this column in place and LEAVE IT EMPTY.
Do not enter ANY data or values in the EduGoals column. If any values accidentally get entered into the column, your students may not be able to select a Major in CCCApply.
| Warning |
|---|
VERY IMPORTANT: Update April 2024: The “EduGoal” field/column is not applicable to the Education Goal/Majors Filter in this release! The "eduGoal" column MUST NOT BE REMOVED and the entire column MUST BE LEFT BLANK in your Majors CSV file. |
Start Date
start
YES
The “start” date is required.
The start date data in this column identifies the date when the Major should begin to display to students in the "Intended Major or Program of Study" menu in CCCApply applications.
The Start Date must be configured in the following format: MM/DD/YYYY
Cannot be after the major’s End Date or the associated term's Term End date, else error message will display;
Must be a valid calendar date (cannot be February 30, etc.)
| Note |
|---|
When importing majors using the CSV file, the date must be formatted as MM/DD/YYYY. This is important or the file will not import correctly.) |
End Date
end
YES
The “end” column identifies the major’s End Date which is the date the major stops displaying in the "Intended Major or Program of Study" menu in CCCApply applications;
The End Date is required, else error message.
The major must be setup with one of the following settings:
Major has no end date (in the CSV file, leave this column blank)
Major has an end date
The End Date must be configured in the following format: mm/dd/yyyy
The End Date can be configured manually by clicking on "Add Major" or "Edit Major" by an authorized user
Must be a valid calendar date, i.e., cannot be February 30, etc. (else error message appears)
Cannot be before the Major Start Date, else error message else error message will display
Can be added by the Import Majors process via a properly formatted .csv file with all required Majors data fields
If user selects "Major has no end date" THEN the Major will ALWAYS display in the "Intended Major or Program of Study" menu in CCCApply
If user selects, "Major has end date" - THEN a valid end date must be provided in the CSV file , else error message should display
Create Date
created
NO
| Warning |
|---|
VERY IMPORTANT: The “Create” column is a system-generated field that MUST REMAIN BLANK when completing your CSV import file. |
| Warning |
|---|
VERY IMPORTANT: The “EduGoal” and the "Created" columns are not currently used, but MUST remain in your majors CSV file and should be BLANK to import properly. |

Importing Majors
You use a .csv file to import majors into the CCCApply Administrator. The easiest way to do this is usually to export the current majors and then /wiki/spaces/PD/pages/758546724 since a header row and some configuration details are required.
The table below details the add and update functionality for majors imports (no deleting or archiving of any majors occurs upon import).
...
If you import a majors CSV file and...
...
...then
...
no existing major(s) values were changed but new majors are added to the .csv file
...
the new majors are added to the Administrator Majors summary table and will appear in the designated CCCApply application.
...
existing major(s) values were changed
...
the changed majors are updated in the Administrator Majors table and will appear changed in the CCCApply application.
...
existing major(s) values were changed AND new major(s) were added
...
the new major(s) are added and the changed majors are updated in the CCCApply Administrator Majors table and will appear in the CCCApply/Noncredit or International application(s)
...
Using the exact format, edit and prepare your Majors CSV file for import.
...
Select either CCCApply or International from the Applications drop-down list.
...
...
Click Choose File to display your computer’s file navigator.
...
Navigate and select the majors .csv file you want to import. Ensure that, if you selected CCCApply or International in step 2 above, you select the correct application majors .csv file. After selecting your .csv file, the file name displays next to the Choose File button.
...
Click Import to import the majors .csv file. The Import Majors dialog box closes automatically, and the Majors table displays with all rows updated and and refreshed to display your edited and new major values.
How Your Majors & Programs Display in the CCCApply Applications
The new default sort order for all majors and programs of study that appear in the Intended Major or Program of Study dropdown menu in the CCCApply Standard, Noncredit, and International applications is alphabetical order of the Major Description field. Colleges can edit the Major Description of each major in the Majors module in the Administrator.
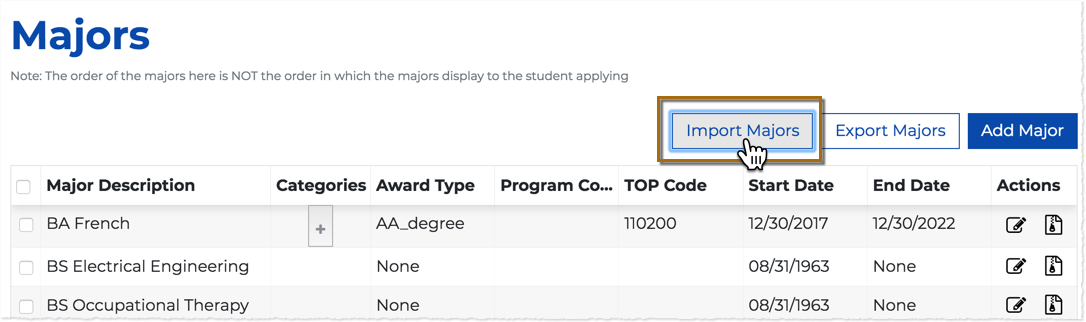
If you have implemented categories in your majors list, each major that has been assigned a category will show a “+” icon in the Categories column of the Majors table. When you click the “+” icon, the associated category name(s) displays below the Major Description name in the order they were created. The “+” icon toggles to display category, while the “-” icon toggles to hide the category.
...
| awardType | YES* |
| ||||||||
Application Type | Yes |
| applicationType | YES |
| ||||||
CIP Code | No | OPTIONAL field. If you choose to populate the CIP Code field, enter the Classification of Instructional Programs (CIP) code. | cipCode | NO |
| ||||||
EduGoals | No | NOT APPLICABLE. Currently not used in the Ed Goal/Majors Filter.
| eduGoals | NO | Leave this column in place and LEAVE IT EMPTY. Do not enter ANY data or values in the EduGoals column. If any values accidentally get entered into the column, your students may not be able to select a Major in CCCApply.
| ||||||
Major Start Date | Yes | Enter the date when this major will start being available for selection by an applicant in either the CCCApply or International application(s)’ Intended Major or Program of Study drop-down list. | start | YES |
| ||||||
Major End Date | Yes* | Every major must either have an end date or the Major has no end date checkbox must be checked. Enter the date in which this major will no longer be available for selection by an applicant in either the CCCApply or International application(s)’ Intended Major or Program of Study drop-down list. For a major to appear in the application’s drop-down list, the current date must be between ‘major:date_start’ and ‘major: date_end’ (inclusive). If you do not want to end-date your major, you must select the Major has no end date check box. If user selects "Major has no end date" THEN the Major will ALWAYS display in the "Intended Major or Program of Study" menu in CCCApply | end | YES* |
| ||||||
Major has no end date | No | Select this check box if the major will have no end date. When this check box is selected, the Major End Date field becomes hidden. | No | (If your major has no end date - leave the “end” column BLANK in the CSV file.) | |||||||
Created Date | Yes |
| created | YES |
|
| Warning |
|---|
REMINDER: The “EduGoal” column and the "Created" column (if applicable) are not currently used but MUST remain in your majors CSV file and should be BLANK to import properly. |
...
Back to Configuring Majors
Back to Top of Page
Importing Majors
Use your properly configured .csv file to import your majors list into the CCCApply Administrator. As detailed in the sections above, the safest, most efficient way to do this is to export the current majors and then edit the file since a header row and some configuration details are required.
The table below details the add and update functionality for majors imports (no deleting or archiving of any majors occurs upon import).
If you import a majors CSV file and... | ...then |
|---|---|
no existing major(s) values were changed but new majors are added to the .csv file | the new majors are added to the Administrator Majors summary table and will appear in the designated CCCApply application. |
existing major(s) values were changed | the changed majors are updated in the Administrator Majors table and will appear changed in the CCCApply application. |
existing major(s) values were changed AND new major(s) were added | the new major(s) are added and the changed majors are updated in the CCCApply Administrator Majors table and will appear in the CCCApply/Noncredit or International application(s) |
Use the following steps to import majors.
Using the same exact format in the export file, edit and prepare your Majors CSV file for import.
If you navigated away from the Majors module in the Administrator (where you exported your majors list), select the appropriate CCCApply application from the Applications drop-down list.
From the Majors module, click the Import Majors button to display the Import Majors dialog box.
Click Choose File to display your computer’s file navigator.
Navigate and select the majors .csv file you want to import. Ensure that, if you selected CCCApply or International in step 2 above, you select the correct application majors .csv file. After selecting your .csv file, the file name displays next to the Choose File button.
Click Import to import the majors .csv file. The Import Majors dialog box closes automatically, and the Majors table displays with all rows updated and and refreshed to display your edited and new major values.
How Your Majors & Categories Display in the CCCApply Applications
The default sort order for all majors and programs of study that appear in the Intended Major or Program of Study dropdown is alphabetical order by the Major Description field. Colleges can edit the Major Description of each major in the Majors module in the CCCApply Administrator. Majors must be configured (individually or via Majors CSV file) for the CCCApply Standard and the CCCApply International applications, separately. Majors and programs must also be configured separately for the Noncredit application by using the Application Type <applicationType> setting in the CCCApply (Standard) Majors module.
What is the display sort order for Majors when… | …In the Standard & Noncredit Applications | …In the International Application |
|---|---|---|
NO Major Category and NO Ed Goal/Majors filters are enabled… | The default sort order for all majors/programs is alphabetical by Major Description <description>, displayed in one big list in the application (Intended Major or Program of Study drop down). | The default sort order for all majors and programs of study is alphabetically by the Major Description field. |
WITH Major Categories implemented ONLY | If Major Categories are implemented: (Reminder: Major categories are not available in the Noncredit Application) then…
| Categories display alphabetically within the Category drop down menu which appears on the application above the Intended Major or Program of Study menu. Associated majors display alphabetically by major description for each category. |
WITH the Ed Goal/Majors filter enabled ONLY | If the Ed Goal/Majors filter is enabled and the student selects the Education Goal option to “Obtain an associate degree and transfer to a 4-year institution” THEN:
| The Ed Goal/Majors Filter feature is not available in the International Application. |
WITH BOTH Major Categories implemented AND the Ed Goal/Majors filter enabled | If Major Categories are implemented and the Ed Goal/Majors filter is enabled and the student selects the Ed Goal option to “Obtain an associate degree and transfer to a 4-year institution”, THEN:
| The Ed Goal/Majors Filter feature is not available in the International Application. |
| Info |
|---|
Displaying Majors in the Noncredit Application: Ensure that majors appropriate for the Noncredit Application are carefully configured with the appropriate “applicationType” and “awardType” settings. |
Back to Configuring Majors
Back to Top of Page
Enabling the Education Goal/Majors Filter
The Education Goal / Majors Filter for Associate Degrees is an optional filter that when enabled allows colleges to streamline their list of available majors and categories if/when applicants select the Education Goal option to “Obtain an Associate degree and transfer to a 4-year institution”. This feature is designed to support legislation: AB-928: Student Transfer Achievement Reform Act of 2021.
How it Works
This feature is based on a simple design:
IF the filter is enabled, AND IF the end-user selects the Education Goal option to “Obtain an Associate degree and transfer to a 4-year institution” option (only)
Then…
majors with any one of the following award types: AA_degree, AA_T, AS_degree, AS_T - will display listed in alphabetical order by the Major Description <description>)
And…
if Major Categories are implemented, only the categories that include at least one of the majors with one of the four award types* will be included in the Major Category drop down and will be listed alphabetically by Major Category <category>
IF the feature is not enabled, then…
No change to existing functionality; no change to the existing display of majors, categories or education goals.
Enable/Disable the Filter
The Education Goal/Majors Filter is disabled by default.
To enable the filter:
On the Majors summary page, place a checkmark in the Enable Transfer Major filter toggle on the left side of the page.
To disable the filter, uncheck the Enable Transfer Major Filter checkbox.
...
| Note |
|---|
Note: Some colleges may notice a lag time between enabling/disabling the filter checkbox and having the change persist in the UI. |
Configuring Majors for the Ed Goal/Majors Filter
Navigate to your college’s instance of the Pilot CCCApply Administrator. Sign In and navigate to the Majors module summary page.
Click the Export Majors button to export (download) your current list of majors to a location of your choice. The file will export as a .csv file.
Open your exported Majors CSV file and edit your list following the specific guidelines presented in the Editing & Formatting the Majors CSV Filesection of this user guide, including, these notable mentions:
Ensure every major has a major description that is clear and appropriate when filtered (optional).
If the Major Category filter is implemented:
Ensure each major is associated with one or more categories (if applicable). Unassociated majors will appear in the “All Majors” category.
Ensure every Major has the appropriate award type value set.
Ensure all Associate Degree- and Associate Degree for Transfer- majors have the correct award type value assigned.
(Reminder: The Ed Goal/Majors Filter only displays majors that have any one of the following award types when the the filter is enabled: AA_degree, AA_T, AS_degree, AS_T)
Consider adding Program Control Numbers for each Major in the Majors CSV file.
Important: Ensure the <start> and <end> date columns are reformatted before importing your CSV file. Dates do not export in the correct format required by the import process.
Important: Ensure the header row in the CSV file is NOT CHANGED and all column headings are formatted correctly (lower case, camel case).
Save changes to your Majors CSV file.
Import your edited Majors CSV file by clicking the Import Majors button. If formatted properly, the system will return a Success message.
Enable the filter by placing a checkmark in the Enable Transfer Major Filter box on the Majors summary page (above the table on the left side).
Sign out of the CCCApply Administrator and the CCC Administrator systems to activate the filter and prepare to test.
Test the filter functionality.
Navigate to your college’s CCCApply application in the Pilot environment and sign in through OpenCCC.
From the My Applications page, click Start a New Application.
On the Enrollment page:
Select a Term
Select from the Education Goal drop down: “Obtain an Associate degree and transfer to a 4-year institution”. This is the option that will filter the Majors and major categories when the Ed Goal/Majors filter is enabled.
If major categories are implemented:
Confirm that your categories are in alphabetical order
Test 1: Select a category other than the “All Majors” category then open the Intended Major or Program of Study drop down to confirm that only the majors that have one of the specified award types* are listed, alphabetically. Repeat with the next category, if needed.
Test 2: Select the “All Majors” category then open the Intended Major or Program of Study drop down to confirm that only the majors that have one of the specified award types* are listed, alphabetically.
If NO major categories are implemented:
Click on the Intended Major or Program of Study menu and confirm that only the majors that have one of the specified award types* are listed, alphabetically.
Open the file See the majors for transfer available in that category.
Repeat steps 1-6 in the Production environment Administrator.
Back to Configuring Majors
Back to Top of Page
...
Configuring Major Categories
...
| Note |
|---|
Display of Major Categories: When adding a new category to a new or existing major, you must hit "Enter" after entering the category name in the Categories text input field. Categories will display in the Summary table in the Summary table in the order they were created. However, in CCCApply application user interface, categories display in alphabetical order. |
If you have implemented categories in your majors list, each major that has been assigned a category will show a “+” icon in the Categories column of the Majors table. When you click the “+” icon, the associated category name(s) displays below the Major Description name in the order they were created.
...
The “+” icon toggles to display category, while the “-” icon toggles to hide the category.
...
Implementing the Major Category Filter
...
The Major Category filter in CCCApply and/or International can be turned off by removing all custom categories created in the CCCApply Administrator’s Major module Categories field for every major. Once all Categories values for all majors are removed the Major Category drop-down list will not display in the CCCApply and/or International application. The Intended Major or Program of Study drop-down list will revert back to displaying the full list of majors and programs in alphabetical order (by Major Description).
Back to Configuring Majors
Back to Top of Page
...
Configuring the English Proficiency Section
...
Step 1: Specify the conditions that should cause the rule to perform an action | Step 2: Specify the action to be performed | ||
|---|---|---|---|
Examples: if(military_status == "2") if(ssn == null) | Examples: For email (students): {
For error messages: { | ||
Use the Application Data Fields, a scrollable list of field names from the student application, to build the “if” part your rule. When you click on one of these fields, it appears in the Rule field at the cursor. You can also simply type the name of the field you wish to check. The field names are only used in the "if" part of your rule. | For email (students): The structure of the action statement is: {
{ | ||
Use the Messages drop-down list, which includes a list of message IDs you have defined in the Messages module, when forming a "mail" or "staffMail" rule, as it indicates the name of the message that should be sent. Note: The Messages drop-down list is only used for email rules, not for error rules. |
...
Enter (or copy/paste) the following rule text in the Rule field:
if(military_status == "2")
{
mail("Welcome Military", "admissions@yourCollege.edu", "Welcome to College!")
}Note that the keyword “mail” is followed by a parenthetical, comma-separated statement consisting of the Message ID in quotes, the “from” email value (for your college), and the email subject text.
...
Changing the "military_status" field to a value of "2" causes the preview to change, presenting the details of the action that will be taken.
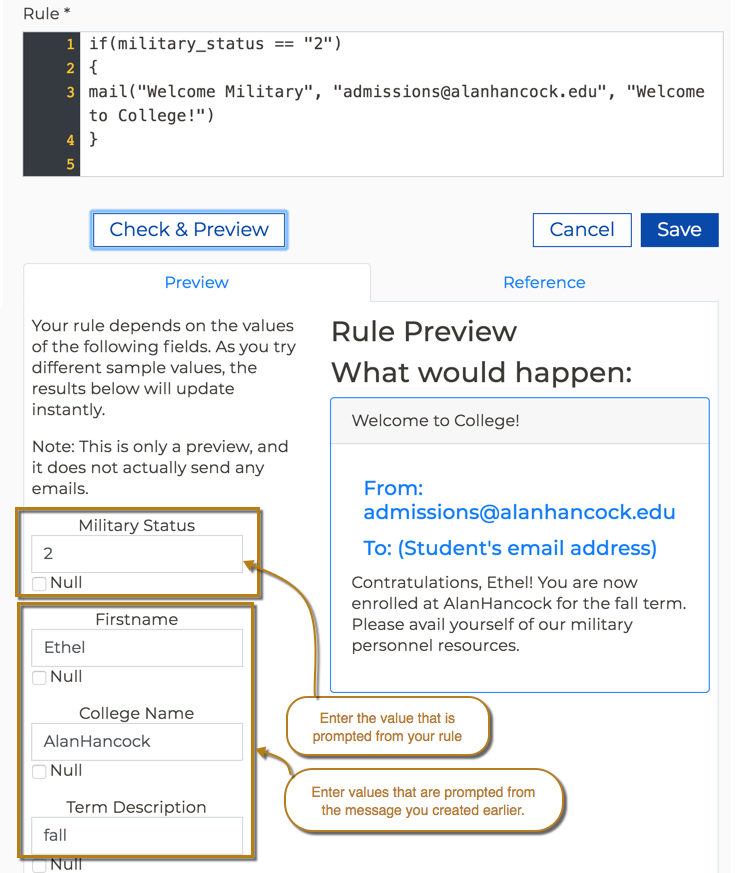
Once you’re satisfied with your rule’s preview, click Save to save the rule, close the Add Rule dialog box, and display your saved rule in the Rules table.
After a caching delay of 30 minutes you can then submit a test application in your Pilot environment that meets the requirements for triggering the email in order to test it and see the result.
For a student who indicates active military status in their CCCApply application, this rule will send him/her an email with the subject line of "Welcome to College!" and a "from" address of "admissions@alanhancockadmissions@alanhancock.edu". The body of the email will be the content of the "Welcome Military" message.
...
| Note |
|---|
Note: You do not need to create messages for rules that report an error to the useran ERROR rule. Messages for error rules are entered directly in the rule definition itself. See the Rules module for more information. |
Creating a New Message
Use the following steps to create a message in the Messages module.
...
Supplemental questions are written in XML and validated with XSD. See the Working with Supplemental Questions guide for details on configuring the contents of the questions file and how they relate to your student application.
...
Select the Download icon on the row the supplemental question set you want to download (only one page can be downloaded at a time).
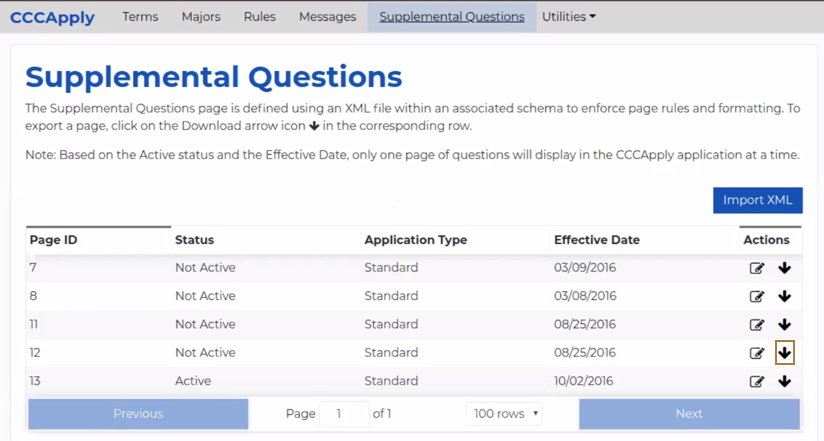
The Export Supplemental Question dialog box displays.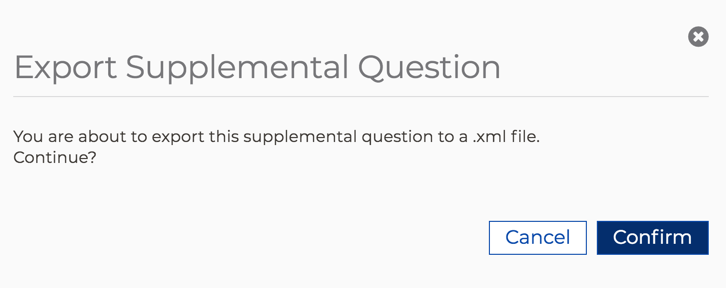
Click Confirm to export/download the XML supplemental question file to your computer’s default download location. The default name of the downloaded file incorporates the page ID and effective date, i.e. the supplemental question set with an ID of 502 and effective date of 5/9/18 has a file name of: supp-611-502-20180509.xml.
Use a text editor or XML editor to edit the file as needed. You can then validate the file and import it and have a new, updated supplemental question set.
...
Using the Application Utilities
The Utilities module contains:
...
...
Change Notifications
Date | Change Description |
|---|
Notification
...
Author | ||
|---|---|---|
April 2024 | Updated the following sections for the Ed Goal/Majors Filter for Associate Degrees: Added the following section: | P. Donohue |