Last Update: November 17, 2021
...
Supplemental questions are written in XML and validated with XSD. You can create one or more sets of supplemental questions to be added to either your college's CCCApply Standard Application and/or the Noncredit Application. Only one supplemental question set can be active/display at a time. The Configuring Application Supplemental Questions section of the CCCApply Administrator User Guide provides details on importing, updating, and downloading your Supplemental Question XML files.
...
Note: The Noncredit application is a workflow and subset of the CCCApply Standard applications questions that skips the residency check and military status for students who are only taking noncredit courses. See the Noncredit Application section of the CCCApply Standard & Noncredit Application Data Dictionary for more details.
...
Most of the contents of your XML file will depend on the questions you want to ask and the responses you expect to receive. For details on creating questions and guiding the student through the application process see Supplemental Questions: Layout And User Experience and Supplemental Questions: Response Elements.
Setting up Your XML File
...
3. Set CollegeName to the name of your college.
You will define your questions by inserting XML code in the blank space in the above example.
For example:
<?xml version ="1.0" encoding="UTF-8"?>
<SupplementalQuestions xmlns:xsi="http://xmlns.cccnext.org/apply"
CollegeId="611" CollegeName="Allan Hancock College" ApplicationTypeApplicationType="Noncredit">
<Header>Tell us more about yourself!</Header> <Section>
<Section>
...
<YesNo id="1">
<Label>While attending classes, do you intend to work more than 40 hours per week?</Label>
</YesNo>
</Section>
</SupplementalQuestions>
| Note |
|---|
Important: The example above is a complete and legal definition of a supplemental questions page. However, you will need to:
|
| Note |
|---|
Important: It is very important that your uploaded XML file be error-free. If there are errors in your supplemental questions XML file, you will likely see an error message in the Administrator when you attempt to upload it. |
...
Multiple <HoverHelp> children are allowed, one for each language your student application supports. The optional <Translations> element allows you to specify English or Spanish language (internationalize) for your questions. You must include at least two <Locale> elements, one with a <lang> attribute of "es" and one without, as well as a message block.
Sample XML: Adding the following XML code below to your starter XML from the previous section will create:
A page header
Two sections of check boxescheckbox questions, each section with its own header
Two check boxes checkboxes indented to the right from those above and below
One check box with hover help in both English and Spanish
<Header>Tell us more about yourself!</Header>
<Section>
...
<Header>Are you interested in any of the following extracurricular activities? Check all that apply.</Header>
<Checkbox <Checkbox id="1"><Label>Chess club</Label></Checkbox>
<Checkbox <Checkbox id="2"><Label>Athletic sports</Label></Checkbox>
...
<Indent>
...
<Checkbox id="3"
...
><Label>As a participant</
...
Label></Checkbox>
...
<Checkbox id="4"
...
><Label>As an observer</Label>
...
<HoverHelp lang="en">Check this box if you enjoy watching sporting events</HoverHelp>
...
<HoverHelp lang="es">Marque si te gusta ver los eventos deportivos</HoverHelp>
...
</Checkbox>
<</Indent> <Checkbox
<Checkbox id="5"><Label>Online gaming</Label></Checkbox>
...
<Checkbox id="6"><Label>Martial arts</Label></Checkbox>
</Section>
<Section>
<Header>Check all that apply to your employment status:</Header>
<Checkbox id="7"><Label>Overworked</Label></Checkbox>
<Checkbox id="8"><Label>Underpaid</Label></Checkbox>
</Section>
...
The application will use the <HoverHelp> tag that applies to the currently-selected language. Only English (lang"=e"n”en”) and Spanish (lang"=e"s”es”, for Español) are supported. The hover help appear appears when the applicant hovers the mouse over the check boxcheckbox.
This hover help from the example above will appear when the page is in English mode: <HoverHelp lang="en">Check this box if you enjoy watching sporting events</HoverHelp>
This hover help from the example above will appear when the page is in Spanish mode: <HoverHelp lang="es">Marque si te gusta ver los eventos deportivos</HoverHelp>
| Warning |
|---|
Warning: You must specify a language (using the lang attribute as in the examples above) for your hover help , or your Supplemental Questions tab will fail , and the applicant will see an error message rather than your supplemental questions. |
...
Internationalization: The Optional <Translations> Element
| Note |
|---|
If your college does not |
...
choose to internationalize the optional supplemental questions you’ve configured, no action is needed. |
If your college has already provided both an English and a Spanish version of supplemental questions manually in the XML, you can continue to leave your XML code as is and both language versions of the question(s) will continue to display.
However, if you implement the internationalization approach below, the supplemental questions will conditionally display in either English or Spanish, based on the end-user's browser language setting.
To internationalize the your custom supplemental questions:
Add the optional <Translations> element.
Within the <Translations> element, add at least two <Locale> elements, one without any "lang" attribute and one with a lang attribute of "es".
Add <Message> element blocks for each code into both of the <Locale> elements.
Each <Message> element must have a <code> and <message> attribute with values.
The <code> attribute value must match the question's <Label> value.
For example, for the two <Label> elements and three <label> attributes below:
<Header>main.header</Header>
<Section>
<Header>section.1.header</Header>
<Text maxLength="50" default="" id="1">
<Label>question.name</Label>
<HoverHelp lang="en">Enter your full name</HoverHelp>
<HoverHelp lang="es">Ingrese su nombre completo</HoverHelp>
</Text>
<Menu id="1">
<Label>question.color</Label>
<MenuItem value="1" label="question.color.1"/>
<MenuItem value="2" label="question.color.2"/>
<MenuItem value="3" label="question.color.3"/>
</Menu>
</Section>
...each has a corresponding <Message code="" message=""/> in the <Translations> element's <Locale> element; the first in English and the second in Spanish:
...
Response elements can contain both <Label> and <HoverHelp> child elements to help guide the user through the application process. Certain attributes such as default and required can also be assigned to response elements for guiding the user. See Supplemental Questions: Layout And User Experience for details.
Each type of response element is associated with a group of fields in the database. Responses to <Checkbox> elements, for example, are stored in a group of fields whose names follow the pattern of supp_check_ followed by a two-digit number. There are 50 supp_check fields in the database, from supp_check_01 to supp_check_50. The id attribute you assign to each response element will determine which particular field the response is stored in.
For example, the response to <Checkbox id="42"> will be stored in the field called supp_check_42. When you are ready to download student data to your college's Student Information System, you will use these field names to tell the Download Client which data you want.
The following table shows the association between a response element and the supplemental questions database.
...
</Section>
In the database (and Download Client results, if downloaded), the example answers in the image above would result in a "0" being stored in supp_check_01 and supp_check_04, while a "1" would be stored in supp_check_02 and supp_check_03.
...
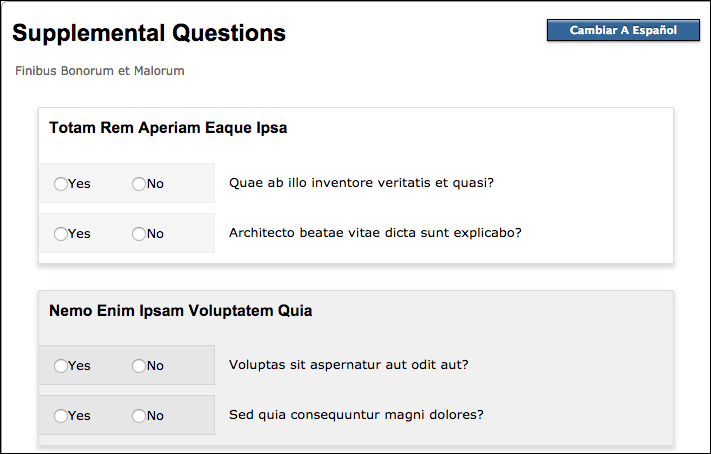
In the database, a "1" would be stored into supp_yesno_01 if the applicant selected "Yes", or a "0" if the applicant selected.