...
This worksheet provides step-by-step instructions for setting up the Major Category field and filter in the CCCApply Administrator 2.0 system for CCCApply Standard & International applications. This worksheet references user information detailed the CCCApply Administrator 2.0 User Guide. If your college chooses to implement this optional filter in CCCApply, this worksheet should be completed before you begin.
...
- There is no limit to the number of custom categories that can be created by the college and aligned to individual majors; however, every major should be aligned to at least one category.
- A category can be added, disassociated, imported and exported in the Majors module in the CCCApply Administrator 2.0.
- Custom categories, also known as response options to the <major_category> field, are case-sensitive and must be spelled correctly and spaced consistently, when added to individual major records through the “Add Major” modal. If a category is accidentally misspelled, or if extra spaces are added, the system will consider it unique and will create a new category.
- If your college plans to implement the Major Category filter in both the CCCApply Standard application and the International application, you will need to set up categories for each application separately.
- The most efficient way to implement the Major Category data field and filter for your existing majors, use the Import Majors process detailed below to ensure consistency across the categories and alignment to majors.
Displaying the Optional Major Category Menu
The Major Category data field and filter is OPTIONAL. If your college chooses to implement categories to filter or group their existing majors, such as meta majors, they should plan out their categories using this worksheet and determine which majors should align to each category in advance.
...
- Getting Started
- Identify Your Major Categories
- Export Your Current Majors List from the CCCApply Administrator
- Align Your Categories to Your List of Majors
- Import Your Configured Majors List
- Test Your Major Category Implementation
Getting Started
Create shared folder to capture implementation files & notes
To document this process and ensure all changes made during this implementation process are securely stored for reference purposes, we recommend creating a shared folder somewhere on your college network to keep save copies or original export files, worksheets, screenshots, and other spreadsheets relative to this implementation.Setup your Major Categories in the Pilot CCCApply Administrator 2.0
Navigate to your Pilot CCCApply Administrator 2.0 system using your new college/district URL
Select "CCCApply Administrator" from the CCC Administrator landing page from the "Applications" menu
From the CCCApply homepage, select the Majors module from the modules menu bar for your college
From the "Majors" module summary page, follow the instructions below to Export Your Majors to begin configuring your major categories.
Identify and Create Your Major Categories
Using the table below, determine names for your custom categories. Remember that each category name will become the custom response options that appear in the "Major Category" dropdown menu on the student-facing application, and will also be the custom data field "values" that will appear in your downloads and reports.*
Category names must not be longer than 100 characters each.
Category names may include multiple words, capitalization, punctuation, and spacing (such as: Arts, Humanities, Communication & Design).
- Category names must be consistent - any deviation in spelling, spacing or punctuation (case sensitive and spacing) will create a separate category in the system.
| Note |
|---|
Reminder: The instructions in this worksheet assumes you will setup all categories at one time using the "Import Majors" method. If any categories are added or edited individually, by adding or editing an individual major in the "Add/Edit Major" modal, you must spell, space and punctuate each category correctly and you must hit "Enter" after each individual category is entered into the "Category" input menu. |
Identify Your Major Categories
Using the table below, define the names of your custom categories. Remember, each category name will become the custom response options that appear in the "Major Category" dropdown menu on the student-facing application, and will also be the custom data field "values" that will appear in your downloads and reports.*
Category names must not be longer than 100 characters each.
Category names may include multiple words, capitalization, punctuation, and spacing (such as: Arts, Humanities, Communication & Design).
- Category names must be consistent - any deviation in spelling, spacing or punctuation (case sensitive and spacing) will create a separate category in the system.
| Category Name - Standard Application | Category Name - International Application | |
|---|---|---|
Category 1 | ||
Category 2 | ||
Category 3 | ||
Category 4 | ||
Category 5 | ||
Category 6 | ||
Category 7 | ||
Category 8 |
...
Export Your Current Majors List from the CCCApply Administrator
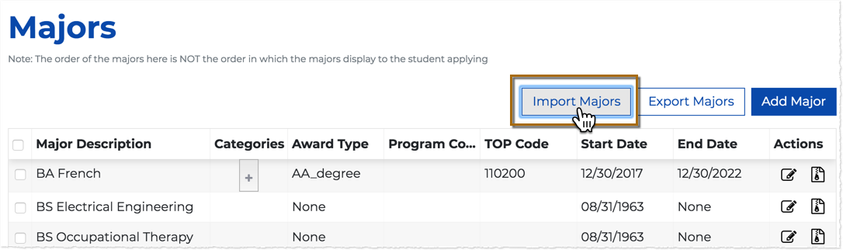
From the Majors module summary table, click on the “Export Majors” button to export your current list of college majors to a CSV file. By default, the file will export as a CSV file.
Locate and open the file from your Downloads folder and Save As with a name that identifies it as the original exported list of majors from your Pilot environment for your college.

| Note |
|---|
Locate your CSV file in your Downloads folder and Save As a CSV file with a filename that indicates it is the original major list for your college from a specific environment. |
Align Your Categories to Your Majors
Editing the Majors CSV File
The export Export Majors function produces a .csv file and the import Import Majors function requires a .csv file in exactly the same format. It is important that you maintain the format that is exported. Unless you have experience with text editors and CSV files, the the best way to edit your .csv file may be with a spreadsheet application such as Microsoft Excel or OpenOffice Calc.
...
- Open the exported majors .csv file on your computer using the application of your choice (Excel or another spreadsheet program is recommended).
- Edit the majors data as needed. It is assumed that your intention is to add new majors and/or edit the majors displayed in order to import them with new values for your CCCApply application(s). Use the table below as a guide.
| Warning |
|---|
Note: You cannot mix CCCApply and International application majors in one .csv file at this time.mix CCCApply and International application majors in one .csv file at this time. If you are implementing major categories in both your Standard and International applications, you must configure them separately in each Administrator application. |
The table below calls out specific information pertaining to the format of your CSV file.
Majors CSV File Element | Purpose/Format Rule | ||
|---|---|---|---|
Header row (i.e. row 1 that reads left to right: application, code, description, etc.) | The header row is required in order for your .csv file to import correctly and the values to be stored properly by the CCCApply Administrator. | ||
Application column (application) | The application column value must be in all caps and be either:
You cannot mix APPLY and INTERNATIONAL application majors in one .csv file at this time. | ||
Award Type (awardType) | The Award Type field values are slightly different in the new Admin 2.0 system. The following notes pertain to implementing this field in the new system: The award type values must not contain any spaces and MUST be one of the following allowed values:
The Award Type field is required in the new system. All imported majors, and majors migrated from the legacy Admin 1.0 system, must include a value in this field. If you do not have an aligned award type for one or more majors, please enter “None”. When importing majors using the CSV file, please include a value in the awardType column on your import file. If you do not have an aligned award type for one or more majors, please enter “None” | ||
Education Goals (eduGoals) (NOT APPLICABLE in this version) |
| ||
Date Values (start or end columns) | IMPORTANT NOTE: |
Aligning Your New Categories to Your Majors
...
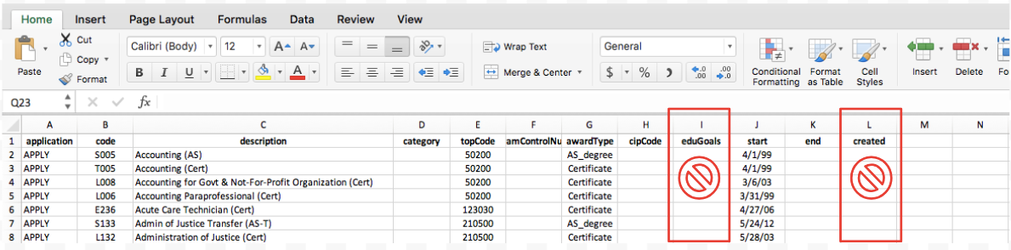
The screen shot below shows an example of a typical Majors Export file. Remember to leave the "eduGoals" column empty and the "created" column empty when you import your configured majors file.

Configuring the Major Start & End Dates
IMPORTANT NOTE: Date formats for the Majors .csv file must be in the following format: yyyy- mm-/dd/yyyy.
After configuring the Start and End dates for your custom major list, check to ensure the format of the Start and End dates columns must be re-formatted with are configured to the correct date format. To correct the format of these columns in your CSV file, highlight the columns and change the date format to “yyyy-mm-dd”“mm/dd/yyyy”.
Major Start Date
- The “Start” date is required.
- The Start Date data in this column identifies the date when the Major starts appearing in the "Intended Major or Program of Study" menu in CCCApply applications.
- Cannot be after the major’s End Date or the associated Term's Term End date, else error message will display; (NOTE:
- Must be a valid calendar date (cannot be February 30, etc.)
| Note |
|---|
When importing majors using the CSV file, the date must be formatted as follows: mm |
...
/dd |
...
/yyyy. This is important or the file will not import correctly.) |
...
Major End Date
- The “End” column identifies the major’s End Date which is the date that the major stops appearing in the "Intended Major or Program of Study" menu in CCCApply applications;
- The End Date is required, else error message.
- The major must be setup with one of the following settings:
- Major has no end date, OR
- Major has end date
- Can be added individually by clicking on "Add Major" or "Edit Major" by an authorized user
- Must be a valid calendar date, i.e., cannot be February 30, etc. (else error message appears)
- Cannot be before the Major Start Date, else error message else error message will display
- Can be added by the Import Majors process via a properly formatted .csv file with all required Majors data fields
- If user selects "Major has no end date" THEN the Major will ALWAYS display in the "Intended Major or Program of Study" menu in CCCApply
- If user selects, "Major has end date" - THEN a valid end date must be provided in the CSV file , else error message should display
- Must be a valid calendar date, i.e., cannot be February 30, etc. (else error message appears)
- Cannot be before the Major Start Date, else error message else error message will display
Configuring Required Majors Data
Now that you’ve aligned your new categories to each major, you must ensure that all required data is configured correctly in the spreadsheet before importing your Majors file.
Specifications for each required data column appears below.
| CSV Column Heading | Required | Important Configuration Notes |
|---|---|---|
| Application | YES |
|
| Major Code | YES |
|
| Major Description | YES |
|
Configuring Optional Majors Data
...
| Category | NO |
|
| TOP Code | NO |
|
| Program Control |
...
| Number | NO |
|
| Award Type | NO |
|
CIP Code | NO |
|
EduGoal (NOT APPLICABLE in this version) | NO |
|
| Create Date | NO |
|
...
|
| Warning |
|---|
VERY IMPORTANT: The “EduGoal” and the "Created" columns do not pertain to this version of the Majors module in Admin 2.0 - BUT the data columns MUST remain in your Import Majors file and should be left BLANK in your CSV file. |
Importing Your Majors CSV File
You must use a .csv file to import majors into the CCCApply Administrator. The easiest way to do this is usually to export the current majors to a .csv file and then edit the file since a header row and some configuration details are required.
The table below details the add and update functionality for majors imports (no deleting or archiving of any majors occurs upon import).
If you import a majors CSV file and... | ...then | |
|---|---|---|
no existing major(s) values were changed but new majors are added to the .csv file | the new majors are added to the CCCApply Administrator Majors table and will appear in the CCCApply application(s) | |
existing major(s) values were changed | the changed majors are updated in the CCCApply Administrator Majors table and will appear changed in the CCCApply application(s) | |
existing major(s) values were changed AND new major(s) were added | the new major(s) are added and the changed majors are updated in the CCCApply Administrator Majors table and will appear in the CCCApply application(s) | |
| major categories were defined and added | the new major(s) are added and the changed majors are updated in the CCCApply Administrator Majors table and will appear in the CCCApply applicationto the .csv file | the Major Category dropdown menu will appear in the CCCApply application(s) NOTE: Every major in your list must be aligned to one or more categories. |
| one or more majors are not aligned to any defined categories | those majors will not appear to applicant's in the Intended Major or Program of Study menu in the CCCApply Application(s) |
Use the following steps to import majors.:
- Using the exact same file format, prepare your configured .csv file of majors for importing. See Editing the Exported Majors CSV File for details.
- Select either CCCApply or International from the Applications drop-down list.
- From the Majors module, click Import Majors to display the Import Majors dialog box.
...

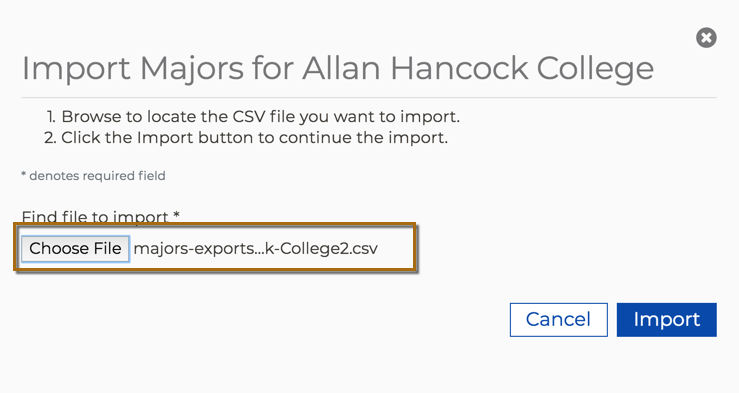
- Click the Choose File button to display your computer’s file navigator.
- Navigate and select the majors .csv file you want to import. Ensure that, if you selected CCCApply or International in step 2 above, you select the correct application majors .csv file. After selecting your .csv file, the file name displays next to the Choose File button (see example below).
...
- Click the Import button to import the majors .csv file. The Import Majors dialog box closes automatically, and the Majors table displays with all rows updated and and refreshed to display your edited and new major values.
...
Test Your Major Category Implementation
Once you’ve completed your Major Category alignment and imported your Majors Import file to the Pilot (or Production) system, the changes require 30 minutes before they will appear in the student-facing CCCApply application.
...
Environment-Specific End-to-End Testing
Remember, changes made in the Pilot Administrator will display in your Pilot Application and, if applicable, are downloaded from the Pilot Downloads server, and reports can be run on the changes in the Pilot Report Center.
...
Remember, changes made in the Pilot CCCApply Administrator will only display in your Pilot CCCApply Application and, for downloadable data fields, are only downloaded from the Pilot Downloads server. This also pertains to reporting. Pilot applications can only be run in the Pilot Report Center.
This is an important concept to remember when setting up your major categories, configuring your required and optional major data fields, and testing the full workflow of setup (configuration), data collection, data download and data reporting in the same environment.
Log in to the Corresponding CCCApply Application URLs
The URLs shown below are templates. To see your college application, you must replace the "XXX" at the end of the URL with your college's MIS code. To validate that you have reached your college applications, you should see your college logo in the upper left corner of the header banner. NOTE: We have no district applications, so if you are a single-college district, use your college MIS code to access your application.
...