| Panel | ||||||
|---|---|---|---|---|---|---|
| ||||||
CCC Data Warehouse Report Server v7.8 Last Update: June 2022 | ||||||
| Panel | ||||||
| ||||||
This guide pertains to the Data Warehouse Report Server for CCC Data 2.2.0 - released to production on January 5, 2023. |
In This User Guide
| Table of Contents | ||||
|---|---|---|---|---|
|
...
The information provided in this document serves as a "Quick Start" guide for users of the CCC Data Warehouse Report Server (“DW Report Server”, “Report Server”). With the DW Report Server you can:
...
, “DWRS”), including:
Getting started with the DW Report Server; requesting authorized access and implementation support
User account set up and authentication processes
Running preconfigured reports that pull data from the CCC Data Warehouse , (currently limited to the LGBTQ report .template)
Query Querying available data sources, run running ad - hoc reports, scheduling and download exporting results.
Create an Creating custom Ad Hoc View Views from which you can create Reports multiple reports can be run based on the following data sources:
CCCApply Standard & Noncredit Applications
CCCApply LGBTQ Data (AB 620)
CCCApply International Application
California Colleges Promise Grant Application
Multiple Measures Placement Service (MMPS)
COCI - Chancellor’s Office Curriculum Inventory
C-ID - Course Identification System
| Panel | |||||||
|---|---|---|---|---|---|---|---|
|
...
| |
Note: If you are interested in direct (ODBC/JDBC) access to the CCC Data Warehouse via a site-to-site VPN, please contact your Enabling Services College Relationship Manager (CRM) to initiate the request for this access. |
| Note |
|---|
Access to Canvas Data is currently available only |
...
by direct access connection. For information regarding the Canvas DW Direct Connect service, please contact your Enabling Services College Relationship Manager (CRM) to initiate the request for this access. |
About the
...
DW Report Server
The DW Report Server is a secure, user-friendly reporting tool that creates pixel-perfect reports, charts & dashboards using secure CCC Data Warehouse data.
The CCC Data Warehouse is a structured source of master data that can be used to generate the data marts and reports and analytics that end-users need.
The DW Report Server is powered by Jasper ReportsJasperReports, a Java-based open-source reporting tool. Jasper ReportsJasperReports, connected to the CCC Data Warehouse, allows for advanced reporting usage and provides extensive help that you can access from the Help link.
| Panel | ||||||
|---|---|---|---|---|---|---|
| ||||||
About TIBCO JasperReports Server |
...
User Authorization & Authentication
The new Data Warehouse Report Server (CCC Data release v.2.1) requires an authorized user account with two-factor authentication Access to the DW Report Server is restricted to authorized users to ensure the privacy and security of the data within the Data Warehouse Report Server.
...
CCC Data Warehouse. Users must request access using one of the appropriate processes below, and upon approval will be granted an account based on their user type.
Requesting Access
College and District Institutional Researchers:
...
An identified lead IRPE Researcher at each college or district will be established as the authorized user and “gatekeeper” for their
...
institution (organized by MIS Code) upon confirmation from their college or district Vice President. These “gatekeepers” can then request access for additional researchers at their
...
| Panel | ||||||
|---|---|---|---|---|---|---|
| ||||||
Process for Gatekeepers to Request Additional Users |
...
Support & FAQs
Support is available to authorized Report Server users in our 24/7 online support community CCCTechnology.info - where college and district staff can share ideas, ask questions, and report bugs and issues for all the CCC Technology Center online applications.
Our experienced support engineers monitor all incoming posts and comments, Monday - Friday, 7:00am - 4:00pm PST. Depending on the nature of the issue or comment, support engineers will respond within 24 hours to critical issues regarding production applications.
Part 2: User Account Setup & Login Process
This part of the User Guide provides information about:
...
institution by submitting an email request to ES Support Services or by contacting their College Relationship Manager (CRM) with the information below.
Chancellor's Office & Other External Stakeholders: All requests for access to the Data Warehouse Report Server from the CCC Chancellor's Office or other external stakeholder organization are to be directed to the CCC Data Warehouse Product Manager (Mark Cohenmcohen@ccctechcenter.org)who must obtain approval from the Vice Chancellor for Digital Innovation & Infrastructure at the CCC Chancellor’s Office.
| Panel | ||||||
|---|---|---|---|---|---|---|
| ||||||
Process for IRPE Gatekeepers to Request Additional Users |
Support & FAQs
Support is available to authorized Report Server users in our 24/7 online support community CCCTechnology.info - where college and district staff can share ideas, ask questions, and report bugs and issues for all the CCC Technology Center online applications.
Our experienced support engineers monitor all incoming posts and comments, Monday - Friday, 7:00am - 4:00pm PST. Depending on the nature of the issue or comment, support engineers will respond within 24 hours to critical issues regarding production applications.
...
Part 2: User Accounts & Access
This section includes:
Getting Started
Establishing an authorized DWRS user account is a two-part workflow between a CCCTC Administrator and the approved user. An Enabling Services Implementation Configuration Engineer (ICE) will create and configure the account in our internal system and then work with the user to complete the final steps and login, depending on the user type. This section of the document outlines the roles and responsibilities - and setup tasks - for the CCCTC Administrator and the approved DWRS user.
The first steps in getting started are:
Contact the CCCTC Enabling Services team to Request Access and initiate the implementation process.
Schedule a call with a CCCTC Administrator to facilitate implementation & configuration services.
| Panel | ||||||
|---|---|---|---|---|---|---|
| ||||||
Contact your College Relationship Manager (CRM) from the CCCTC Enabling Services team to request authorized access or setup an approved account, today. |
User Accounts
Access to the DWRS requires an authorized user account configured based on user type. There are two types of user accounts:
SSO Users: Colleges and Districts using their institution’s IDP for single sign-on. The institution’s login may include two-factor authentication (2FA), but this SSO mechanism is not managed by the CCCTC.
Non-SSO Users: CCCCO, CVCOEI, and other authorized external users will authenticate directly to the DWRS using 2FA to secure and protect our systemwide student data.
| Panel | ||||||
|---|---|---|---|---|---|---|
| ||||||
Two-Factor Authentication (2FA) is a security process that authenticates a user’s identity by requiring two or more pieces of evidence (credentials + verification code) before granting access to a service or system. |
...
| Note |
|---|
IMPORTANT: Beginning with the production launch of DW Report Server (CCC Data v.2.1), all new and existing authorized DW Report Server users are required to set up new user accounts with two-factor authorization in order to gain access to data through the DW Report Server. All previous accounts have been de-provisioned and removed. For more information, please contact your Enabling Services College Relationship Manager (CRM) or contact Support Services. |
User Types & Access Levels
Authorized access corresponds directly to the user’s college or district 3-digit MIS Code, as shown in the table below.
...
User Type
...
Authorized Access Level
...
College User
...
Single college access to available data sets based on College MIS Code
...
District User
...
Multi-college access to available data sets based on District MIS Code
...
Chancellor's Office User
...
Access to all data sets across all colleges
The Account Creation & User Setup Process
The account creation and user setup process is a two-part workflow between a CCCTC system Administrator and the authorized user. There are two user types and each has its own process for setting up the user in Keycloak. Once the user is set up in Keycloak and the user authenticates via either a Keycloak log-in page (branded with CCTC logos) or via the IDP’s log-in page (branded for the individual school or district). Below is a breakdown of each of the two ways of setting up a user.
The Administrator account creation process is summarized as follows:
...
If the user is a native Keycloak user (CO/CVC/Superadmin) the Administrator securely transmits the account credentials and password to the User’s institution email (.edu) using Privnote. If the user is using a school or district IDP, the user’s credentials will be set at the school/district and the user should either know the credentials or contact the school’s IT department to change/update the user’s credentials.
...
The User engages with the Enabling Services implementation team and receives account credentials and user setup information
The User installs a compatible authentication app on their desktop or mobile device
The User completes the “first-time login” process (the one-time scan of the QR code with the authenticator app happens and captures the verification code required for login)
The User is automatically authenticated and authorized to login to the DW Report Server.
...
User Types & Access Levels
User Type | Authentication | Authorized Access Level | |
College User | SSO User | SSO access via college/district IdP | Single college access to available data sets based on College MIS Code |
District User | SSO User | SSO access via college/district IdP | Multi-college access to available data sets based on District MIS Code |
Chancellor's Office User | Non-SSO User | Direct access (non-IdP) via two-factor authentication (2FA) | Access to all data sets across all colleges |
CVCOEI User | Non-SSO User | Direct access (non-IdP) via two-factor authentication (2FA) | Access to CVCOEI report but no actual data (can see tables and columns in AdHoc view, but no data populates) |
CCCTC Administrator | Non-SSO User | Direct access (non-IdP) via two-factor authentication (2FA) | Access to the internal system administration console to facilitate account creation & configuration. |
| Panel | ||||||
|---|---|---|---|---|---|---|
| ||||||
College & District SSO Users: See Appendix A: Data Warehouse Report Server URLsfor your custom IdP URL. |
Set Up & Log In Processes
The process for account setup and login will be different depending on user type, access level, and the mechanism used to authenticate. Working with an Implementation & Configuration Engineer (ICE) from the CCCTC Enabling Services team to set up and configure your account, college & district users (SSO Users) will be provided a custom URL configured to your institution’s MIS code and internal IdP link. Non-SSO Users will be directed to the DWRS directly to log in and complete additional setup & verification tasks to facilitate authentication.
Below is an explanation of the setup process followed by summaries of the login process for each of the two authentication methods.
Pre-requisites
Before a user can log into the DWRS the following conditions must be met:
The authorized user has followed the Getting Started tips and has coordinated with CCCTC Enabling Services to begin the account creation and configuration process based on their user type and access level.
The account has been configured with the appropriate roles, attributes, and - for SSO Users only - their institution’s IDP link.
SSO Users have received their unique college or district URL, configured to their IDP, and know their single sign-on credentials provided to them by their college or district’s IT department.
Non-SSO Users have received their account credentials and temporary password from CCCTC Administrator, have installed the authentication app software, and have completed the “First-Time User Log In” process (setup and verification tasks) required to facilitate two-factor authentication at the generic DWRS URL.
SSO Users: Account Setup & Log In Process
Colleges & Districts
The User coordinates with the Enabling Services implementation team and receives acknowledgment that the user their account has been created with the appropriate roles and attributes, and the IDP has been linked.
The User goes is directed to the appropriate link URL for their IDP and logs in.
The User is automatically authenticated and authorized to log through their institution IDP (SSO) and is logged in to the DW Report Server.
Receiving Your Secure Login Credentials (CO/CVC/Superadmin)
For security purposes, the User will receive their account credentials and password (for CO/CVC/Superadmins) from the CCCTC Administrator in one or two separate emails to their institution email address (.edu).
The User will receive:
...
CO/CVC/Superadmin users only: An email with a link to Privnote containing the user’s unique password.
| Note |
|---|
Note: The unique password will not be passed to the authorized user until they have commenced the implementation process with the CCCTC Enabling Services team for added security. |
Implementing the Authentication Software (CO/CVC/Superadmin)
...
| Tip |
|---|
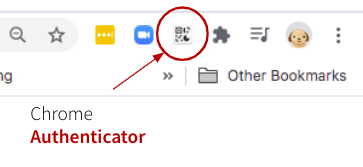
Suggestion: Although any six-digit TOTP compatible authentication software should work for the Report Server User Account, the tools that we’ve found to be most user friendly are: Chrome Authenticator for desktop use and Google Authenticator for mobile devices. Both are free downloads and both can also be used together. |
Chrome Authenticator for Desktop
Authenticator for Mac and Windows Chrome browsers is available free from the Chrome Web Store. This app installs very quickly to your desktop (recommended) as well as your phone, and includes a lot of great features that promote security and usability. NOTE: The entire download and install process takes less than one minute. You may need local IT authorization and assistance to install it if policy requires this.
To Install the Chrome Authenticator:
Navigate to the Chrome Web Store and search for Authenticator by authenicator.cc
Click on “Add to Chrome” button to initiate the download and follow very simple instructions to install.
When the Authenticator app has been installed, a shortcut will appear in your Extensions toolbar in your browser.

| Note |
|---|
WARNING: If you have already installed Chrome Authenticator (Authenticator.cc) don’t re-install this application as it will overwrite you previous download of this same application. |
NEXT: Start the “First-Time User Login” process below to initiate the authentication process and login.
Google Authenticator App for Mobile Device
Another user-friendly option, especially for users who want to use their mobile device for authentication, is the Google Authenticator; a free app available from the Google Play Store.
Google Authenticator is compatible with multiple different mobile devices, operating systems, and browsers. The process for downloading and installing can be found here.
...
NEXT: Start the “First-Time User Login” process below to initiate the authentication process and login.
NOTE: The authenticator tools recommended above are just suggestions. If the user already has a compatible authentication tool it may be used instead.
The First-Time User LogIn Process
...
The prerequisites for initiating the first-time login process:
The user has the Data Warehouse Report Server URL (http://dw-reports.ccctechcenter.org/)
The user has received their unique password and account credentials from the CCCTC Administrator
The user has installed and configured a compatible authentication application on their desktop and/or mobile device
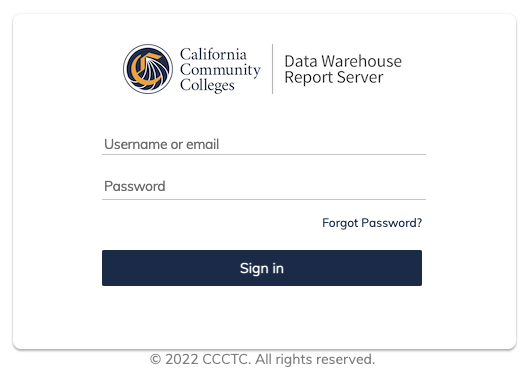
Step 1: Enter Your Account Credentials on the Log In Page
...
Ensure you have one of the compatible authenticator apps installed on your desktop or mobile device.
...
Enter the account credentials provided to you into the following fields:
User ID: Enter your institutional email address in the User ID field (.edu or .org is required).
Password: Enter the unique password provided to you by the Administrator (sent separately via Privnote). This password is generated by the system Administrator during the account creation process. This unique password cannot be changed or reset by the user.
Complete the Log In page by clicking the “Login” Button: After entering your user credentials, click the “Login” button to continue to the QR Code Scan page.
...
| Note |
|---|
Forgot Your Password? The unique password configured by the Administrator for the user account cannot be changed or reset by the user. If you’ve forgotten your account password - or if your account has been compromised and you need a replacement password, please contact ES Staff Support to request assistance at staffsupportccctc@openccc.zendesk.com. |
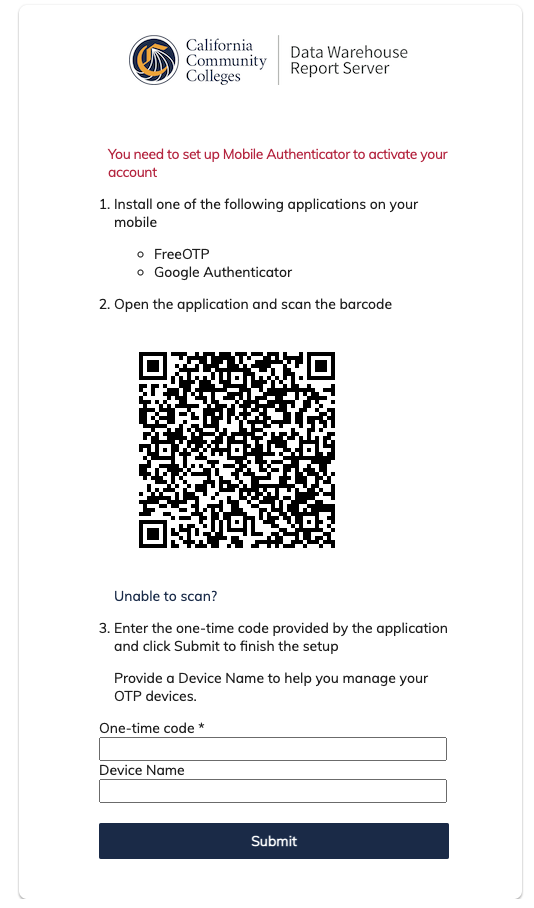
Step 2: Scan the QR Code Page
The Scan the QR Code page is displayed once during the “first-time user login” process. The user must have the authentication software installed on their desktop or mobile device in order to scan the QR code that appears on the page. The code is captured by the authenticator app which establishes the connection between the account (shared secret key hidden in the barcode) and the authenticator app to complete the initial two-factor authentication process.
With your Authenticator App installed, scan the QR code that appears in the center of the page.
...
Scanning the QR Code with Chrome Authenticator (from desktop).
...
As the authenticator scans the barcode (QR Code), a six-digit verification code will appear/register in your authenticator app.
...
As soon as you see the six-digit code appear in your authenticator app, copy the code and then click “Login” to go to the next page.
...
Click the “Login” button to return to the Log In Page.
...
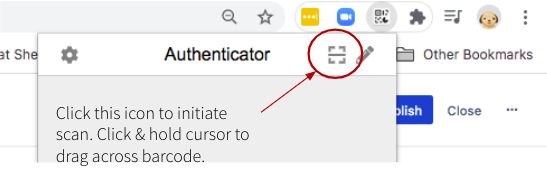
Using Chrome Authenticator to Scan the QR Code
Once the Chrome Authenticator app has been installed, a shortcut will appear in your Extensions toolbar in your browser.
Click the Authenticator icon in your Extensions toolbar to open the tool.
Click the scan icon and move your mouse over the QR barcode in the center of the page.
Click + hold the mouse to drag the scan functional across the bar code.
The secret key hidden within the barcode will register as a six digit code in the Authenticator registered to your Report Server account.
...
Using Google Authenticator to Scan the QR Code
Once the Google Authenticator app has been installed on your mobile device, an icon will appear on your phone wall or homepage.
Click to open the Google Authenticator app
Point the camera on your mobile device at the barcode on the screen and snap a picture.
The secret key hidden within the barcode will register as a six digit code in the GA app registered to your DW Report Server account.
| Tip |
|---|
Tip: After scanning the QR code and confirming the verification code is captured by the authentication software, snap a screen shot of the code and store in a secure place. For security purposes, don’t store the verification code with the URL or other credentials to the DWRS. |
Step 3: Repeat Log In Page
After scanning and capturing the six-digit verification code in authenticator app, you have established the connection between the authenticator application and your secure Report Server User Account.
Now you must return to the Log In page to re-enter your user credentials and verification code.
Back on the Log In page, re-enter your account credentials in the input fields: Organization (MIS Code), User ID (email address), and Password.
Click the “Login” button, again.
...
| Warning |
|---|
Validation Error Note: A validation error message will display to all users when they are completing the first-time user login” process. This system message is indicating that the user attempted to login without entering a verification code. As you know, you haven’t been asked for a verification code yet (that is coming in Step 4). Please disregard this error message and continue with the login process. |
Step 4: Verification Code Page
After re-entering the account credentials a second time, the user is now presented with the Verification Code page to enter the six-digit verification code that was scanned and stored in the Authenticator app. .
Enter your six digit Verification Code
Click on your Authenticator app and retrieve the time-limited verification code.
Paste the code in the “Verification Code” field.
Click the “Login” button on the Verification Code page to complete the login process.
...
Verified User Login Process
...
DWRS.
| Panel | ||||||
|---|---|---|---|---|---|---|
| ||||||
College & district user credentials are set by their institution IdP for single sign-on (SSO). These users should know their unique credentials or should contact their institution’s IT department to change or update them. |
Non-SSO Users: Account Setup & Log In Process
All Other Users
The User coordinates with the Enabling Servicesimplementation team and receives account credentials and user setup information via secure method (i.e., Privnote).
The User downloads and installs a compatible authentication software on their desktop or mobile device.
The User completes the “First-time User Log In” process, which enables entry of account credentials, one-time QR code verification, and authentication to the DWRS.
Optional: After logging in, the User may update their temporary password using the Forgot Password? link to reset their password.
Receiving Your Secure Account Credentials
For security purposes, all non-SSO users will receive their account credentials and temporary password in one or two separate emails from the CCCTC Administrator. The email(s) will include a link to a secure Privnote message, sent to their institution email address (.edu).
| Panel | ||||||
|---|---|---|---|---|---|---|
| ||||||
Note: The password will not be passed to the authorized user until they have started the implementation process with the CCCTC Enabling Services team for added security. |
Implementing the Authentication Software
All Non-SSO users are required to use a compatible authentication app to log in to the Data Warehouse Report Server. Prior to the first log in, logging in to the DWRS for the first time, users must have a compatible authentication app installed on their desktop or mobile device that facilitates Time-based One-Time Password TOTP functionality such as Google Authenticator, Chrome Authenticator, or Authy(which you could download to a phone or computer). Below are several examples of compatible authentication software apps that can be used; however there are many free, user-friendly Authenticators available at no cost that can be downloaded and installed quickly and easily to your desktop and/or mobile device.
Chrome Authenticator for Desktop
Authenticator for Mac and Windows Chrome browsers is available free from the Chrome Web Store. This app installs very quickly to your desktop (recommended) as well as your phone, and includes a lot of great features that promote security and usability. NOTE: The entire download and install process takes less than one minute. You may need local IT authorization and assistance to install it if policy requires this.
| Expand | |||||||||||
|---|---|---|---|---|---|---|---|---|---|---|---|
| |||||||||||
To Install the Chrome Authenticator:
|
Google Authenticator App for Mobile Device
Another user-friendly option, especially for users who want to use their mobile device for authentication, is the Google Authenticator; a free app available from the Google Play Store.
| Expand | |||||||||
|---|---|---|---|---|---|---|---|---|---|
| |||||||||
Google Authenticator is compatible with multiple different mobile devices, operating systems, and browsers. The process for downloading and installing can be found here. 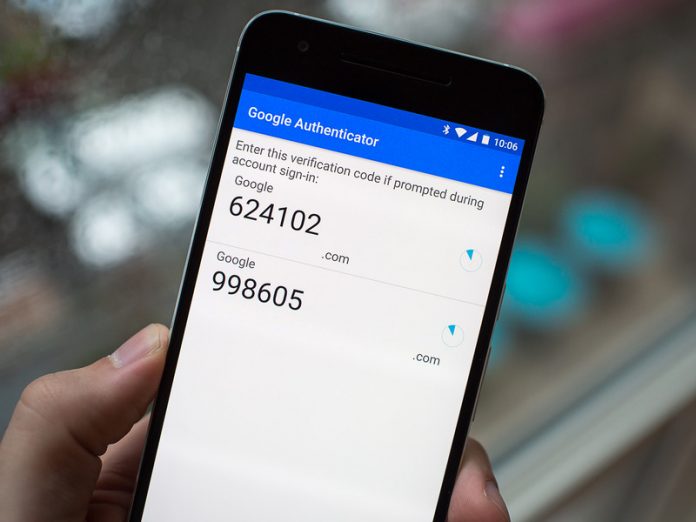
|
| Panel | ||||||||
|---|---|---|---|---|---|---|---|---|
| ||||||||
Suggestion: Although any six-digit TOTP compatible authentication software should work for the Report Server User Account, the tools that we’ve found to be most user friendly are: Chrome Authenticator for desktop use and Google Authenticator for mobile devices. Both are free downloads and both can also be used together. |
| Panel | ||||||
|---|---|---|---|---|---|---|
| ||||||
NEXT: Start the “First-Time User Log In” process below to initiate the authentication process and log in. |
The First-Time User Log In Process
For Non-SSO Users Only: The first time a new user attempts to log in to the DWRS they must establish the connection between their user account credentials, a shared secret key (QR Code), and the authentication software to enable the two-factor (2FA) login authentication.
Pre-requisites:
The User has the Data Warehouse Report Server URL (http://dw-reports.ccctechcenter.org/).
The User has received their account credentials and temporary password from the CCCTC Administrator.
The User has installed and configured a compatible authentication software app on their desktop and/or mobile device.
| Expand | |||||||||||||||||||||||||||||||||||||
|---|---|---|---|---|---|---|---|---|---|---|---|---|---|---|---|---|---|---|---|---|---|---|---|---|---|---|---|---|---|---|---|---|---|---|---|---|---|
| |||||||||||||||||||||||||||||||||||||
Step 1: Enter Your Account Credentials on the Log In Page
Step 2: Scan the QR Code Page
|
Verified User Log In Process
For Non-SSO Users Only: After the user completes the one-time “First-Time User Log In” process, the user is “verified” and will not have to repeat the Scan the QR Code Page stepagain UNLESS they need to re-install their authentication software and/or generate a new QR code. After the first time login and verification process, user login requires the user For all subsequent logins, the verified user needs only to enter their account credentials and the verification code retrieved from the their authenticator app.
...
Step 1: Log in Page
Navigate to the Data Warehouse Report Server URL (http://dw-reports.ccctechcenter.org/) and land on the Log In page.
Enter your user account credentials and password in the input fields.
Organization (MIS Code): Enter your 3-digit MIS Code.
User ID: Enter your institutional email address in the User ID field (.edu, or org) (Required)
Password: Enter your unique password.
...
User ID: Enter your institutional email address in the User ID field (.edu, or org) (Required)
Password: Enter your unique password.
Click the “Sign In” button.
| Panel | ||||||||
|---|---|---|---|---|---|---|---|---|
| ||||||||
Reminder: Click the Forgot Password? link on the Log In page to recover your account password or to change your password at any time. |
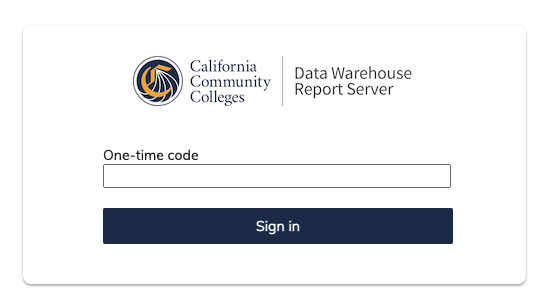
Step 2: Verification Code Page
...
The User user refers to their authenticator app to retrieve their new Verification code within 30 seconds of making the request (clicking on Login Sign In button on Log In screen).
Verification Code: The user enters Enter the code from the Authenticator App authenticator app into the Verification Code “One-time code” field.
Click the “Login” button on the Verification Code page “Sign in” button to complete the login log in process and access the DW Report Server.
...
DWRS.
...
Appendix A: Data Warehouse Report Server URLs
| Panel | ||||||
|---|---|---|---|---|---|---|
| ||||||
Click here for college and district Data Warehouse Report Server URLs. |
...
Part 3: Using the Report Server
The CCC Data Warehouse Report Server is a branded version of TIBCO JasperReports (v.7.8.0), with role-based access to integrated CCC data for authorized CCC researchers using multi-factor authentication.
In this section:
| Panel | ||
|---|---|---|
|
...
|
...
|
...
The scope of this |
...
section provides details for accessing and running reports, views and dashboards related to CCC Data Warehouse data. For the purposes of this |
...
User Guide, it is assumed that you are accessing reports based on CCC Data Warehouse data specifically. |
In this section:
...
| panelIconId | atlassian-check_mark |
|---|---|
| panelIcon | :check_mark: |
| bgColor | #FFFFFF |
...
Benefits of the Report Server
...
Centrally-managed reporting server for CCC Data Warehouse objects
Role based access permissions to all data objects/domains by organization MIS code
Create custom ad hoc reports and charts using filters, groups and measures
Schedule interactive reports and charts to be delivered to one or more email addresses and/or output to external network location
Export custom or public reports and charts in a variety of output formats
Schedule reports or charts to run daily, weekly, or monthly using relative date filter - and save/attach in a variety of output formats
Ability to make on the fly modifications to ad hoc “Views” for real-time data analysis.
Introduction to the Report Server
...
To run a report, click the name of a report in the repository. For example, click DW LGBTQ Report. The report appears in the Report Viewer.
...
On the Home page, click Create in the Reports block. The Create Report wizard opens.
Select the Ad Hoc view you want to use as the basis for your report.
Select a report template. To use a template other than the default, select Custom Report Template, click Browse and select the desired template. See Report Templates for more information.
Click OK. If asked, enter the input controls needed. See Using Input Controls.
You can now begin working with your report.
...
| Panel | ||||||
|---|---|---|---|---|---|---|
| ||||||
Creating Filters with Relative DatesYou can filter information in your view based on a date range relative to the current system date. You can accomplish this using date-based filters, and entering a text expression describing the relative date or date span you want to display, using the format <Keyword>+/-<Number> where:
For example, if you want to see all of the CC Promise Grant Applications submitted during the prior week, your expression would be: WEEK-1. |
...