Version 2.1.2 - Last update: January 21, 2022
...
Navigate to Tenant Admin tab -> Tenant Portal Administration panel -> Manage This Skin link to open the College Skin configuration screen.
To update your college portal's background image, click the Upload Image link next to the Tenant Background Image URL field to open the Attachments dialog box.
Enter the optional file name and source information in the Filename and Source fields, if desired.

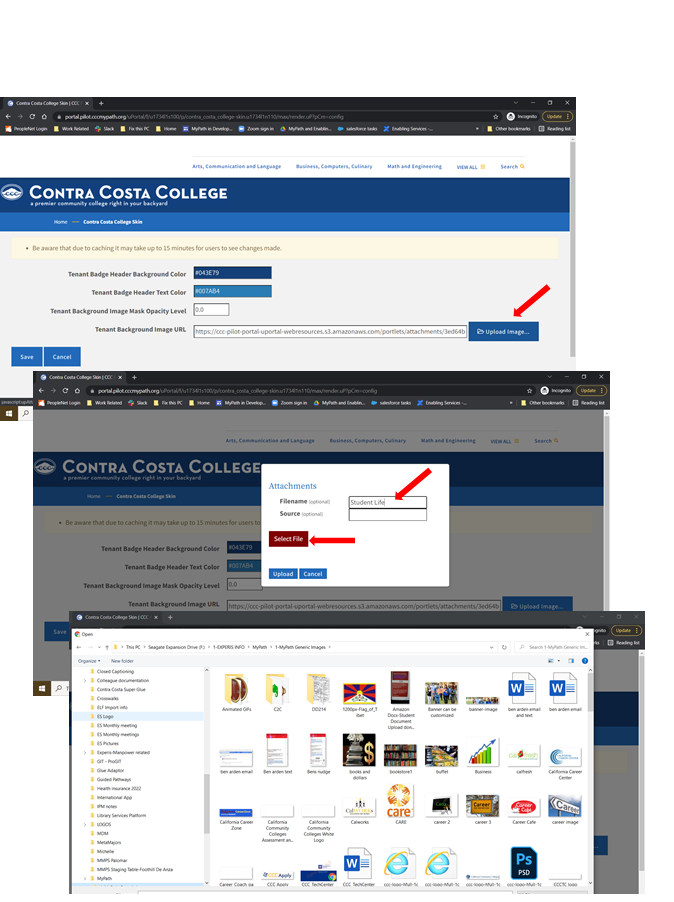
Click Select File to open your operating system's file browser, and navigate to and select the image file you want to use as your college portal's background. The selected file name displays beneath the Select File button (collegeBackground.png in the example image above). Suggested image size is 350px high and a minimum of 1170px wide.
Click Upload to upload the image. The Attachments dialog box closes automatically once the file uploads successfully.
Click Save to save all your changes, close the Manage This Skin screen, and return to the Tenant Admin tab with your new background image displayed.


Note: Due to caching, it make take up to 15 minutes for changes to header and background colors to be seen by students.
...
The college portal administrator manages content by creating specific portlets and then adding or removing them for specified user groups, applying portlet expiration dates, etc. The steps to do all of this are included within the instructions for creating each of the different portlets currently available, including:
Static Content & Registering Portlets
App Launchers
Surveys
Advisor Cards
...
Portlet Basics
Anything that you create or configure to display inside your college portal is considered a portlet. A portlet is basically a "container" for the thing you are creating or configuring to display.
...
Navigate to Tenant Admin tab-> Portal Administration panel-> Manage portlets link to display the Portlet Registry screen.
When you click the Edit link for a portlet the Edit Portlet screen will be displayed.
Scroll down to the Lifecycle Management section and click the Option radio button that corresponds to the portlet state of Created, Approved, Published, Expired or Maintenance as needed.
If you want to set an optional expiration date for the portlet (only available when Approved or Published is selected), scroll down to the Automatic Expiration (optional) section and click in the Setting field to display a pop-up calendar where you can choose an expiration date.
After selecting the expiration date, drop-down list will be displayed so you can select the time (hour, minutes, and period of the day (AM or PM)) the portlet will expire.
[ add all the screen shots in this section as needed ]
Note: When the selected date and time are reached, the portlet will no longer display in the Portal and its state will automatically revert to the Option of Expired.
See:
Adding App Launchers
Adding Surveys
Adding Advisor Cards
Adding Static Content & Registering Portlets
...
Note: The life cycle of the portlet can be modified as defined in the Portlet Lifecycle section.
18. Click Save and Configure to save your content portlet and display the Edit Portlet Configuration content Editor screen.
19. Enter and format the content you want to display in the portlet. If you are familiar with HTML, CSS, or Javascript, you may edit the portlet's code by clicking the Source button. To embed a video in your new content portlet, see:
Embed a Video into a Content Portlet
Embed a Video with the OzPlayer Interface
Note: CKEditor won't always keep code entered into it from Source exact, so having a local copy is important.
...
22. To add your new content portlet to a tab, see: Adding Content to a Tab.
Embed a Video into a Content Portlet
...
Note: The life cycle of the portlet can be modified as defined in the Portlet Lifecycle section.
18. Click Save and Configure to save your App Launcher portlet and display the Edit Portlet Configuration screen.
...
22. To add your new App Launcher portlet to a tab, see Adding Content to a Tab.
...
Surveys
You can add surveys to the student portal to gather information from your student population. When you create and publish a survey it appears in the Student Portal below the Advisor Cards.
...
10. Once you've registered your survey portlet you must use Manage DLM Fragments to make it available to students. See Adding Content to a Tab on page 67.
a. Click the drop-down list and select the college group (i.e. Your college Students) and click Go. Manage DLM Fragments link to display the Fragment Administration options.
b. Follow the instructions for Adding Content to a Tabin the link below to add the survey portlet to the student layout. See the following next topics:
Adding Static Content & Registering Portlets
Fragment Administration Vs. Personal Customization
...
Advisor Cards
Advisor Cards are tasks that display to students in the college portal beneath the background image. Once a student has completed a task, a green circle with a check will display next to the task, indicating that they finished the task. Each task has a duration and as the tasks on a card are completed, a green status bar shows current state of completion.
...
Note: As values are entered into the Link field, search results matching the entered values will be displayed for selection.
[ screen shot ]
See Custom URLs on how to create customized links.
...
A fragment, in context of the Portal, is a layout element or piece (i.e. portlet) that can be pushed out/ merged into the larger end-user layout display.
See the next section (Adding Content to a Tab) for more details.
Adding Content to a Tab
...
Note: The Edit Portlet Configuration page is displayed. See Adding Top Level Links and Adding Dropdown Links for information on configuring your navigation menu link.
...