...
This worksheet provides step-by-step instructions for setting up the Major Category field and filter in the CCCApply Administrator 2.0 system for CCCApply Standard & International applications. This worksheet references user information detailed the /wiki/spaces/PD/pages/758546724 CCCApply Administrator User Guide. If your college chooses to implement this optional filter in CCCApply, this it is recommended that worksheet should be completed before you begin.
| Warning | ||||||
|---|---|---|---|---|---|---|
| Panel | ||||||
| ||||||
To export a copy of this worksheet, click on the icon in the upper right header and select "Export to PDF" or "Export to Word". Once you export a copy, print it out or complete the worksheet in Microsoft Word or comparable text editor. |
College / District Name | |
MIS Code | |
College Staff Contact | |
College Staff Email |
| Note |
|---|
For the purpose of efficiency, the process outlined in this worksheet assumes that the college will be using The process below incorporates the “Import Majors” functionality feature to implement set up the Major Category filter, as opposed to editing each Major individually in the Majors module in in the CCCApply Administrator. |
...
General Definitions & Notes
Majors Module
A series of custom data fields configured by each CCC college for use in one or more CCC web applications. The Majors module is accessible in the CCCApply Administrator 2.0 by an authorized college or district user. From the CCCApply, or International, Administrator homepage, click on the "Majors" link from the modules menu bar.
Major Category
...
Field
A new optional data field added to the Majors table in CCCApply. The data field <major_category> is a text field and the response options - which are determined by the college - are restricted to 100 characters each. There is no limit to the number of response options that can be defined for this field by the college. The data field responses/values, are configured in the CCCApply Administrator 2.0. The data field responses/values must be setup separately for CCCApply Standard and International applications. When implemented correctly, the response options will appear in a new Major Category dropdown menu which will appear on the Enrollment page directly above the existing "Intended Major or Program of Study" menu in the CCCApply Standard, or International, application.
Custom categories are configured in the Majors module in the CCCApply Administrator 2.0
Categories must be set up separately for the CCCApply Standard and International applications
Categories can be created and aligned to one or more Majors - manually (through the Add/Edit Major modals) or by .csv file import
Categories are NOT available in the Noncredit application
Major Category Filter
The dynamic display of the custom-defined response options that will appear in the Major Category drop down menu on the Enrollment page in CCCApply Standard, or International, application. When the Major Category data field is configured, the dropdown menu appears in the student-facing application as a filter, prompting the applicants to choose a high-level major "category" before selecting a filtered major or program. Each response option that appears in the "Major Category" dropdown menu aligns to one or more majors or programs of study configured by the college.
...
Custom categories are restricted to 100 characters each.
No limit to the number of categories that can be defined and aligned to individual majors; however, every major should be aligned to at least one category.
A category can be added, edited, disassociated, imported and exported in the Majors module in the CCCApply Administrator 2.0.
Custom categories, also known as response options to the <major_category> field, are case-sensitive and must be spelled correctly and spaced consistently.
If a category is accidentally misspelled, or if extra spaces are added, the system will consider it unique and will create a new category.
Custom categories can be added to individual major records through the “Add/Edit Major” modal or through the "Import Majors" function.
When adding custom categories manually through the "Add/Edit Major" modal - the user must click ENTER after spelling (case sensitive) the category correctly. Multiple categories can be added to the same Major, but the ENTER button must be clicked after each Category is entered.
If your college plans to implement the Major Category filter in both the CCCApply Standard application and the International application, you will need to set up categories for each application separately.
...
| Panel | ||||||
|---|---|---|---|---|---|---|
| ||||||
Adding Categories Individually Using the "Add/Edit Major" ModalScreen When adding custom categories manually to individual your Majors through using the "Add/Edit Major" modal - the user , you must hit ENTER after adding each category (correctly spelledis added. It is important to add categories carefully, using correct, case-sensitive )spelling. Multiple categories can be added to the same Major, but the ENTER button must be clicked you must hit ENTER after each Category is entered. |
...
| Panel | ||||||
|---|---|---|---|---|---|---|
| ||||||
If a category is accidentally misspelled, or if extra spaces are added, the system will consider it unique and will create a new a separate and unique category. The most efficient way to implement set up the Major Category data field and filter Filter for your existing majors , is to use the Import Majors process detailed below to ensure consistency across the categories and alignment to majors. |
...
Getting Started
Identify Your Major Categories
Export Your Current Majors List from the CCCApply Administrator
Align Your Categories to Your List of Majors
Import Your Configured Majors List
Test Your Major Category Implementation
...
Getting Started
Plan your Major Category implementation completely before you begin;
Setup your Major Categories in the Pilot CCCApply Administrator 2.0
Navigate to your Pilot CCCApply Administrator 2.0 system using your new college/district URL
Select "CCCApply Administrator" from the CCC Administrator landing page from the "Applications" menu
From the CCCApply homepage, select the Majors module from the modules menu bar for your college
From the "Majors" module summary page, follow the instructions below to Export Your Majors to begin configuring your major categories.
Identify and Create Your Major Categories
Using the table below, determine names for your custom categories. Remember that each category name will become the custom response options that appear in the "Major Category" dropdown menu on the student-facing application, and will also be the custom data field "values" that will appear in your downloads and reports.*
Category names must not be longer than 100 characters each.
Category names may include multiple words, capitalization, punctuation, and spacing (such as: Arts, Humanities, Communication & Design).
Category names must be consistent - any deviation in spelling, spacing or punctuation (case sensitive and spacing) will create a separate category in the system.
| Note |
|---|
Reminder: The instructions in this worksheet assumes you will setup all categories at one time using the "Import Majors" method. If any categories are added or edited individually, by adding or editing an individual major in the "Add/Edit Major" modal, you must spell, space and punctuate each category correctly and you must hit "Enter" after each individual category is entered into the "Category" input menu. |
Identify Your Major Categories
Using the table below, define the names of your custom categories. Remember, each category name will become the custom response options that appear in the "Major Category" dropdown menu on the student-facing application, and will also be the custom data field "values" that will appear in your downloads and reports.*
Category names must not be longer than 100 characters each.
Category names may include multiple words, capitalization, punctuation, and spacing (such as: Arts, Humanities, Communication & Design).
Category names must be consistent - any deviation in spelling, spacing or punctuation (case sensitive and spacing) will create a separate category in the system.
Category Name - Standard Application | Category Name - International Application | |
|---|---|---|
Category 1 | ||
Category 2 | ||
Category 3 | ||
Category 4 | ||
Category 5 | ||
Category 6 | ||
Category 7 | ||
Category 8 |
[Add more rows to the table above, if needed.]
...
Export Your Current Majors List from the CCCApply Administrator
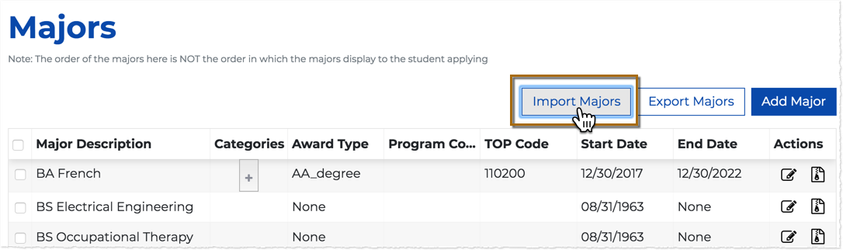
From the Admin 2.0 Majors module summary table, click on the “Export Majors” button to export your current list of college majors to a CSV file. By default, the file will export as a CSV file.
Locate and open the file from your Downloads folder and Save As with a name that identifies it as the original exported list of majors from your Pilot environment for your college.
...
| Note |
|---|
Locate your CSV file in your Downloads folder and Save As a CSV file with a filename that indicates it is the original major list for your college from a specific environment. |
...
However, these applications may have default date settings in place that will need to be reset when configuring your file for Import, so please be prepared to reformat your dates across Admin 2.0 in the mm/dd/yyyy format. Remember to save your file in CSV format when you are finished editing it.
Open the exported majors .csv file on your computer using the application of your choice (Microsoft Excel is recommended).
Edit the majors data as needed. It is assumed that your intention is to add new majors and/or edit the majors displayed in order to import them with new values for your CCCApply application(s). Use the table below as a guide.
| Warning |
|---|
Note: You cannot mix CCCApply and International application majors in one .csv file at this time. If you are implementing major categories in both your Standard and International applications, you must configure them separately in each Administrator application. |
...
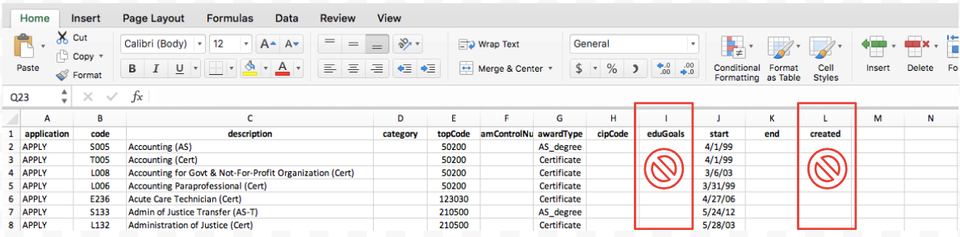
Now that your categories are identified and you’ve exported your current list of Majors, your export spreadsheet now becomes your working spreadsheet to align your categories to each major and configure any other required or optional data to be imported to your Majors table.
Ensure your spreadsheet contains the new column format shown in the image above.
Each row listed represents a major or program record in your Majors table.
Review each major listed and determine which category it should display under when selected by a student in the CCCApply application.
A major can be aligned to more than one category; however, every major must be aligned to at least one category.
Align one or more categories to each major in the “Category” column on your spreadsheet.
Repeat this process for all majors listed on your spreadsheet.
| Note |
|---|
IMPORTANT: When aligning multiple categories to a single major, in the "category" column in your configuration file, separate each correctly spelled and punctuated category names by a comma WITH NO SPACES IN BETWEEN. For example, if your categories are:
These four categories should be listed like this in the category column: "Mathematics,Science,Art,Communication & Design" (no spaces between each category name). |
...
Now that you’ve aligned your new categories to each major, you must ensure that all required data is configured correctly in the spreadsheet before importing your Majors file. Specifications for each required data column appears below.
CSV Column Heading | Required | Important Configuration Notes | ||||
|---|---|---|---|---|---|---|
HEADER ROW | YES | IMPORTANT: The header row is required in order for your .csv file to import correctly and the values to be stored properly by the CCCApply Administrator. | ||||
Application | YES |
| ||||
Major Code | YES |
| ||||
Major Description | YES |
| ||||
Category | NO |
| ||||
TOP Code | NO |
| ||||
Program Control Number | NO |
| ||||
Award Type (AwardType) | YES | The Award Type (AwardType) field values are slightly different in the new Admin 2.0 system. The following notes pertain to implementing this field in the new system:
| ||||
CIP Code | NO |
| ||||
Education Goals (eduGoals) NOT APPLICABLE in this version | NO |
| ||||
Start Date | YES | |||||
End Date | YES | |||||
Create Date | NO |
| Warning |
|---|
VERY IMPORTANT: The “EduGoal” and the "Created" columns do not pertain to this version of the Majors module in Admin 2.0 - BUT the data columns MUST remain in your Import Majors file and should be left BLANK in your CSV file. |
...
The table below details the add and update functionality for majors imports (no deleting or archiving of any majors occurs upon import).
If you import a majors CSV file and... | ...then |
|---|---|
no existing major(s) values were changed but new majors are added to the .csv file | the new majors are added to the CCCApply Administrator Majors table and will appear in the CCCApply application(s) |
existing major(s) values were changed | the changed majors are updated in the CCCApply Administrator Majors table and will appear changed in the CCCApply application(s) |
existing major(s) values were changed AND new major(s) were added | the new major(s) are added and the changed majors are updated in the CCCApply Administrator Majors table and will appear in the CCCApply application(s) |
major categories were defined and added to the .csv file | the Major Category dropdown menu will appear in the CCCApply application(s) NOTE: Every major in your list must be aligned to one or more categories. |
one or more majors are not aligned to any defined categories | those majors will not appear to applicant's in the Intended Major or Program of Study menu in the CCCApply Application(s) |
Use the following steps to import majors:
Using the exact same file format, prepare your configured .csv file of majors for importing. See Editing the Exported Majors CSV File for details.
Select either CCCApply or International from the Applications drop-down list.
From the Majors module, click Import Majors to display the Import Majors dialog box.
Click the Choose File button to display your computer’s file navigator.
Navigate and select the majors .csv file you want to import. Ensure that, if you selected CCCApply or International in step 2 above, you select the correct application majors .csv file. After selecting your .csv file, the file name displays next to the Choose File button (see example below).
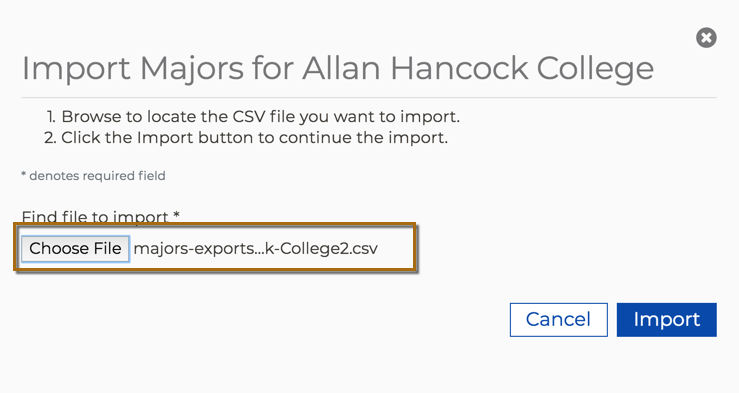
Click the Import button to import the majors .csv file. The Import Majors dialog box closes automatically, and the Majors table displays with all rows updated and and refreshed to display your edited and new major values.
Test Your Major Category Implementation
...
The URLs shown below are templates. To see your college application, you must replace the "XXX" at the end of the URL with your college's MIS code. To validate that you have reached your college applications, you should see your college logo in the upper left corner of the header banner. NOTE: We have no district applications, so if you are a single-college district, use your college MIS code to access your application.
PILOT Application | Application URL |
|---|---|
PILOT CCCApply Standard Application | https://pilot.opencccapply.net/cccapply-welcome?cccMisCode=XXX |
PILOT Noncredit Application | https://pilot.opencccapply.net/cccapply-welcome?cccMisCode=XXX&nonCredit=true *Replace the XXX with your college MIS code |
PILOT Promise Grant Application | https://pilot.bog.opencccapply.net/gateway/bog?cccMisCode=XXX |
PILOT International Application | https://pilot.intl.opencccapply.net/gateway/intl?cccMisCode=XXX
|
Majors Sort Order
The following Sort Order logic should be in place - The default sort order for Majors without any filters added is: alphabetical, ascending, by <major_description> (not Major code, but the description of the major (i.e., Art History 1A = description, vs. ART1A = major code.)
Only the Major description field displays to the student in the Apply & International applications. This is what appears in the "Intended Major or Program of Study" dropdown menu that the student chooses. If no filtering is added in the Administrator, the long, flat list of majors should appear in alphabetical order to the student in the menu in the application.
Save- User needs the ability to save so that the major is added and configurations are affiliated.
Cancel- user needs the ability to cancel out of adding a major without any configurations being saved.