Registering your Shibboleth (or other SAML) Identity Provider with InCommon
- Start at: Information for InCommon Site Administrators ( https://www.incommon.org/federation/siteadmin.html )
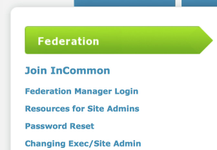
- Click on "Federation Manager Login" in left-hand panel
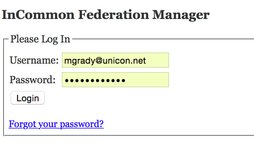
- Login using your InCommon-issued Site Admin credentials
- When registering a new IdP, you need to:
- Upload its signing certificate
- Use the Wizard to register a new IdP
- Upload signing cert
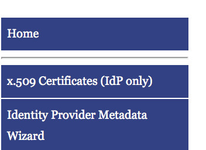
- Click on "X.509 Certificates (IdP Only)" in left-hand panel
- Click on "Submit new X509 certificate (IdP only)" in main panel
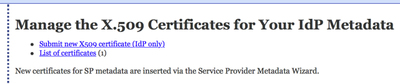
- (or you can review any signing certs you've already uploaded by clicking on "List of certificates (n)")
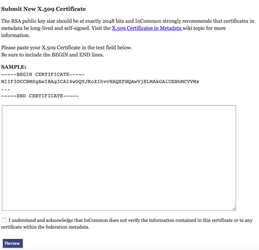
- Copy and paste the contents of your IdP's signing certificate into the form for such.
- If you are running Shibboleth IdPv3.x, this will be the certificate file that is listed as the value of the 'idp.signing.cert' property in the IdP's conf/idp.properties file. That file will be in the IdP's credentials directory, as either:
- credentials/idp.crt or
- credentials/idp-signing.crt
- If you are still running Shibboleth IdPv2.x, it will almost certainly be that first name above: credentials/idp.crt
- If you are running any other SAML IdP software (PortalGuard, Ellucian EIS/Ethos, etc.), it will be whatever certificate that software identifies as being the IdP's "Signing Certificate" or "Public Certificate".
- If you are running Shibboleth IdPv3.x, this will be the certificate file that is listed as the value of the 'idp.signing.cert' property in the IdP's conf/idp.properties file. That file will be in the IdP's credentials directory, as either:
- Check the "I understand and acknowledge that InCommon ..." box
- Click on the Review button
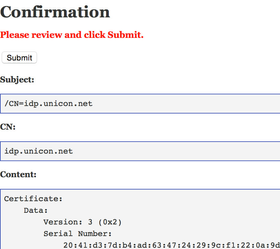
- You will get the Confirmation page. Review and click on the Submit button if all looks good to you
- Click on "X.509 Certificates (IdP Only)" in left-hand panel
- Register the IdP — You are now ready to register the IdP. An important thing to keep in mind is that, even though your IdP might support lots of different endpoints and features. it's usually better just to register the ones that you'll know may need to be used, and not define the other ones to InCommon. That doesn't mean the other endpoints "won't work", just that you don't advertise them to anyone else for now. If you need them later, you can revise/update your InCommon metadata.
- Click on "Identity Provider Metadata Wizard" in left-hand panel (see screen shot for 5a above if needed)
- If you have kept your IdP's metadata up-to-date, then for a Shibboleth IdP, the file in the default location of /opt/shibboleth-idp/metadata/idp-metadata.xml will have the information you need when you are using the Wizard. If you are using another SAML IdP implementation, you'll have to look for the matching-type information from it.
- Assuming you haven't already registered an IdP (you can only register one), then after you click on Identity Provider Metadata Wizard", you should get a page that looks similar to the following. (Since I already have registered an IdP, I can't go thru the "new flow" myself.)

- The first key thing to enter is your IdP's entityID (I wouldn't bother using the Hostname field/IdP Server Software combo). The entityID can be found in several places, at least for the Shibboleth IdP. If you are looking at the metadata file for your IdP, it's in the top EntityDescriptor element, labelled as (e.g.) entityID="https://idp.campus.edu/idp/shibboleth". You will also find it listed as the value of the 'idp.entityID' property in the IdP's conf/idp.properties file.
- For PortalGuard, the entityID for your IdP is under your control. We've seen examples like 'https://pg.campus.edu/sso' and 'https://login.campus.edu/sso/'. PortalGuard will let you have the entityID not actually start with 'https://', but I don't think InCommon will let you enter such, since an entityID is supposed to be a valid URI.
- For Ellucian EIS/Ethos, the entityID might be something like 'https://eisweb.campus.edu'.
- Next is the Attribute Scope. That's a value like 'campus.edu', the value you defined to be used as the "right-hand side" for your "scoped attributes" (such as eduPersonPrincipalName). Again, at least for the Shibboleth IdP, you can find that in its metadata as the <shibmd:Scope regexp="false">campus.edu</shibmd:Scope> element (in Extensions), or as the value of the 'idp.scope' property in the IdP's conf/idp.properties file.
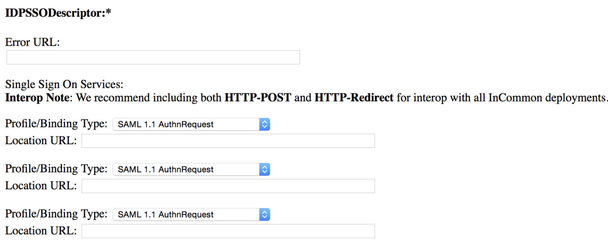
- There will also be (either just after the above, or at the start of the IDPSSODescriptor section) a place to enter what is called an Error URL.That is optional, and many institutions don't have one listed. The idea is that you could create a general web page that contained information for your users, like who to contact etc., if they were to have problems accessing a service (SP, service provider) using your IdP. If you create such a page, you could enter the URL for that page in this box.
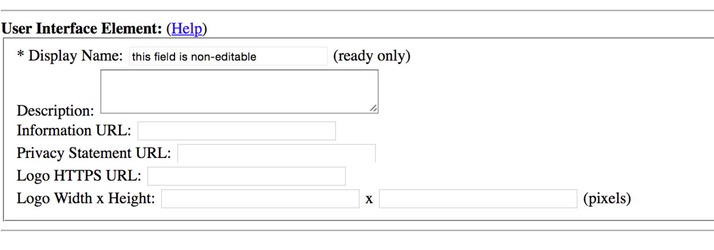
- The next section in the Wizard is labeled as the User Interface Elements. These may be used if your IdP is listed in a "discovery service" as one of multiple IdPs that can be chosen by a user. The Display Name is already set for you based on your InCommon membership, and the other elements in this section are optional. It's usually good to at least fill in a Description (e.g. purpose of your IdP, perhaps something like "Login service for XXXX College"). The Information URL might just be the URL for the college's main web page (e.g. http://www.campus.edu).
- The next section is "Hide From Discovery". You probably don't need/want to check this, so skip checking it.

- Now we are at the point where we actually enter information on the endpoints/profiles/features our IdP is ready to support. And recalling the recommendation we made above (only list what you know you need to list), and that InCommon itself recommends, you really only want to register 2 or 3 Single Sign-On (SSO) endpoints. These would be endpoints with the Profile/Binding Types of:
- urn:oasis:names:tc:SAML:2.0:bindings:HTTP-Redirect
- urn:oasis:names:tc:SAML:2.0:bindings:HTTP-POST
- (maybe) urn:mace:shibboleth:1.0:profiles:AuthnRequest (there are some SPs with "primitive SAML support" that still require this, although it is most likely you will never need to integrate with any such).
- You'll enter these each with a pair of boxes, one a drop-down for the Profile/Binding Type, and the corresponding one where you enter the URL that is used for that binding. So you'll see something like the following:
- And you will want to choose the Profile/Binding Type and enter URLs such that you end up with something like the following:
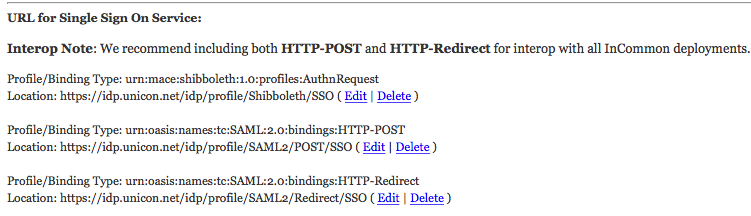
- Again, if you look at the metadata for your IdP, you'll see elements in it like the following, and if you look at those closely, you'll see the Binding and Locations that you enter into the above. For a Shibboleth IdP, these are exactly what you'll have, just substituting your IdP's "hostname" (the hostname part of that URL) for 'idp.campus.edu'.
<SingleSignOnService Binding="urn:oasis:names:tc:SAML:2.0:bindings:HTTP-POST" Location="https://idp.campus.edu/idp/profile/SAML2/POST/SSO"/>
<SingleSignOnService Binding="urn:oasis:names:tc:SAML:2.0:bindings:HTTP-Redirect" Location="https://idp.campus.edu/idp/profile/SAML2/Redirect/SSO"/>
--- For PortalGuard, the SAML2 SSO endpoint for both Redirect and POST is the same, and will be something like 'https://pg.campus.edu/sso/go.ashx'. Whatever you have as the host/servicename, it will be at '/sso/go.ashx'.
- For Ellucian EIS/Ethos, the SAML2 SSO endpoint for both Redirect and POST again is the same, and will be something like 'https://eisweb.campus.edu/samlsso' .
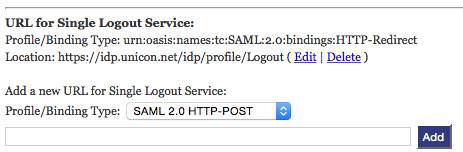
- There will be a section for entering a URL for a Single Logout Service. If you want services/SPs that support this to send the user to be logged out of your IdP (ending their SSO session) after they are logged out of a given SP, then you can fill in an appropriate URL here. For Shibboleth IdPv3, the only choice we'd recommend for that right now is illustrated by the following example, where you choose the Profile/Binding Type of urn:oasis:names:tc:SAML:2.0:bindings:HTTP-Redirect, and a Location (URL) of the form https://idp.campus.edu/idp/profile/Logout:
- There will be other sections to enter Bindings/Locations for Artifact Resolution Service and Attribute Authority Descriptor, but you are very unlikely to need either of those, so don't enter anything for those.
- Now you need to choose the X.509 Certificate (IdP's Signing Cert) that you registered in Step 5 above. The drop-down will show you your choices, and unless you've registered more than one certificate, there will be only one choice.


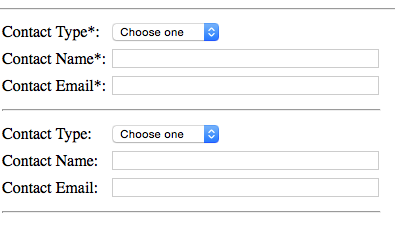
- There is one last thing to fill out, and that is the Contacts section. Near the end of the Next Steps after Signing the Participation Agreement, we listed a short description of what the types are and the recommendations for filling out. You are required to list a Technical and an Administrative contact. Choose the type from the drop-drown and fill in a Name and Email (where ideally that is for a mailing list/group email, not a single individual). You should also enter a Security contact.
- There is one more checkbox you likley want to "uncheck", and that is the one labeled "Include this IdP metadata in the InCommon export aggregate". To be clear, that does not exclude it from the InCommon metadata feed – your IdP will be in the InCommon metadata. By unchecking, it keeps the metadata for your IdP from being exported into a larger metadata aggregate that is used by servces/SPs in Europe and other places outside the U.S. Chances are you are not going to make use of any European etc. services where you'd need those services to "know" about your IdP, so there is no real advantage to having it "exported".
- Finally, you are "done". You are ready to Submit this IdP to be registered. Clicking on the button to do that (might be labeled Review) will bring up a page showing a summary of what you have entered, and a sample of the metadata, and give you a button to Confirm you want to submit this.
- All IdPs submitted are reviewed by InCommon staff before they are "approved" and added to the InCommon metadata store. You should get email when it has been approved, and information on when the next InCommon metadata aggregate will be published that will first contain your IdP's metadata. That process can take a business day to complete.
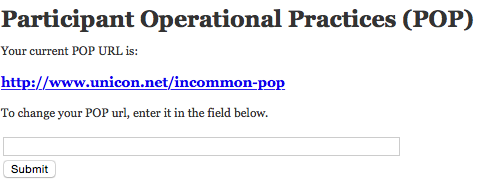
- We said you were done, but there is one more thing you should do if you have not already. If you recall we talked about the requirement for providing InCommon a URL with information on your POP (see the page Next Steps after Signing the Participation Agreement). In that same left-hand panel where you found the links to register the X.509 cert and the IdP, you'll see a link for POPs. You want to click on that link, which will take you to a page where you can enter the URL that goes to the page that contains your POP (or at least contains info on how to get a copy of it.)
- Now you really are done – Congratulations!