...
...
...
...
...
...
...
...
...
...
...
| Panel | ||||||
|---|---|---|---|---|---|---|
| ||||||
The CVC/OEI Enrollment Report is a report in the CCC Data Warehouse Report Server (DWRS)designed exclusively for authorized CVC/OEI users. Access to this report is to be requested through CVC/OEI and not through the CCC Technology Center. |
Contents
| Table of Contents | ||||
|---|---|---|---|---|
|
...
The information below is designed to serve as a "Quick Start" guide for the CVC/OEI Enrollment Report accessiblewithin the CCC Data Warehouse Report Server (DWRS). With the CVC/OEI Enrollment Report authorized users can:
...
The CVC/OEI Enrollment Report is based on CCCApply submitted application data and designed exclusively for CVC/OEI authorized users. This report is to be run only by authorized college staff on behalf of students who have enrolled through CVC/OEI for one or more courses at the college querying the report. The report is titled “Full Application by CCCID and MIS Code” and allows users to query any submitted application by student CCCID and college MIS code. The report does not include LGBTQ data (note that the Full Application Report contains a field labeled as “orientation” which indicates whether the applicant completed a college orientation and is not related to data found in the LGBTQ report), and contains the last 4 digits of the SSN.
...
| Panel | ||||||
|---|---|---|---|---|---|---|
| ||||||
The CVC/OEI Enrollment Report is generated from CCCApply data in the CCC Data Warehouse which is updated nightly, and is not based on real-time production data as found in the CCCApply Report Center. |
...
The authorized CVC/OEI user is only permitted access to the CVC/OEI Enrollment Report. All other DWRS data sources, reports, and files are not accessible unless the user has a separate authorized account to the full Data Warehouse Report Server.
| Panel | ||||||
|---|---|---|---|---|---|---|
| ||||||
NOTE: Although certain aspects and resources in the DWRS are visible and appear to be operational to the CVC/OEI user, including the “Public” directory of data sources and templates, these features and data can not be accessed using the limited CVC/OEI user account. |
Notes About the CVC/OEI Report
Authorized CVC/OEI users are only permitted to access the CVC/OEI Enrollment Report in the Data Warehouse Report Server.
The report should only be used to query students who have cross registered through CVC/OEI
All other DWRS data sources, reports, and files are not accessible unless the user has a separate authorized user account to the full Data Warehouse Report Server.
The report appears as a single, ready-to-run report template in the DWRS Library page.
A query of the CVC/OEI data requires a single student CCCID and a single college MIS Code which returns the most recently submitted application associated with that CCCID and MIS code.
If more than one application is found based on the CCCID and MIS code entered, only the most recently submitted record is shown.
If there are no results for the MIS code and CCCID entered, the query will result in a message that reads “The report is empty”.
While it may appear that ad hoc report views can be created for these broader DWRS data sources and users may drill down into field names - no resulting data is shown through this view.
...
College access to the CVC/OEI Report requires a user account created with two-factor authentication (2FA) to secure and protect student data. Two-Factor Authentication authenticates a user’s identify by requiring two or more pieces of evidence (credentials + verification code) before granting access to a service or system.
Account Creation & Setup Process
...
| Panel | ||||||
|---|---|---|---|---|---|---|
| ||||||
Note: Due to the unique configuration of this report setup, it is not possible for a CVC/OEI user account to have access to both this report and other data in the Data Warehouse Report Server. If an individual user requires institutional research access in addition to the CVC/OEI report, they must have two separate user accounts established. For more information, please contact ES Support Services. |
Account Creation & Setup Process
Account creation is a two-part process between the CCCTCand the CVC/OEI authorized user.
Step 1: The CCCTC creates the account for the user and transmits the account credentials to the approved user via secure process.
...
The User engages with the Enabling Services implementation team and receives account credentials and user setup information
The User installs a compatible authentication app on their desktop or mobile device
The User completes the first-time login process for CVC/OEI accounts (the one-time scan of the QR code with authenticator app happens and captures Verification code required for login)
The User is automatically authenticated and authorized login to access the CVC/OEI Enrollment Report in the DW Report Server.
| Note |
|---|
[ message about restriction to the report vs. full access to the DWRS ]Note: CVC/OEI user accounts have restricted access to the CVC/OEI special report only. |
Receiving Your Secure Login Credentials
...
An email containing the user’s account credentials and URL to the Data Warehouse Report Server, and
A link to access their unique password via secure process.
| Note |
|---|
Note: The For added security, the unique password will is not be passed to the authorized user until they have commenced the implementation process engaged with the CCCTC Enabling Services team for added securityand begun the setup process. |
Implementing the Authentication Software
Before the user can log in to the Data Warehouse Report Server to access the CVC/OEI Enrollment Report for the first time, they must have a compatible authentication app installed that implements Time-based One-Time Password TOTP functionality such as Google Authenticator, or Chrome Authenticator. There are many free, user-friendly Authenticator apps available at no cost that can be downloaded and installed quickly and easily onto your desktop and/or mobile device.
...
| Panel | ||||||
|---|---|---|---|---|---|---|
| ||||||
Suggestion: Although any six-digit TOTP compatible authentication software should work for the Report Server User Account, the tools that we’ve found to be most user friendly are: Chrome Authenticator for desktop use and Google Authenticator for mobile devices. Both are free downloads and both can also be used together. |
...
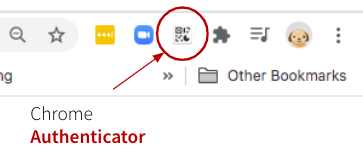
To Install the Chrome Authenticator:
Navigate to the Chrome Web Store and search for Authenticator by authenicator.cc
Click on “Add to Chrome” button to initiate the download and follow very simple instructions to install.
When the Authenticator app has been installed, a shortcut will appear in your Extensions toolbar in your browser.
...
| Panel | ||||||
|---|---|---|---|---|---|---|
| ||||||
WARNING: If you have already installed Chrome Authenticator (Authenticator.cc) don’t re-install this application as it will overwrite you previous download of this same application. |
...
Google Authenticator is compatible with multiple different mobile devices, operating systems, and browsers. The process for downloading and installing can be found here.
...
| Panel | ||||||
|---|---|---|---|---|---|---|
| ||||||
NOTE: The authenticator tools recommended above are just suggestions. If the user already has a compatible authentication tool it may be used instead. |
NEXT: Start the “First-Time User Login” process below to initiate the authentication process and login.
The First-Time LogIn Process
...
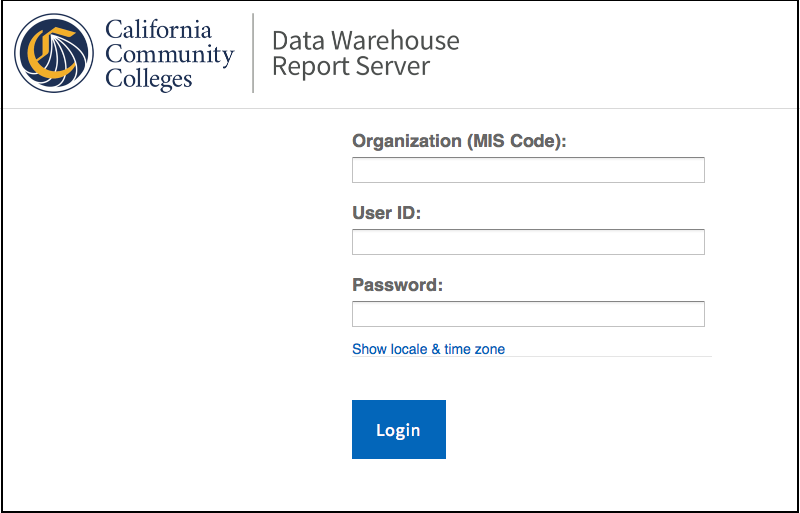
Step 1: Enter Account Credentials on the Log In Page
Ensure you have one of the compatible authenticator apps installed on your desktop or mobile device.
...
Navigate to theData Warehouse Report Server URL Log In page.
Enter
...
your account credentials
...
in the following fields:
Organization (MIS Code): Enter “cvcoei” code here.
User ID: Enter your institutional email address in the User ID field (Note: .edu or .org is required).
Password: Enter the unique password provided to you by the CCCTC (sent separately via secure process). This password is generated by the a CCCTC Administrator during the account creation process.
| Note |
|---|
NoteImportant: The unique password cannot be changed or reset by the user. |
...
The Scan the QR Codepage is displayed once during the “first-time” login process. The user must have the authentication software installed on their desktop or mobile device in order to scan the QR code that appears on the page. The code is captured by the authenticator app which establishes the connection between the account (shared secret key hidden in the barcode) and the authenticator app to complete the initial two-factor authentication process.
With your Authenticator App installed, scan the QR code that appears in the center of the page.
Scanning the QR Code with Chrome Authenticator (from desktop).
Scanning the QR Code with Google Authenticator(usinga mobile device).
As the authenticator scans the barcode (QR Code), a six-digit verification code will appear/register in your authenticator app.
As soon as you see the six-digit code appear in your authenticator app, copy the code and then click “Login” to go to the next page.
Click the “Login” button to return to the Log In Page.
...
| Panel | ||||||
|---|---|---|---|---|---|---|
| ||||||
NOTE: This step requires you to use theauthentication software on your desktop or mobile device to scan the onscreen barcode. The “secret” key identified by the barcode will add the required attribute to the User’s account. |
Using Chrome Authenticator to Scan the QR Code
Once the Chrome Authenticator app has been installed, a shortcut will appear in your Extensions toolbar in your browser.
Click the Authenticator icon in your Extensions toolbar to open the tool.
Click the scan icon and move your mouse over the QR barcode in the center of the page.
Click + hold the mouse to drag the scan functional across the bar code.
The secret key hidden within the barcode will register as a six digit code in the Authenticator registered to your Report Server account.
...
Using Google Authenticator to Scan the QR Code
Once the Google Authenticator app has been installed on your mobile device, an icon will appear on your phone wall or homepage.
Click to open the Google Authenticator app
Point the camera on your mobile device at the barcode on the screen and snap a picture.
The secret key hidden within the barcode will register as a six digit code in the GA
...
app registered to your DW Report Server account.
| Panel | ||||||
|---|---|---|---|---|---|---|
| ||||||
Tip: After scanning the QR code and confirming the verification code is captured by the authentication software, snap a screen shot of the code and store in a secure place. For security purposes, don’t store the verification code with the URL or other credentials to the DWRS. |
...
Now you must return to the Log In page to re-enter your user credentials and verification code.
Back on the Log In page, re-enter your account credentials in the input fields: Organization (“cvcoei”), User ID (email address), and Password.
Click the “Login” button, again.
...
| Panel | ||||||
|---|---|---|---|---|---|---|
| ||||||
Validation Error Note: A validation error message will display to all users when they are completing the first-time user login” process. This system message is indicating that the user attempted to login without entering a verification code. As you know, you haven’t been asked for a verification code yet (that is coming in Step 4). Please disregard this error message and continue with the login process. |
...
After re-entering the account credentials a second time, the user is now presented with the Verification Code page to enter the six-digit verification code that was scanned and stored in the Authenticator app. .
Enter your six digit Verification Code.
Click on your Authenticator app and retrieve the time-limited verification code.
Paste the code in the “Verification Code” field.
Click the “Login” button on the Verification Code
...
page to complete the login process.
| Panel | ||||||
|---|---|---|---|---|---|---|
| ||||||
Reminder: The “first-time login” process is a one-time process intended to set up the two-factor authentication for your account. |
...
After the first time login and verification process, user login requires the user to enter their credentials and the verification code retrieved from the authenticator app.
Step 1: Log in Page
Navigate to the Report Server URL (http://dw-reports.ccctechcenter.org/) and land on the Log In page.
Enter your account credentials and password in the input fields.
Organization: Enter the code “cvcoei”
User ID: Enter your institutional email address in the User ID field (.edu, or org) (Required)
Password: Enter your unique password.
...
Step 2: Verification Code Page
Open your authenticator app to retrieve your Verification code within 30 seconds of clicking on the Login button on the Log In page.
Enter the code from the authenticator app into the Verification Code field.
Click the “Login” button to complete the login process and access the DW Report Server.
| Note |
|---|
WARNING: Your unique Password is generated by a CCCTC Administrator at the time of account creation. The password cannot be changed or reset by the user. To get a new password, please contact ES Support Services. |
...
Part 3: Querying & Exporting Data
| Panel | ||||||
|---|---|---|---|---|---|---|
| ||||||
The following section provides basic information on querying & exporting application data using the CVC/OEI Enrollment Report in the DW Report Server. |
Querying the Report Data
Log in to the DWRS using your CVC/OEI user account.
From the homepage, select the Library menu.
Select the Full Application Report by CCCID and MIS Code report.
...
...
...
| Panel | ||||||
|---|---|---|---|---|---|---|
| ||||||
IMPORTANT: CVC/OEI user accounts have restricted access to the CVC/OEI special report only. |
4. Enter values in the Input Controls fields and press OK.
CCCID = Enter the CCCID for the student data being queried.
MIS Code = Enter the MIS code of the college associated with the student data being queried.
...
| Panel |
|---|
...
| ||||||
Note: Due to the uniqueness in how unique configuration of this report is set upsetup, it is not possible for an a user account to have access to this report and other data in the Data Warehouse Report Server. If an individual user requires both the institutional research access to the DWRS and access to the CVC/OEI report, they will need to have two separate user accounts established. For more information, please contact ES Support Services. |
...
To export the data in CSV format, follow the steps below.
Click on the Export menu icon in the Report Viewer toolbar, and select CSV from the menu options.
...
...
| Panel | ||||||
|---|---|---|---|---|---|---|
| ||||||
Exported data will save to your computer desktop or to your designated Downloads folder. In CSV format, the file is suitable for use with MS Excel. |
...