Versions Compared

Key

  • This line was added.
  • This line was removed.
  • Formatting was changed.

Panel
panelIconIdatlassian-info
panelIcon:info:
bgColor#F4F5F7

This guide is for the Data Warehouse Report Server (CCC Data 2.2.0) released to production on January 27, 2023.

...

  • The User has the Data Warehouse Report Server direct accessURL (https://dw-reports.ccctechcenterccctechce

    nter.org/jasperserver-pro/login.html).

  • The User has received their account credentials and temporary password from the CCCTC Implementation & Configuration Administrator.

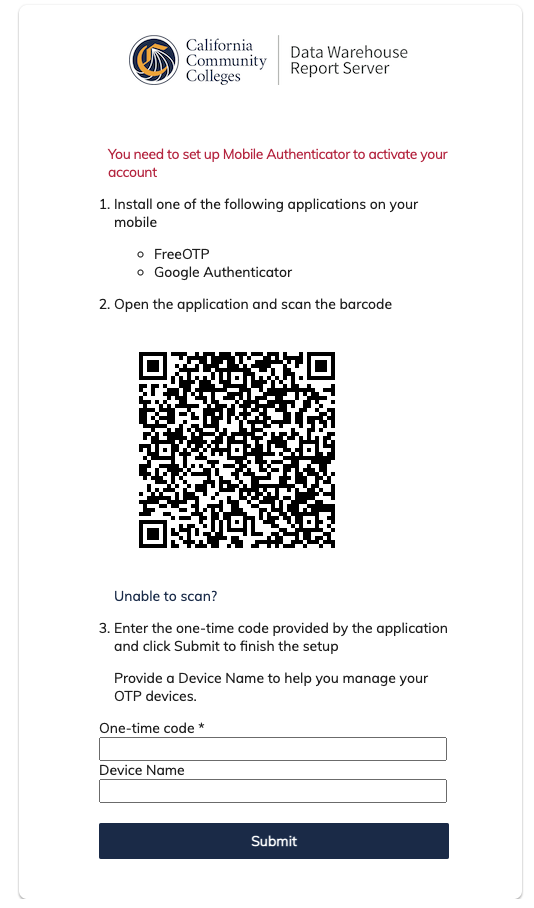
  • The User has installed and configured a compatible authentication software app on their desktop and/or mobile device.

Expand
titleExpand here to see the First-Time User Log In steps (one-time process).
Note

Non-SSO Users Only: Complete this one-time process using the steps below.

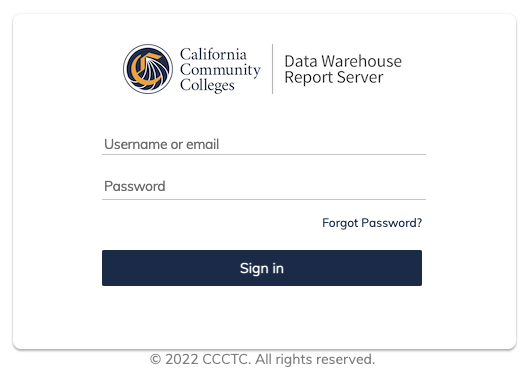
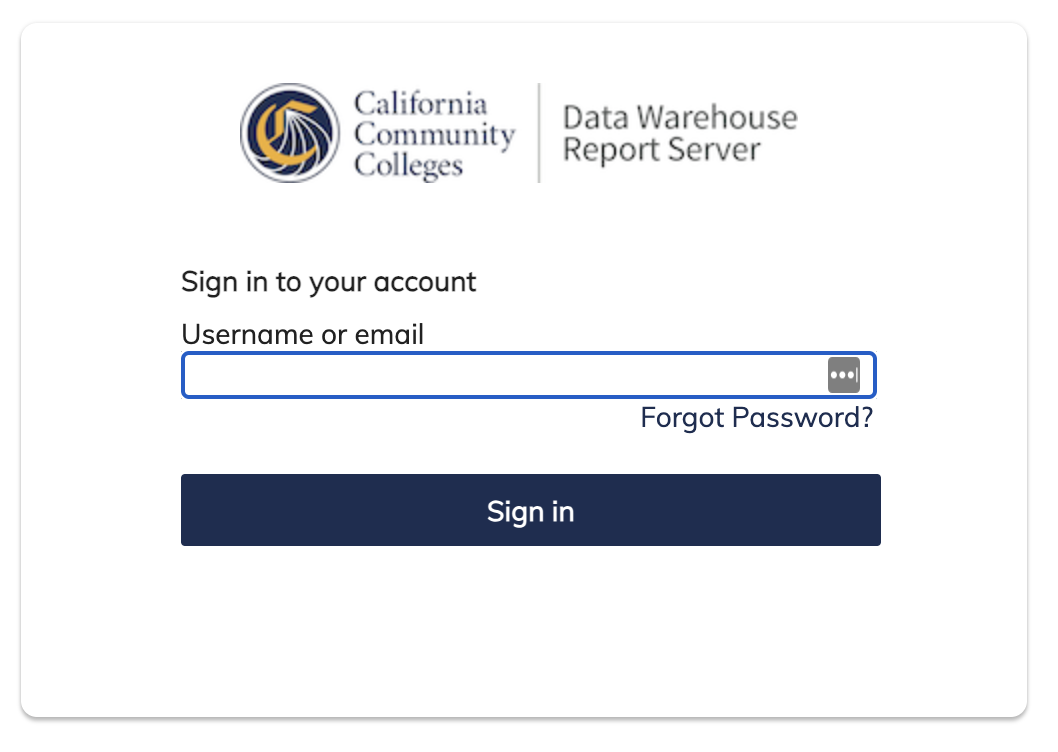
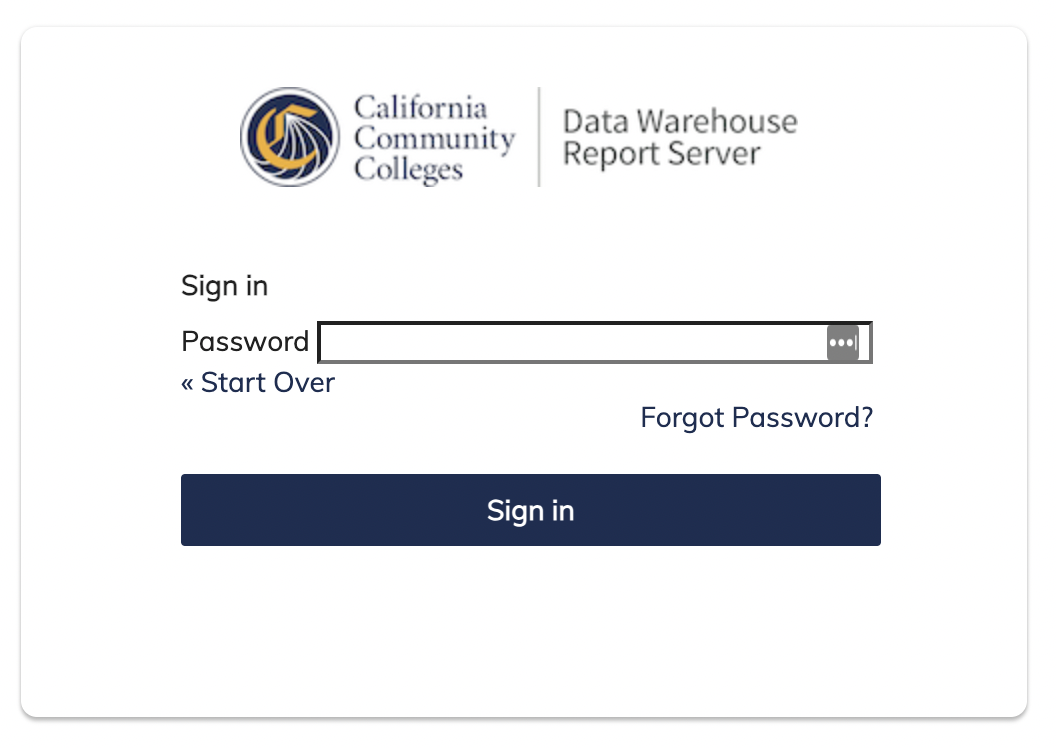
Step 1: Enter Your Account Credentials on the Log In

Page

Pages

  1. Ensure you have one of the compatible authenticator apps installed on your desktop or mobile device.

  2. Navigate to the Data Warehouse Report Server URL for non-SSO users (https://dw-reports.ccctechcenter.org/jasperserver-pro/login.html); land on the log in page.

  3. Enter the account credentials provided to you into the following fields:

User ID: Enter your
  1. your Username or Email Address (institutional email address) in the

User ID
  1. Username or email input field (.edu or .org is required) on the main “Sign in to your account” screen. Click “Sign In” to proceed to the nextscreen.

Password:
  1. Enter the temporary

password
  1. Password provided to you by the CCCTC Administrator (sent separately via Privnote).


  1. Click the “Sign in” button to continue to the QR Code Scan

page
  1. screen.

Image RemovedScreen shot of the Data Warehouse Report Server Sign In Email screen.Image Added

Screen shot of the Data Warehouse Report Server Sign In Password screen.Image Added

Panel
panelIconIdatlassian-info
panelIcon:info:
bgColor#F4F5F7

The temporary password is generated by the CCCTC Administrator during the account creation process. You can change this password at any time by using the “Forgot Password?” link.

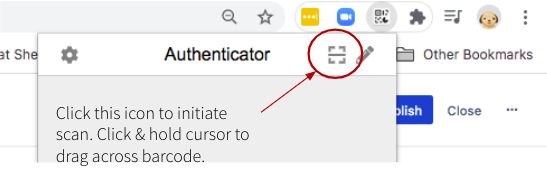
Step 2: Scan the QR Code Page

The Scan the QR Code page is displayed once during the “first-time user log in” process. The user must have the authentication software installed on their desktop or mobile device in order to scan the QR code that appears on the page. The code is captured by the authenticator app which establishes the connection between the account (shared secret key hidden in the barcode) and the authenticator app to complete the initial two-factor authentication process.

  1. With your Authenticator App installed, scan the QR code that appears in the center of the page.

    1. Scanning the QR Code with Chrome Authenticator (from desktop).

    2. Scanning the QR Code with Google Authenticator(usinga mobile device).

  2. As the authenticator scans the barcode (QR Code), a six-digit verification code will appear/register in your authenticator app.

  3. As soon as you see the six-digit code appear in your authenticator app, copy the code and then click “Submit” to go to the next page.

Panel
panelIconIdatlassian-warning
panelIcon:warning:
bgColor#F4F5F7

NOTE: This step requires the user to use theirauthentication app previously installed on their desktop or mobile device to scan the onscreen barcode. The “secret” key identified by the barcode will add the required attribute to the User’s account.

Using Chrome Authenticator to Scan the QR Code

  1. Once the Chrome Authenticator app has been installed, a shortcut will appear in your Extensions toolbar in your browser.

  2. Click the Authenticator icon in your Extensions toolbar to open the tool.

  3. Click the scan icon and move your mouse over the QR barcode in the center of the page.

  4. Click + hold the mouse to drag the scan functional across the bar code.

  5. The secret key hidden within the barcode will register as a six digit code in the Authenticator registered to your Report Server account.

Using Google Authenticator to Scan the QR Code

  1. Once the Google Authenticator app has been installed on your mobile device, an icon will appear on your phone wall or homepage.

  2. Click to open the Google Authenticator app

  3. Point the camera on your mobile device at the barcode on the screen and snap a picture.

  4. The secret key hidden within the barcode will register as a six digit code in the GA app registered to your DW Report Server account.

Panel
panelIconIdatlassian-check_mark
panelIcon:check_mark:
bgColor#F4F5F7

Tip: After scanning the QR code and confirming the verification code is captured by the authentication software, snap a screen shot of the code and store in a secure place. For security purposes, don’t store the verification code with the URL or other credentials to the DWRS.

...

  1. On the Home page, click Create in the Reports block. The Create Report wizard opens.

  2. Select the Ad Hoc view you want to use as the basis for your report.

  3. Select a report template. To use a template other than the default, select Custom Report Template, click Browse and select the desired template. See Report Templates for more information.

  4. Click OK. If asked, enter the input controls needed. See Using Input Controls.

...

Panel
panelIconIdatlassian-info
panelIcon:info:
bgColor#F4F5F7

Creating Filters with Relative Dates

You can filter information in your view based on a date range relative to the current system date. You can accomplish this using date-based filters, and entering a text expression describing the relative date or date span you want to display, using the format <Keyword>+/-<Number> where:

  • Keyword indicates the time span you want to use. Options include: DAY, WEEK, MONTH, QUARTER, SEMI, and YEAR. An option used by itself (without +/-<Number>) gives the current value for that option.

  • or - indicates whether the time span occurs before or after the chosen date.

  • Number indicates the number of the above-mentioned time spans you want to include in the filter.

For example, if you want to see all of the CC Promise Grant Applications submitted during the prior week, your expression would be: WEEK-1.

...